fastqc <fastq-file>Read QC with FastQC
And the distinction between program-specific scripts and an overarching runner/master script
Under construction
This page is still under construction.
Overview & setting up
So far, we have covered all the building blocks to be able to run command-line programs at OSC:
- Basics of a supercomputer and of OSC specifically
- Unix (Bash) shell basics to work at a supercomputer, and learn the language used in our scripts
- The bells and whistles needed to turn our commands into a shell script
- Loading and the software (command-line programs) that we want to run
- Working with the Slurm job scheduler, so we can submit scripts as batch jobs
- The ability to loop over commands, so that we can submit many scripts at once
With these skills, it’s relatively straightforward to create and submit scripts that run command-line programs to analyze our genomics data. In this session, we’ll apply them to run FastQC.
VS Code improvements
These two settings will make life easier when writing shell scripts in VS Code.
First, we’ll add a keyboard shortcut to send code from your editor to the terminal. This is the same type of behavior that you may be familiar with from RStudio, and will prevent you from having to copy-and-paste code into the terminal:
Click the (bottom-left) =>
Keyboard Shortcuts.Find
Terminal: Run Selected Text in Active Terminal, click on it, then add a shortcut, e.g. Ctrl+Enter. (Don’t worry about the warning that other bindings exist for this shortcut.)
In VS Code’s editor pane, the entire line that your cursor is on is always selected by default. As such, your keyboard shortcut will by default send the line that your cursor is in to the terminal; you can also send multiple lines to the terminal after selecting them.
Second, we’ll add the ShellCheck VS Code extension. This extension will check your shell scripts for errors like referencing variables that have not been assigned, and not using variables that have been assigned. Potential problems will show up as colored squiggly lines below the words or lines in question. You can also click on the links that will appear when you hover over a problematic piece of code, and find information about how to fix this mistake and improve your code. All in all, this extension is incredibly useful!
Click on the Extensions icon in the far left (narrow) sidebar in VS Code.
Type “shellcheck” and click the small purple “Install” button next to the entry of this name (the description should include “Timon Wong”, who is the author).
FastQC: A program for quality control of FASTQ files
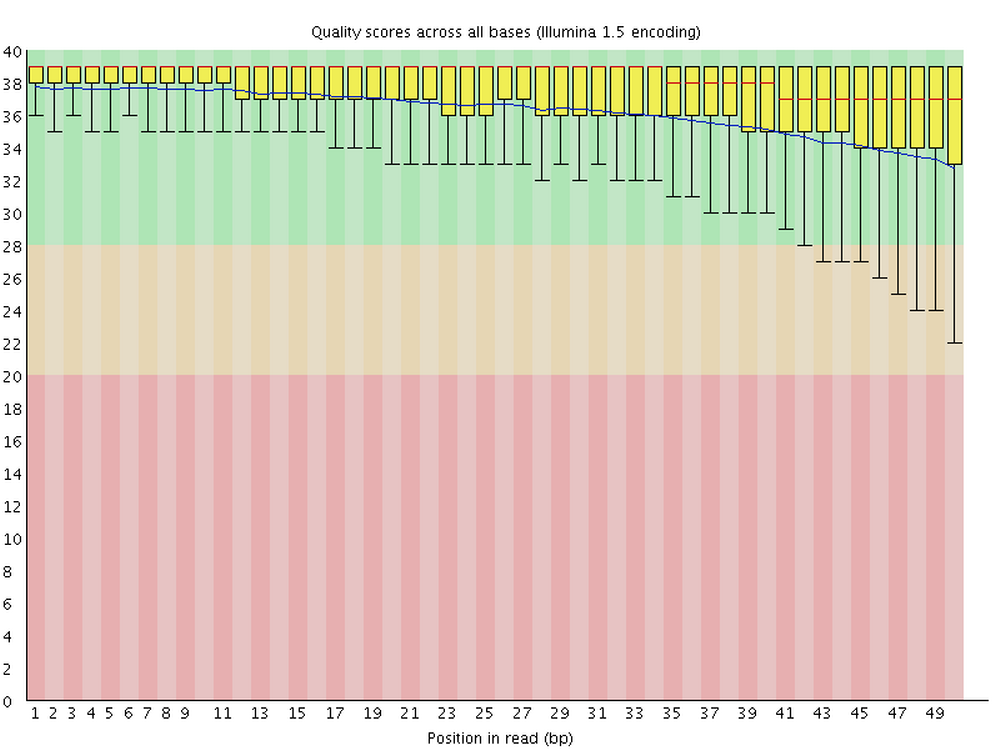
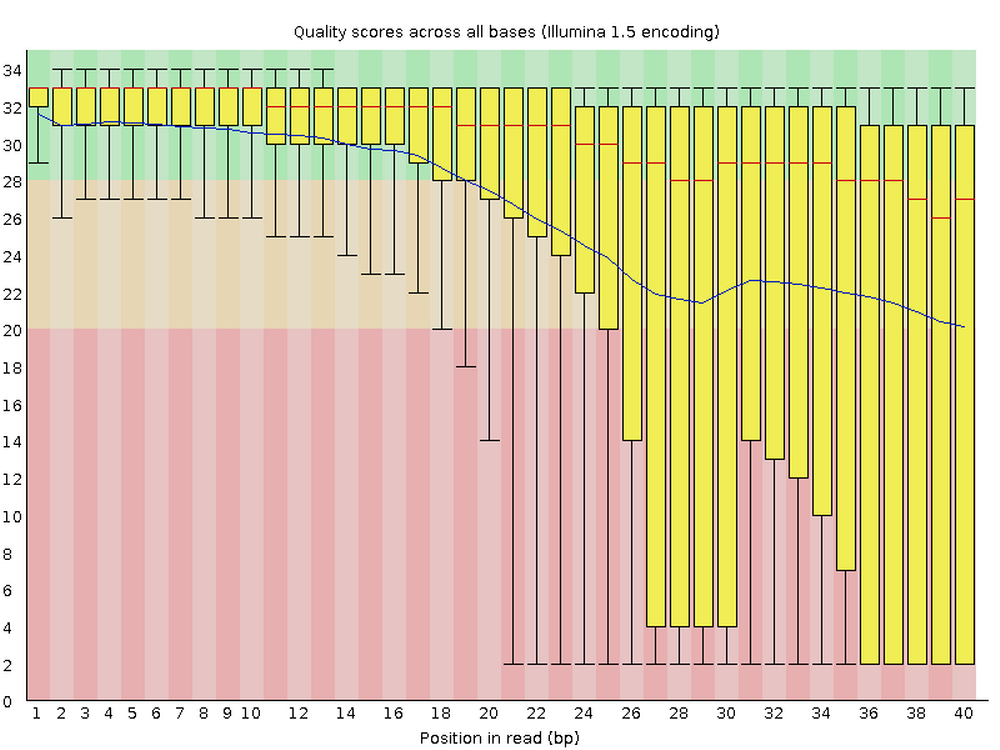
FastQC is one the most ubiquitous pieces of genomics software. It allows you to assess the overall quality of, and potential problems with, the reads in your FASTQ files. It produces visualizations and assessments of for statistics such as per-base quality (below) and adapter content. Running FastQC or an equivalent program should always be the first analysis step after you receive your sequences.
For each FASTQ file, FastQC outputs an HTML file that you can open in your browser and which has about a dozen graphs showing different QC metrics. The most important one is the per-base quality score graph shown below.
Start VS Code and open your folder
As always, we’ll be working in VS Code — if you don’t already have a session open, see below how to do so.
Make sure to open your /fs/ess/PAS0471/<user>/rnaseq_intro dir, either by using the Open Folder menu item, or by clicking on this dir when it appears in the Welcome tab.
Starting VS Code at OSC - with a Terminal (Click to expand)
Log in to OSC’s OnDemand portal at https://ondemand.osc.edu.
In the blue top bar, select
Interactive Appsand then near the bottom of the dropdown menu, clickCode Server.In the form that appears on a new page:
- Select an appropriate OSC project (here:
PAS0471) - For this session, select
/fs/ess/PAS0471as the starting directory - Make sure that
Number of hoursis at least2 - Click
Launch.
- Select an appropriate OSC project (here:
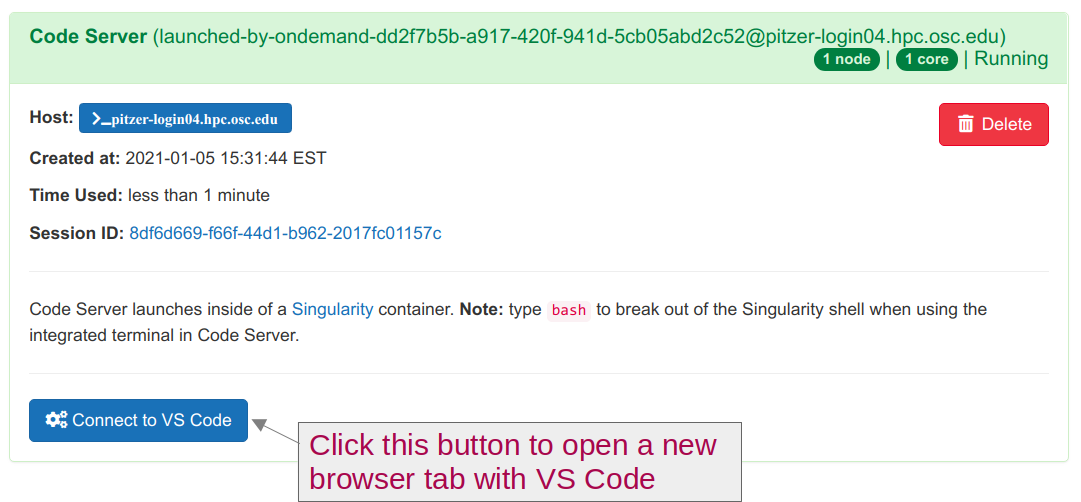
On the next page, once the top bar of the box has turned green and says
Runnning, clickConnect to VS Code.
Open a Terminal by clicking =>
Terminal=>New Terminal. (Or use one of the keyboard shortcuts: Ctrl+` (backtick) or Ctrl+Shift+C.)In the
Welcometab underRecent, you should see your/fs/ess/PAS0471/<user>/rnaseq_introdir listed: click on that to open it. Alternatively, use =>File=>Open Folderto open that dir in VS Code.
Don’t have your own dir with the data? (Click to expand)
If you missed the last session, or deleted your rnaseq_intro dir entirely, run these commands to get a (fresh) copy of all files you should have so far:
mkdir -p /fs/ess/PAS0471/$USER/rnaseq_intro
cp -r /fs/ess/PAS0471/demo/202307_rnaseq /fs/ess/PAS0471/$USER/rnaseq_intro
And if you do have an rnaseq_intro dir, but you want to start over because you moved or removed some of the files while practicing, then delete the dir before your run the commands above:
rm -r /fs/ess/PAS0471/$USER/rnaseq_introYou should have at least the following files in this dir:
/fs/ess/PAS0471/demo/202307_rnaseq
├── data
│   └── fastq
│       ├── ASPC1_A178V_R1.fastq.gz
│       ├── ASPC1_A178V_R2.fastq.gz
│       ├── ASPC1_G31V_R1.fastq.gz
│       ├── ASPC1_G31V_R2.fastq.gz
│       ├── md5sums.txt
│       ├── Miapaca2_A178V_R1.fastq.gz
│       ├── Miapaca2_A178V_R2.fastq.gz
│       ├── Miapaca2_G31V_R1.fastq.gz
│       └── Miapaca2_G31V_R2.fastq.gz
├── metadata
│   └── meta.tsv
└── README.md
│   └── ref
│       ├── GCF_000001405.40.fna
│       ├── GCF_000001405.40.gtf
1 A script to run FastQC
1.1 FastQC syntax
To analyze one (optionally gzipped) FASTQ file with FastQC, the syntax can be as simple as:
Above, <fastq-file> should be replaced by the path to an actual FASTQ file. We’ll also always want to specify the output directory, though, because the unfortunate default for FastQC is to put them in the directory that contains the FASTQ files themselves1. We can tell FastQC about our desired output directory as follows:
fastqc --outdir <output-dir> <fastq-file>For instance, if we wanted output files to go to the directory results/fastqc and wanted the program to analyze the file data/fastq/ASPC1_A178V_R1.fastq.gz, a functional command would be:
fastqc --outdir results/fastqc data/fastq/ASPC1_A178V_R1.fastq.gz
FastQC’s output file names are automatically determined
FastQC allows us to specify the output directory, but not the output file names, which will be automatically determined based on the input file name.
For one FASTQ file, FastQC will output one HTML file and one ZIP archive. The latter contains files with the summary statistics that were computed and on which the figures are based — we generally don’t need to look at that.
1.2 A basic script to run FastQC
Instead of running FastQC interactively, we’ll want to write a FastQC script that we can submit as a batch job.
Specifically, our script will deliberately run FastQC for only one FASTQ file. Alternative approaches would be to include multiple FASTQ files in our FastQC command (this is possible), or even to loop over FASTQ files inside the FastQC script. However, given that we have access to OSC’s compute cluster, it will be much more efficient to submit a separate batch job for each FASTQ file.
This approach means that our script needs to accept an argument with a file name (of the focal FASTQ file), something that we have practiced with quite a bit in the previous sessions. So here is what a basic script along these lines could look like:
#!/bin/bash

# Strict Bash settings
set -euo pipefail

# Copy the placeholder variables
fastq_file=$1
outdir=$2

# Run FastQC
fastqc --outdir "$outdir" "$fastq_file"

# (Don't run this in your terminal, this is an example script)
1.3 A more well-developed FastQC script
We should add a few things to this script to e.g. make it run it smoothly as a batch job at OSC:
A line to load the relevant OSC software module:
module load fastqc/0.11.8A few
sbatchoptions (we’ll keep the time limit and number of cores at their default values of 1 hour and 1 core, respectively):#SBATCH --account=PAS0471 #SBATCH --mail-type=FAIL #SBATCH --output=slurm-fastqc-%j.outSeveral
echostatements to report what’s going onA line to create the output directory if it doesn’t yet exist:
mkdir -p "$outdir"
Refresher: the
-p option to mkdir (Click to expand)
Using the -p option does two things at once for us, both of which are necessary for a foolproof inclusion of this command in a script:
It will enable
mkdirto create multiple levels of directories at once (i.e., to act recursively): by default,mkdirerrors out if the parent directory/ies of the specified directory don’t yet exist.mkdir newdir1/newdir2mkdir: cannot create directory ‘newdir1/newdir2’: No such file or directorymkdir -p newdir1/newdir2 # This successfully creates both directoriesIf the directory already exists, it won’t do anything and won’t return an error (by default,
mkdirwould return an error in this case, which would in turn lead the script to abort at that point with oursetsettings):mkdir newdir1/newdir2mkdir: cannot create directory ‘newdir1/newdir2’: File existsmkdir -p newdir1/newdir2 # This does nothing since the dirs already exist
Here is what our script looks like with those additions:
#!/bin/bash
#SBATCH --account=PAS2250
#SBATCH --mail-type=FAIL
#SBATCH --output=slurm-fastqc-%j.out

# Strict Bash settings
set -euo pipefail

# Load the OSC module for FastQC
module load fastqc

# Copy the placeholder variables
fastq_file="$1"
outdir="$2"

# Initial reporting
echo "# Starting script fastqc.ch"
date
echo "# Input FASTQ file:   $fastq_file"
echo "# Output dir:         $outdir"
echo

# Create the output dir if needed
mkdir -p "$outdir"

# Run FastQC
fastqc --outdir="$outdir" "$fastq_file"

# Final reporting
echo
echo "# Listing the output files:"
ls -lh "$outdir"

echo
echo "# Done with script fastqc.sh"
date

# (Don't run this in your terminal, but copy it into a .sh text file)
Open a new file in VS Code ( => File => New File) and save it as fastqc.sh within your scripts/ directory. Paste in the code above and save the file.
Notice that this script is very similar to our toy scripts from the previous sessions: mostly standard (“boilerplate”) code with just a single command to run our program of interest. Therefore, you can adopt this script as a template for scripts that run other command-line programs, and will generally only need minor modifications!
On Your Own: Use multiple threads
Most bioinformatics programs, including FastQC, can make use of multiple threads/CPUs/cores (which we can all treat as the same unit below the node level, for our purposes), and this can speed things up tremendously.
To run FastQC with multiple threads, we need to take two steps — below, n is the number of threads that we would like to use.
Add the
#SBATCH --cpus-per-task=noption to the script.Tell FastQC that it can use
nthreads.
Include both of these options in your fastqc.sh script so as to run FastQC with 8 cores.
(To find out the name of the FastQC option for the number of threads, run fastqc --help and search for the relevant option.)
Hint (click here)
The FastQC option in question is -t (short form) or --threads (long form). For clarity, I would suggest to use the long form option in your script.
Solution (click here)
- You should add the following
#SBATCHline at the top of the script:
#SBATCH --cpus-per-task=8- Your FastQC command in the script should now be as follows (though the order of the
--threadsand--outdiroptions does not matter, as long as the input file positional argument comes last):
fastqc --threads 8 --outdir "$outdir" "$fastq_file"2 A master / runner “script”
Above, we created a fastqc.sh script, which we’ll eventually want to submit a bunch of times with a for loop. The code with that loop and the sbatch command could be directly typed in the terminal. But it’s better to save the commands used for job submission in a file/script as well.
We will now create such a file, which has the overall purpose of documenting the steps we took and the batch jobs we submitted. You can think of this file as your analysis lab notebook, or perhaps more accurately, your notebook entry that contains the final protocol you followed.
This kind of script is sometimes called a “master” or “runner” script. Because it will contain shell code, we will save it as a shell script (.sh) just like the script to run fastqc.sh and other individual analysis steps. However, it is important to realize that the runner script is conceptually different from the scripts that run individual steps of your analysis. The latter are meant to be run/submitted in their entirety by the runner script, whereas a basic runner script that contains sbatch compute job commands for multiple steps has to be run step-by-step (see the box below).
The runner script can’t itself be run at once in its entirety (Click to expand)
Once we’ve added multiple batch job steps, and the input of a later step uses the output of an earlier step, we won’t be able to just run the script as is. This is because the runner script would then submit jobs from different steps all at once, and that later step would start running before the earlier step has finished.
For example, consider the following series of two steps, in which the second step uses the output of the first step:
# This script would create a genome "index" for STAR, that will be used in the next step
# ('my_genome.fa' = input genome FASTA, 'results/star_index' = output index dir)
sbatch scripts/star_index.sh my_genome.fa results/star_index

# This script would align a FASTQ file to the genome index created in the previous step
# ('results/star_index' = input index dir, 'sampleA.fastq.gz' = input FASTQ file,
# 'results/star_align' = output dir)
sbatch scripts/star_align.sh results/star_index sampleA.fastq.gz results/star_align
If these two lines were included in your runner script, and you would run that script in its entirety all at once, the script in the second step would be submitted just a split-second after the first one (recall: when using sbatch, you get your prompt back immediately – there is no waiting). As such, it would fail because of the missing output from the first step.
It is possible to make sbatch batch jobs wait for earlier steps to finish (e.g. with the --dependency option), but this quickly gets tricky. If you want to create a workflow/pipeline that can run from start to finish in an automated way, you should consider using a workflow management system like Snakemake or NextFlow.
To summarize, we’ll separate our code into two hierarchical levels of scripts, which we’ll also save in separate dirs to make this division clear:
- The scripts that run individual steps of your analysis, like
fastqc.sh. We’ll save these in a directory calledscripts. - An overarching “runner” script that orchestrates the batch job submission of these individual steps. We’ll save this script in a directory called
run.
Let’s go ahead and open a new text file, and save it as run/run.sh (VS Code should create that directory on the fly as needed).
Keep the scripts for individual steps simple
It is a good idea to keep the shell scripts you will submit (e.g., fastqc.sh) simple in the sense that they should generally just run one program, and not a sequence of programs.
Once you get the hang of writing these scripts, it may seem appealing to string a series of programs/steps together in a single script, so that it’s easier to rerun everything at once — but in practice, that will often end up leading to more difficulties than convenience. Once again, if you do want to develop a workflow that can run from start to finish, you’ll have to bite the bullet and learn a workflow management system like Snakemake or Nextflow.
3 Running FastQC using batch jobs
3.1 Submitting the script for one FASTQ file
Let’s submit our fastqc.sh script to the Slurm queue with sbatch:
sbatch scripts/fastqc.sh data/fastq/ASPC1_A178V_R1.fastq.gz results/fastqcSubmitted batch job 12521308
Once again: Where does our output go? (Click to expand)
Output that would have been printed to screen if we had run the script directly, such as our
echostatements and FastQC’s progress logging, will go into the Slurm log fileslurm-fastqc-<job-nr>.outin our working dir.FastQC’s main output files (HTML and zip) will end up in the output directory we specified, in this case
results/fastqc.
If we take a look at the queue, you may catch the job while it’s still pending (note below that the job’s NAME will by default be the filename of the script):
Fri Aug 25 12:07:48 2023
    JOBID PARTITION     NAME     USER    STATE       TIME TIME_LIMI  NODES NODELIST(REASON)
  23666218 serial-40 fastqc.s   jelmer  PENDING       0:00   1:00:00      1 (None)
…and then it should start running:
Fri Aug 25 12:07:54 2023
    JOBID PARTITION     NAME     USER    STATE       TIME TIME_LIMI  NODES NODELIST(REASON)
  23666218 condo-osu fastqc.s   jelmer  RUNNING       0:06   1:00:00      1 p0133
The job will be finished within 10 seconds, though (recall that we are working with small subsets of the full FASTQ files), and you might miss its listing in the squeue output entirely: as soon as it’s done, it will be removed from the list.
Of course, just because a job has finished does not mean that it has ran successfully, and we should always check this. Let’s start by taking a look at the Slurm log file:
cat slurm-fastqc-23666218.out # You'll have a different job number in the filename
Click to see the contents of the Slurm log file
# Starting script fastqc.ch
Fri Aug 25 12:07:50 EDT 2023
# Input FASTQ file:   data/fastq/ASPC1_A178V_R1.fastq.gz
# Output dir:         results/fastqc

Started analysis of ASPC1_A178V_R1.fastq.gz
Approx 5% complete for ASPC1_A178V_R1.fastq.gz
Approx 10% complete for ASPC1_A178V_R1.fastq.gz
Approx 15% complete for ASPC1_A178V_R1.fastq.gz
Approx 20% complete for ASPC1_A178V_R1.fastq.gz
Approx 25% complete for ASPC1_A178V_R1.fastq.gz
Approx 30% complete for ASPC1_A178V_R1.fastq.gz
Approx 35% complete for ASPC1_A178V_R1.fastq.gz
Approx 40% complete for ASPC1_A178V_R1.fastq.gz
Approx 45% complete for ASPC1_A178V_R1.fastq.gz
Approx 50% complete for ASPC1_A178V_R1.fastq.gz
Approx 55% complete for ASPC1_A178V_R1.fastq.gz
Approx 60% complete for ASPC1_A178V_R1.fastq.gz
Approx 65% complete for ASPC1_A178V_R1.fastq.gz
Approx 70% complete for ASPC1_A178V_R1.fastq.gz
Approx 75% complete for ASPC1_A178V_R1.fastq.gz
Approx 80% complete for ASPC1_A178V_R1.fastq.gz
Approx 85% complete for ASPC1_A178V_R1.fastq.gz
Approx 90% complete for ASPC1_A178V_R1.fastq.gz
Approx 95% complete for ASPC1_A178V_R1.fastq.gz
Approx 100% complete for ASPC1_A178V_R1.fastq.gz
Analysis complete for ASPC1_A178V_R1.fastq.gz

# Listing the output files:
total 5.1M
-rw-r--r-- 1 jelmer PAS0471 266K Aug 25 12:07 ASPC1_A178V_R1_fastqc.html
-rw-r--r-- 1 jelmer PAS0471 456K Aug 25 12:07 ASPC1_A178V_R1_fastqc.zip

# Done with script fastqc.sh
Fri Aug 25 12:07:56 EDT 2023
The Slurm log file shown in the box above looks good, we can see that FastQC ran and finished and that there are no errors. Make sure your log file looks similar.
At the end of the log file, our script listed FastQC’s output files (a ZIP file and an HTML file), so we could see their file names and sizes: another useful check that everything went well.
3.2 Submitting the script many times with a loop
The script that we wrote above will run FastQC for a single FASTQ file. Now, we will write a loop that iterates over all of our FASTQ files (only 8 files in our case, but this could be 100s of files just the same), and submits a batch job for each of them.
In our run.sh script, let’s start by writing a loop that iterates over our FASTQ files and simply prints their names (note: the -e option to echo will allow us to insert an extra new line with \n, resulting in an empty line):
for fastq_file in data/fastq/*fastq.gz; do
    echo -e "\nFASTQ file: $fastq_file"
done
FASTQ file: data/fastq/ASPC1_A178V_R1.fastq.gz

FASTQ file: data/fastq/ASPC1_A178V_R2.fastq.gz

FASTQ file: data/fastq/ASPC1_G31V_R1.fastq.gz

FASTQ file: data/fastq/ASPC1_G31V_R2.fastq.gz

FASTQ file: data/fastq/Miapaca2_A178V_R1.fastq.gz

FASTQ file: data/fastq/Miapaca2_A178V_R2.fastq.gz

FASTQ file: data/fastq/Miapaca2_G31V_R1.fastq.gz

FASTQ file: data/fastq/Miapaca2_G31V_R2.fastq.gz
Now that we’ve confirmed that we are succesfully looping over our files, let’s add the code to submit a batch job in every iteration:
for fastq_file in data/fastq/*fastq.gz; do
    echo -e "\nFASTQ file: $fastq_file"
    sbatch scripts/fastqc.sh "$fastq_file" results/fastqc
done
FASTQ file: data/fastq/ASPC1_A178V_R1.fastq.gz
Submitted batch job 24048031
FASTQ file: data/fastq/ASPC1_A178V_R2.fastq.gz
Submitted batch job 24048032
FASTQ file: data/fastq/ASPC1_G31V_R1.fastq.gz
Submitted batch job 24048033
FASTQ file: data/fastq/ASPC1_G31V_R2.fastq.gz
Submitted batch job 24048034
FASTQ file: data/fastq/Miapaca2_A178V_R1.fastq.gz
Submitted batch job 24048035
FASTQ file: data/fastq/Miapaca2_A178V_R2.fastq.gz
Submitted batch job 24048036
FASTQ file: data/fastq/Miapaca2_G31V_R1.fastq.gz
Submitted batch job 24048037
FASTQ file: data/fastq/Miapaca2_G31V_R2.fastq.gz
Submitted batch job 24048038On Your Own: Check if everything went well
Use
squeueto monitor your jobs.Take a look at the Slurm log files while the jobs are running and/or after the jobs are finished.
A nice trick when you have many log files is to check the last few lines of all of them using
tailwith a wildcard. This is useful because recall that with our strict Bash settings, a script should only run until the end if it did not encounter errors. Andtailwill helpfully include file name markers when you run it on multiple files as follows:tail slurm-fastqc*Take a look at FastQC’s output files: are you seeing 8 HTML files?
Check your email to see that you didn’t receive any emails from Slurm: any emails would mean that the job(s) in question failed.
4 Interpreting the FastQC output
4.1 Downloading the HTML files
In the older version of VS Code that’s installed at OSC, we unfortunately can’t view HTML files. So we’ll have to download FastQC’s HTML output files to our own computers and then take a look at them.
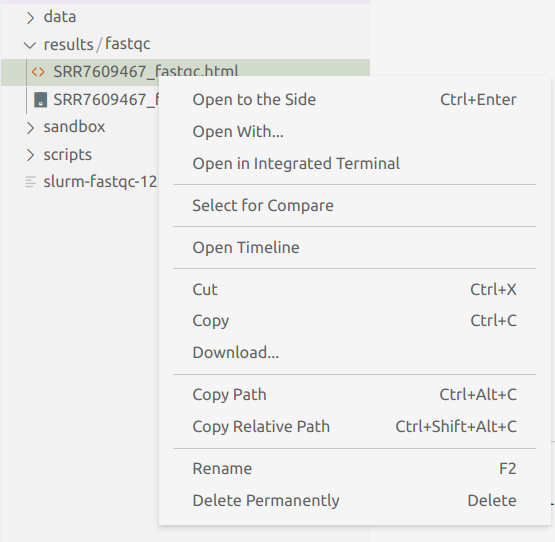
Find the results/fastqc dir in VS Code’s file Explorer on the left-hand side of the screen, right-click on it, and find and use the “Download…” entry towards the bottom (the screenshot just has a single file selected, but please select the dir instead):
Once you’ve downloaded the files, go to the folder you’ve downloaded them to in your computer’s file explorer / Finder.
We will look at just two of the HTML files: those for the R1 and R2 files of the first sample, ASPC1_A178V. It would be a bit tedious to have to go through all HTML files, and this would especially be the case if we have dozens of files, which would be the case for most full datasets. After looking at these two FastQC HTML files, we will use MultiQC to summarize all FastQC outputs into a single file, and examine the MultiQC output to look for differences among samples.
In your file explorer, double-click on the first file (ASPC1_A178V_R1_fastqc.html) and it should open inside your browser.
4.2 Interpreting the results
TBA – for now, see these slides.
Footnotes
And we’d like to separate our data from our results!↩︎