FASTQ files
And: gzip-compressed files, grep, checking file integrity, and write-protecting files
Overview & setting up
Over the next two sessions, you’ll be introduced to three very common types of genomic data files, all of which you should have when you start your analysis of, for example, a reference-based RNAseq dataset.
We’ll talk about the following three types of genomic data file:
- FASTQ files: When you get your sequence data back, it will be in this format, which contains one entry per read, and has per-base quality scores along with the sequence itself.
- FASTA files: Simpler sequence files, where each entry contains just a header and a DNA or protein sequence. Your reference genome assembly will be in this format.
- GTF (& GFF) files: These contain annotations in a tabular format, e.g. the start & stop position of each gene.
This session will focus on FASTQ files, which you should already have in your practice directory (if not, see the instructions below). In the next session, we will download and explore reference genome FASTA and GFF files.
You’ll also learn a number of new shell concepts and commands, such as commands to work with gzip-compressed files and grep to search for text.
The at-home reading below will cover how you can make important data read-only, and how you can check whether your data files were not accidentally modified upon transfer.
Start VS Code and open your folder
As always, we’ll be working in VS Code — if you don’t already have a session open, see below how to do so.
Make sure to open your /fs/ess/PAS0471/<user>/rnaseq_intro dir, either by using the Open Folder menu item, or by clicking on this dir when it appears in the Welcome tab.
Log in to OSC’s OnDemand portal at https://ondemand.osc.edu.
In the blue top bar, select
Interactive Appsand then near the bottom of the dropdown menu, clickCode Server.In the form that appears on a new page:
- Select an appropriate OSC project (here:
PAS0471) - For this session, select
/fs/ess/PAS0471as the starting directory - Make sure that
Number of hoursis at least2 - Click
Launch.
- Select an appropriate OSC project (here:
On the next page, once the top bar of the box has turned green and says
Runnning, clickConnect to VS Code.
Open a Terminal by clicking =>
Terminal=>New Terminal. (Or use one of the keyboard shortcuts: Ctrl+` (backtick) or Ctrl+Shift+C.)In the
Welcometab underRecent, you should see your/fs/ess/PAS0471/<user>/rnaseq_introdir listed: click on that to open it. Alternatively, use =>File=>Open Folderto open that dir in VS Code.
If you missed the last session, or deleted your rnaseq_intro dir entirely, run these commands to get a (fresh) copy of all files:
mkdir -p /fs/ess/PAS0471/$USER/rnaseq_intro
cp -r /fs/ess/PAS0471/demo/202307_rnaseq /fs/ess/PAS0471/$USER/rnaseq_intro
And if you do have an rnaseq_intro dir, but you want to start over because you moved or removed some of the files while practicing, then delete the dir before your run the commands above:
rm -r /fs/ess/PAS0471/$USER/rnaseq_introYou should have at least the following files in this dir:
/fs/ess/PAS0471/demo/202307_rnaseq
├── data
│   └── fastq
│       ├── ASPC1_A178V_R1.fastq.gz
│       ├── ASPC1_A178V_R2.fastq.gz
│       ├── ASPC1_G31V_R1.fastq.gz
│       ├── ASPC1_G31V_R2.fastq.gz
│       ├── Miapaca2_A178V_R1.fastq.gz
│       ├── Miapaca2_A178V_R2.fastq.gz
│       ├── Miapaca2_G31V_R1.fastq.gz
│       └── Miapaca2_G31V_R2.fastq.gz
├── metadata
│   └── meta.tsv
└── README.md
1 The FASTQ format
FASTQ is a very common output format of high-throughput sequencing machines — at least from Illumina sequencing, you will almost always receive the sequences in this format. Like most genomic data files, these are plain text files, and each sequence that is read by the sequencer (i.e., each “read”) forms one FASTQ entry represented by four lines. The lines contain, respectively:
- A header that starts with
@and e.g. uniquely identifies the read - The sequence itself
- A
+(plus sign) - One-character quality scores for each base in the sequence
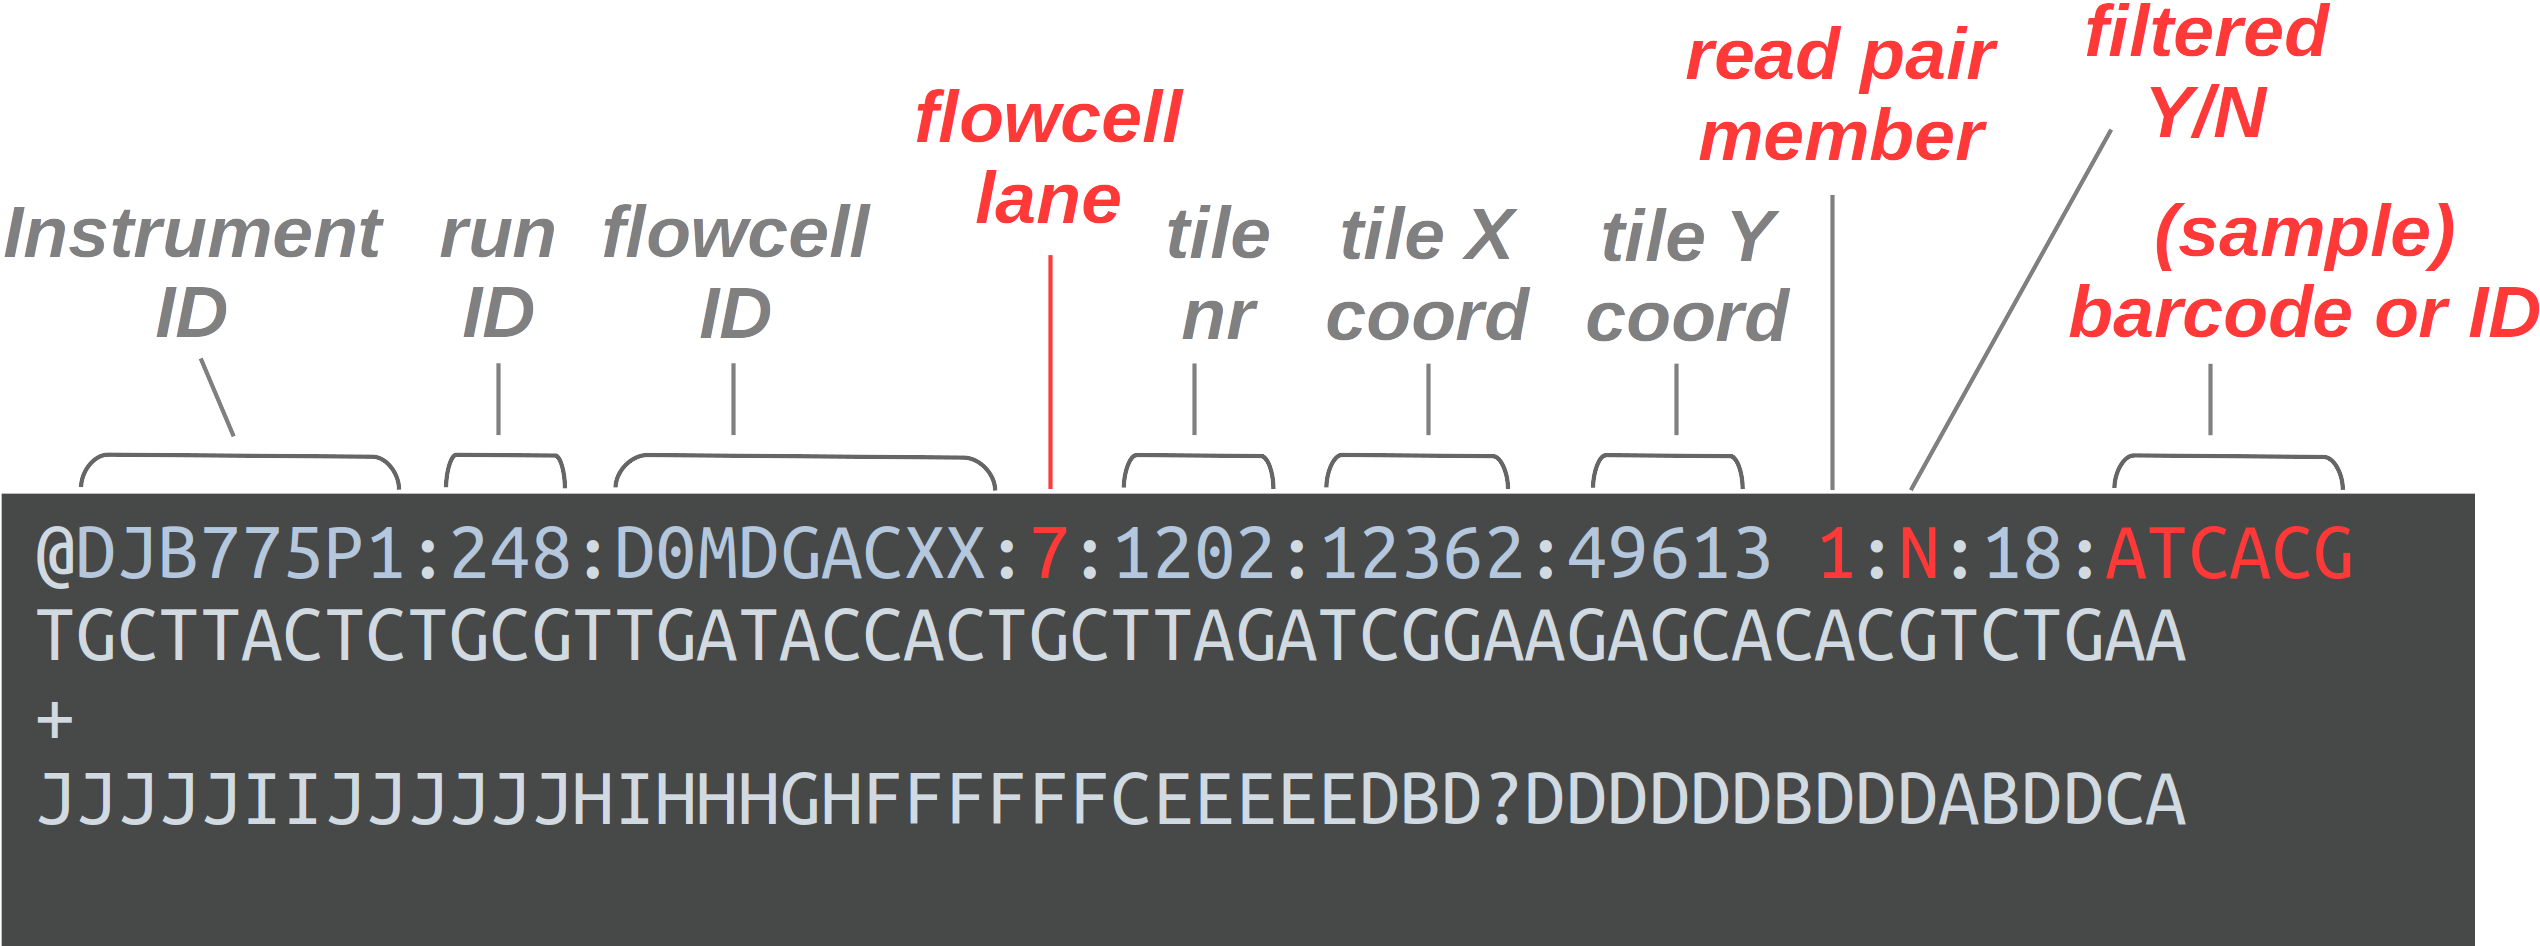
The header line is annotated, with some of the more useful components highlighted in red.
For viewing purposes, this read (at only 56 bp) is shorter than regular Illumina read lengths.
The “Q” in FASTQ stands for “quality”, to contrast this format with FASTA, a more basic and generic format that does not include base quality scores. FASTQ files have the extension .fastq or .fq, but they are very commonly gzip-compressed, in which case their name ends in .fastq.gz or .fq.gz.
The bottom line (starting with JJJJ) in the figure above contains a quality score for each base of the sequence in the second line. Specifically, the characters on that line correspond to a numeric Phred quality score (Q), which is defined as:
Q = -10 * log10(P)
In the equation above, P is the estimated probability that a base call is erroneous — see the table below for some specific probabilities and their rough qualitative interpretation for Illumina data:
| Phred quality score | Error probability | Rough interpretation |
|---|---|---|
| 10 | 1 in 10 | terrible |
| 20 | 1 in 100 | bad |
| 30 | 1 in 1,000 | good |
| 40 | 1 in 10,000 | excellent |
With Illumina data, these Phred quality scores typically go up to 42 (though newer platforms like NovaSeq used binned quality scores). This numeric quality score is represented in FASTQ files not by the number itself, but by a corresponding “ASCII character”, which allows for a single-character representation of each possible score.
As a consequence, each quality score character can conveniently correspond to (i.e., line up with) a base in the sequence: e.g., the 30th base number in a DNA sequence line corresponds to the 30th quality score character two lines below that.
In practice, you almost never have to manually check the quality scores of bases in FASTQ files, but if you do want to know which character corresponds to which quality, this Illumina webpage has a table (though note that Q41 = J and Q42 = K are missing).
Illumina sequencing is by far the most common for RNAseq1, and can be done in two “modes”: single-end and paired-end. With paired-end sequencing, each individual (c)DNA fragment is sequenced from two ends in opposite directions (with the total size of the fragment –“insert size”– determining whether these two reads will overlap). The resulting two, “paired”, reads for each fragment are inextricably linked, with the first called the forward read and the second called the reverse read.
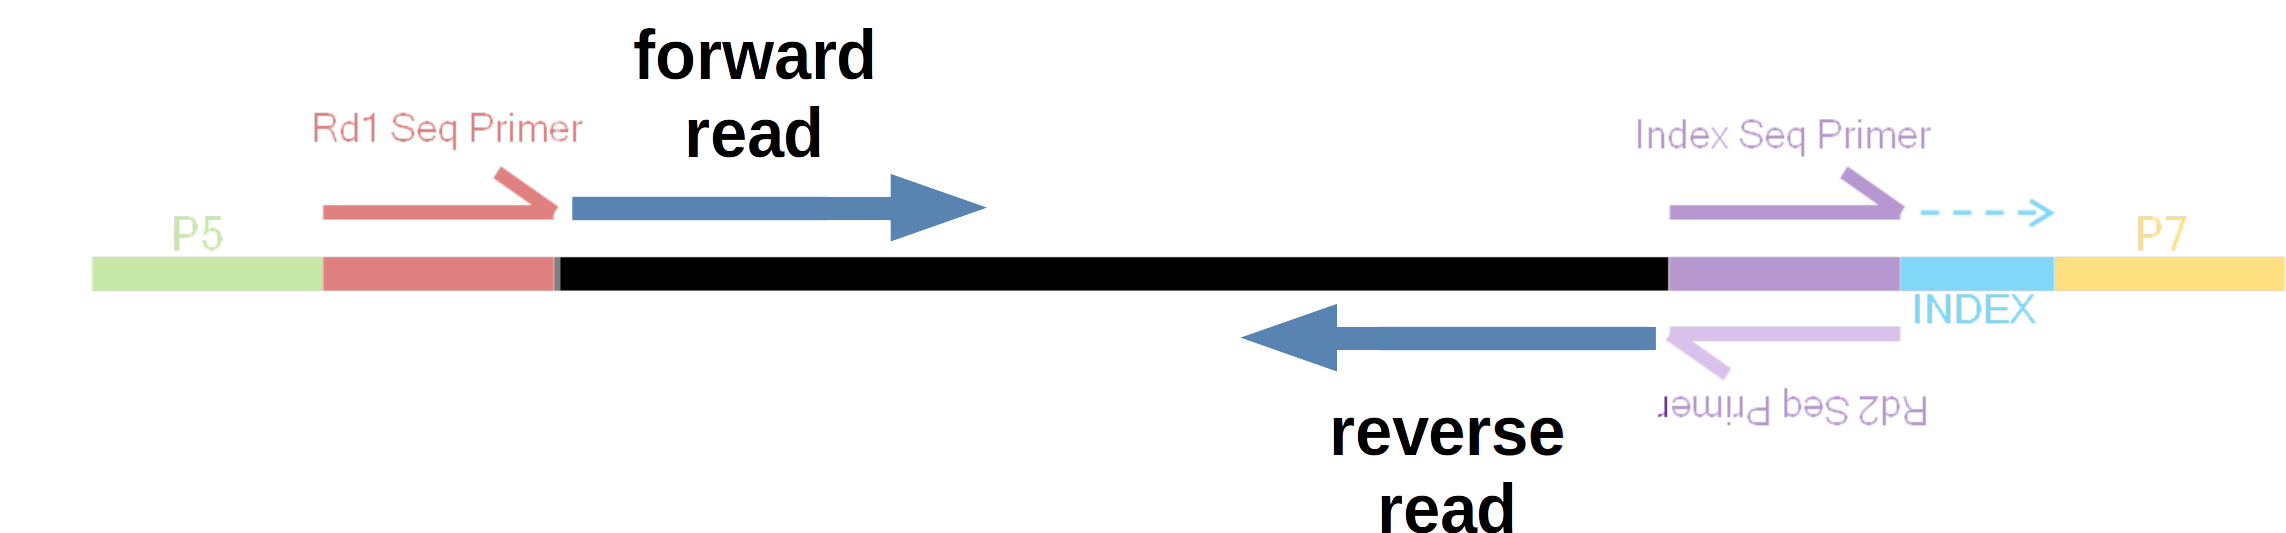
In this example, the insert size is such that the forward and reverse reads do not overlap.
Most commonly for paired-end data, forward and reverse reads are placed in separate files. As such, you’ll usually have two files2 for each sample that was sequenced:
- The file with forward reads has
_R1(or sometimes_1) in its name, e.g.ASPC1_A178V_R1.fastq.gz - The file with reverse reads has
_R2(or sometimes_2) in its name, e.g.ASPC1_A178V_R2.fastq.gz(i.e., the file name should be identical to that for the forward read, except for the read direction identifier).
Because the forward and reverse reads are so tightly linked, R1 and R2 files for one sample should always contain the same number of reads. (It is possible to end up with “orphan” reads, such as after one member of the pair is removed by quality filtering, but these are either discarded or saved in separate files.)
2 Working with compressed (FASTQ) files
Let’s start by reminding ourselves about our own FASTQ files — recall that this is a subset of the full dataset, with way fewer reads reads per file than the originals, and with files for only four of the samples:
ls -lh data/fastqtotal 38M
-rw-r--r-- 1 jelmer PAS0471 4.1M Jul 27 11:53 ASPC1_A178V_R1.fastq.gz
-rw-r--r-- 1 jelmer PAS0471 4.2M Jul 27 11:53 ASPC1_A178V_R2.fastq.gz
-rw-r--r-- 1 jelmer PAS0471 4.1M Jul 27 11:53 ASPC1_G31V_R1.fastq.gz
-rw-r--r-- 1 jelmer PAS0471 4.3M Jul 27 11:53 ASPC1_G31V_R2.fastq.gz
-rw-r--r-- 1 jelmer PAS0471 5.1M Jul 27 11:53 Miapaca2_A178V_R1.fastq.gz
-rw-r--r-- 1 jelmer PAS0471 5.3M Jul 27 11:53 Miapaca2_A178V_R2.fastq.gz
-rw-r--r-- 1 jelmer PAS0471 5.1M Jul 27 11:53 Miapaca2_G31V_R1.fastq.gz
-rw-r--r-- 1 jelmer PAS0471 5.3M Jul 27 11:53 Miapaca2_G31V_R2.fastq.gzThe FASTQ files all have a .gz extension (and should listed in red in your terminal), indicating they are “gzip-compressed”. This is a common type of compression for large genomic files.
Next, we’ll take a peak inside one of these files. It’s worth mentioning that during actual FASTQ file analysis (QC, trimming, alignment), you’re at most very rarely interacting with the raw contents of the file, since bioinformatics programs take care of the details. While it is therefore possible to run your analysis while treating FASTQ (and other genomic) files as “black boxes”, it is helpful to at least have a rough idea of what a FASTQ file looks like, and how you can get some quick stats on them using basic shell commands.
Let’s consider our options to look inside one of these files. cat will print the contents of the entire file to screen, which doesn’t sound like a good idea for such a large file. Other than less, perhaps head will work well here? We’ll try to print 8 lines, which should show us two reads:
head -n 8 data/fastq/ASPC1_A178V_R1.fastq.gz
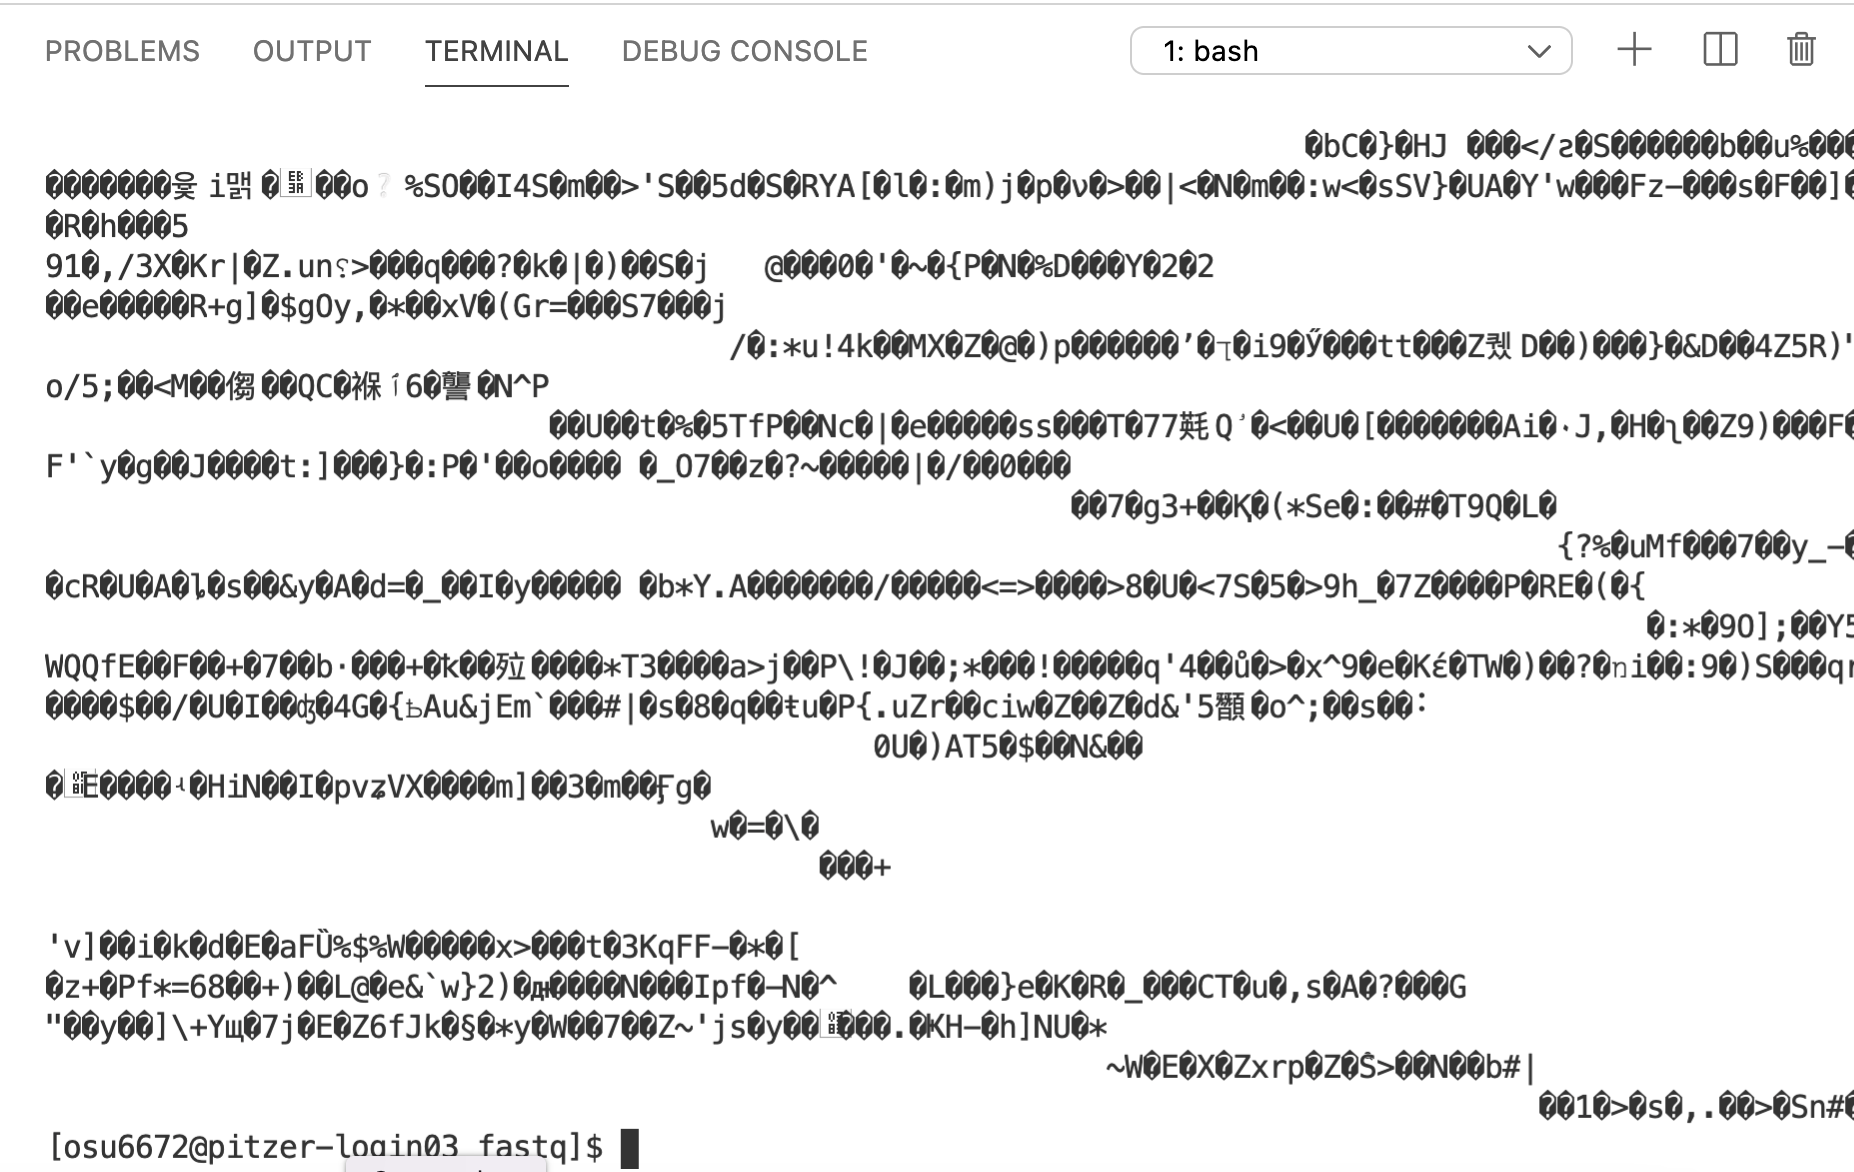
Ouch, what was that?! What happened here is that we are directly seeing the contents of the compressed file, which is simply not human-readable. Other shell commands, like those that count the number of lines (wc -l), or search for text (grep, see below), would also run into trouble with compressed files3.
To get around all of this, we might be inclined to uncompress these files, which we could do with the gunzip command. However, uncompressed files take up several times as much disk storage space as compressed ones, and this can add up to a lot when we’re talking about FASTQ files in particular. Fortunately, there are other approaches available. First of all, almost any bioinformatics tool will accept compressed FASTQ files. Additionally, the following commands and strategies should help you to do some basic exploration of your FASTQ files without uncompressing them.
Like with FASTA files, multiple FASTQ files can simply be concatenated to produce a valid, larger FASTQ file.
It generally doesn’t make sense to concatenate files from different samples, but a relatively common situation in which you might want to concatenate FASTQs is when you have multiple files for each sample, originating from different Illumina “lanes”.
In the previous session, we saw that it is very easy to concatenate files in the shell using cat, even if there are many of them and/or the files are very large.
Concatenating compressed files is also really straightforward — the example below would concatenate two files from different Illumina lanes (L001 and L002), separately for the forward and reverse reads:
# Fictional example; note that we concatenate the R1 and R2 files separately
cat sampleA_L001_R1.fastq.gz sampleA_L002_R1.fastq.gz > sampleA_R1.fastq.gz
cat sampleA_L001_R2.fastq.gz sampleA_L002_R2.fastq.gz > sampleA_R2.fastq.gz
2.1 less / zless
As you may recall from the previous session, we were actually able to directly view a compressed FASTQ file with less! less also has a zless counterpart that is explicitly meant to display gzip-compressed files, but at least at OSC, less itself will also work:
less data/fastq/ASPC1_A178V_R1.fastq.gz
# (Recall, press 'q' to quit less)less
Depending on your zoom level and the length of reads in your FASTQ file, some lines may contain too many characters to fit on your screen. If that’s the case, less will by default “wrap” those lines onto the next line on your screen, so characters won’t run off the screen on the right-hand side. That may be useful when the file contains text you’re trying to read in full, but it is often confusing for files like FASTQ as well as for tabular files.
To turn off line-wrapping, call less with the -S option:
less -S data/fastq/ASPC1_A178V_R1.fastq.gz2.2 zcat
Like the less/zless pair, cat has a counterpart that will print the uncompressed contents of a compressed file: zcat.
Of course, we just established that cat’s behavior of printing all the contents of a file isn’t great for large FASTQ files. But zcat is nevertheless very useful for FASTQ files when we combine it with the pipe, |. For example, we can pipe the output of zcat to the head command to view the first 8 lines (2 reads) as follows:
zcat data/fastq/ASPC1_A178V_R1.fastq.gz | head -n 8@A00195:432:HC7JWDRX3:2:1241:25093:24627 1:N:0:CCGATCGT+GACTGTTT
GAACTAACCAAAGTGTGCTGAACATTATTAGGCTCTCCAGACATGTCTAGTTTATACTGGTAAATGCATATCAATTGTAAATATAAAAATAAAATTTGCAT
+
FFFFFFFFFFFFFFFFFFFFFFFFFFFFFFFFFFFFFFFFFFFFF:FFFFFFFFFFF:FFFFFFFFFFFFFFFF:FFFFFFFFFFFFFFFFF:F:F,F:FF
@A00195:432:HC7JWDRX3:1:1232:30716:27226 1:N:0:CCGATCGT+GACTGTTT
GTCCGGACCTTCTTGACGTAAGTGACATCTGGGTGGTGTTTGGGCGGCATGAGCAGCAGATGCAGCCGCTCATAGAACTGGATCCCGTTAAGGGAGGTGAC
+
FFFFFFFFFFFFFFFFFFFFFFFFFFFFFFFFFFFFFFFFFFFFFFFFFFFFFFFFFFFFFFFFFFFFFFFFFFFFFFFFFFFFFFFFFFFFFFFFFFFFFAlong the same lines, we can count the number of lines in a FASTQ file like so:
zcat data/fastq/ASPC1_A178V_R1.fastq.gz | wc -l400000Your Turn: The number of reads in a FASTQ file
Given the output of the command above, how many reads are in this FASTQ file?
What line count do you get when you run
wc -ldirectly on the compressed file?
Solutions
There are 400,000 / 4 = 100,000 reads in this file
You’ll get a line count of 15,358, quite a ways off from the 400,000 lines in the uncompressed file! So, don’t do this when you want to count lines/reads!
wc -l data/fastq/ASPC1_A178V_R1.fastq.gz 15358 data/fastq/ASPC1_A178V_R1.fastq.gzYour Turn: Getting the read length (advanced)
What is the read length for these FASTQ files? Can you get the answer using the commands we have covered so far?
Two extra pieces of information:
wc -cwill return the number of characters in its input.- Nearly all reads in Illumina FASTQ files have the same length, so you can examine the length of a single read to get your answer.
Hints
Recall that the number of characters in e.g. the second (and the fourth) line of a FASTQ file corresponds to the read length.
Think about how you might be able to use
headandtail, each with the-noption, and back-to-back, to get a single, specific line from a file.String all four commands together in a single line using the pipe
|.
Solution
zcat data/fastq/ASPC1_A178V_R1.fastq.gz | head -n 2 | tail -n 1 | wc -c102You can extract any line from a text file by its line number N using head -n N | tail -n 1: the last line from head’s output will be the line of interest, which you can then isolate with tail -n 1.
One (annoying) little twist here is that wc -c will include the newline “character” in its count: as such, the read length is 102 - 1 = 101.
3 Finding text with grep / zgrep
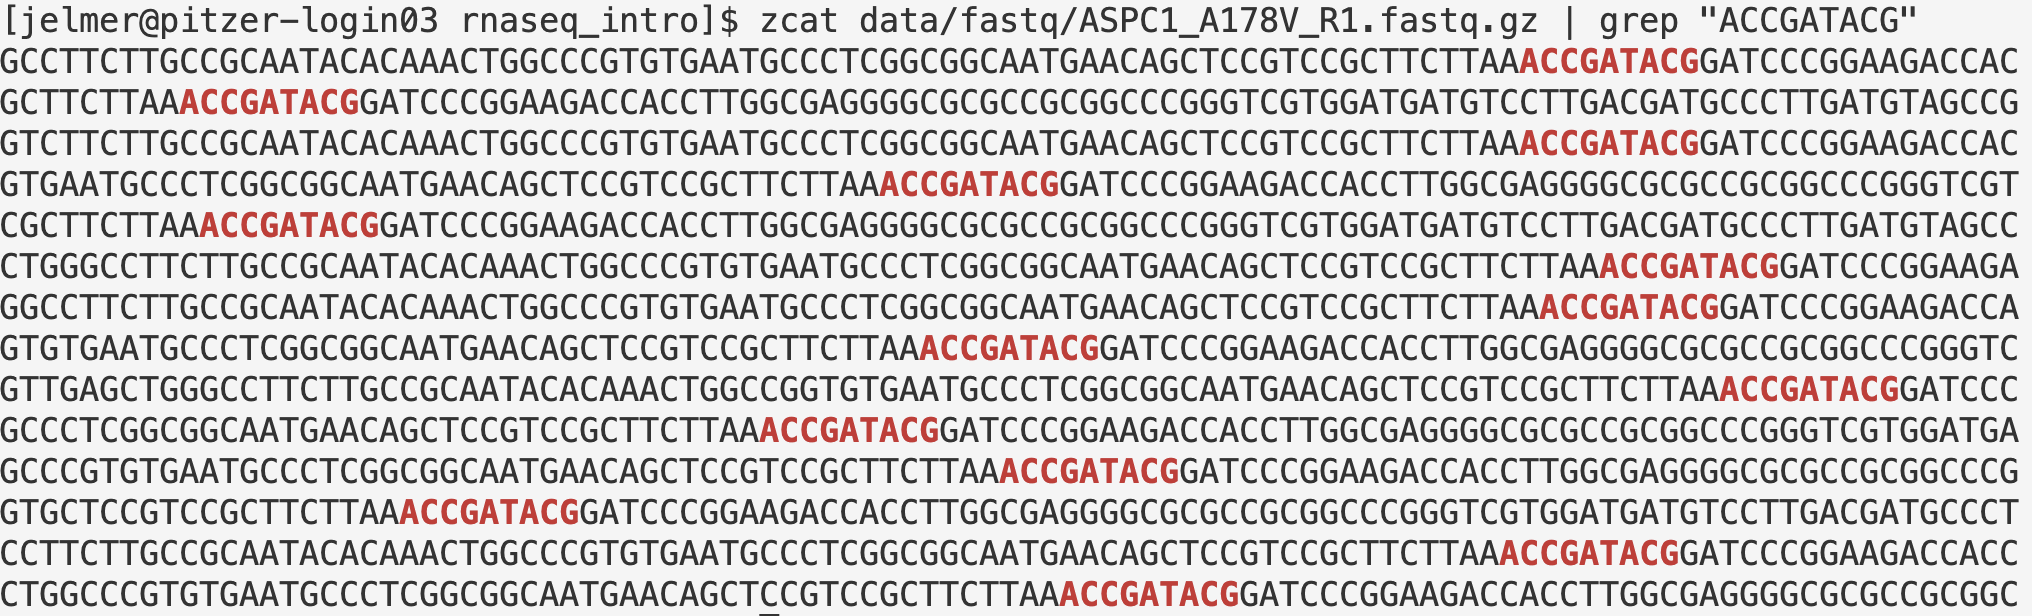
grep allows you to search a file for any text or text patterns. By default, it will return the entire line whenever it finds a match, and it is often set up (including at OSC) to highlight, within that line, the matching text in bold red in its output.
For example, let’s say we wanted to print the sequences in our FASTQ file that contain “ACCGATACG”:
zcat data/fastq/ASPC1_A178V_R1.fastq.gz | grep "ACCGATACG"
If we wanted to know how many reads contain a certain sequence (e.g, the shorter and therefore more common “CCAGTA”), we can simply pipe grep’s output into wc -l:
zcat data/fastq/ASPC1_A178V_R1.fastq.gz | grep "CCAGTA" | wc -l1118grep has many options — one of those is -c, which will directly count matching lines instead of printing them (i.e., the command below is an alternative to the command above where we piped greps output into wc -l):
zcat data/fastq/ASPC1_A178V_R1.fastq.gz | grep -c "CCAGTA"1118grep even has a zgrep counterpart for gzip-compressed files, so the above can be further shortened by omitting zcat and passing the FASTQ file name as an argument to zgrep:
zgrep -c "CCAGTA" data/fastq/ASPC1_A178V_R1.fastq.gz1118We could also create a new FASTQ file whose sequences match our search by printing one line before each match (-B1) and two lines after it (-A2):
zgrep -B1 -A2 --no-group-separator "CCAGTA" data/fastq/ASPC1_A178V_R1.fastq.gz > CCAGTA.fastq Among many other options, grep can also search multiple files at once (simply pass multiple filenames as arguments like with other commands, e.g. using a glob pattern to select them), and it can even search directories recursively using the -R flag.
At-home reading: raw data management
Making your valuable data read-only
Your raw FASTQ data is extremely invaluable as it contains the result of your experiment and was produced by an expensive sequencing process. Even after you’ve produced “clean versions” of these files after quality and adapter trimming, or after you have generated your final gene count tables, you’ll always want to keep these files around. For example, these are the foremost files you need to make publicly available when you publish your results (they are typically deposited at the NCBI’s SRA), they ensure that your results can be reproduced by yourself and others, and they allow for a modified re-analysis of the data after e.g. new methods or relevant data become available.
You should therefore keep at least one copy of your FASTQ files in a Project dir (as opposed to a Scratch dir) at OSC — recall that these dirs are being backed up daily by OSC! You’ll also want to keep at least one copy of the data outside of OSC.
Even with those automatic back-ups and extra copies, it’s still good practice to be careful with your copy of the data at OSC. In the previous session, we learned that file removal with (e.g.) rm is permanent and irreversible, and performing an accidental removal of some of your FASTQ files or the entire dir with a wrong command is not that far-fetched. To make this much less likely to happen, it’s a good idea to “write-protect” your FASTQ files (or, phrased differently, to make them “read-only”).
First, let’s briefly recap and expand our knowledge of file permissions:
- Read permissions allow you to read and copy files/dirs
- Write permissions allow you to move, rename, modify, overwrite, or delete
- Execute permissions allow you to directly execute a file (e.g. running a program, or a script as a command).
These permissions can be most easily set for three different groups of people:
- Owner (or “user”) — By default, this the person that created the file or dir. After you have copied or downloaded some FASTQ files, for example, you are the owner of these copies.
- Group — When you create a file in the PAS0471 project dir, its “group” will include all members of the OSC project PAS0471.
- Other — In the example above, anyone with access to OSC that is not a member of PAS0471.
We can see what these permissions are for any file or dir by looking at the first column of the output of ls -l. Let’s practice write-protection and its consequences with a dummy file — first, we create the dummy file and check the default permissions:
touch permission_test_file

ls -l permission_test_file
# (Note, the very first dash below is about file _type_, not permissions:)
-rw-r--r-- 1 jelmer PAS0471 0 Aug 7 16:27 permission_test_file

The command to set (read/write/execute) permissions for these categories of people (user/group/others, or everyone together) is chmod. There are multiple ways of using this command, but a common one is along the lines of chmod <who><operation><permission>, with e.g.:
chmod a-wmeaning “all minus write”: remove write-permissions for allchmod o+rmeaning “others plus read”: add read-permissions for others.
To remove write-permission for everyone, including yourself, we will use:
chmod a-w permission_test_file

ls -l permission_test_file
# (Notice that there is no longer a 'w' in the sequence below:)
-r--r--r-- 1 jelmer PAS0471 0 Aug 7 16:27 permission_test_fileNow, let’s see what happens when we try to remove this file:
rm permission_test_filerm: remove write-protected regular empty file ‘permission_test_file’? nNote that we can still remove this file by answering y, but we will hopefully not act that carelessly, and the question will make us reconsider and press n (also, if you made a mistake in a script that you run non-interactively, it will fail to remove write-protected files).
Finally, let’s actually write-protect our FASTQ files, and the reference genome files:
chmod a-w data/fastq/* data/ref/*One tricky aspects of file permissions is that to list a directory’s content, or to cd into it, you need execute permissions for the dir (and not read permissions as you might have expected)! This is something to take into account when you want to grant others access to a directory at OSC.
To set execute permissions only for dirs throughout a dir hierarchy:
chmod -R a+X my_large_dir # Note the *uppercase* XMore intuitive is that when you don’t have write-permissions for a dir, it’s not just that you can’t delete or modify any of the files in it, but you’re also not able to create or copy your own files there. Therefore, if you want someone to obtain their own copy of one of your files, you’ll typically have to get them to run the cp command.
Checking file integrity after transfer
When you receive your FASTQ files from a sequencing facility, a small text file will usually accompany your FASTQ files, and will have a name along the lines of md5.txt, md5checksums.txt, or shasums.txt.
Such a file contains so-called checksums, a sort of digital fingerprints for your FASTQ files, which can be used to check whether your copy of these files is completely intact. Checksums are extremely compact summaries of files, computed so that even if just one character is changed in the data, the checksum will be different.
For example, in the dir with the original FASTQ files for our focal project, the following md5.txt file is present:
ls -lh /fs/ess/PAS0471/jelmer/assist/2023-08_hy/data/fastq | head -n 6total 48G
-rw-r--r-- 1 jelmer PAS0471 3.4K Aug 9 16:33 md5.txt
-rw-r--r-- 1 jelmer PAS0471 1.2G Aug 9 16:33 X10784_Cruz-MonserrateZ_ASPC1_vec_V1N_1_S25_R1_001.fastq.gz
-rw-r--r-- 1 jelmer PAS0471 1.2G Aug 9 16:33 X10784_Cruz-MonserrateZ_ASPC1_vec_V1N_1_S25_R2_001.fastq.gz
-rw-r--r-- 1 jelmer PAS0471 1.3G Aug 9 16:33 X10785_Cruz-MonserrateZ_ASPC1_RASD1_V1N_1_S26_R1_001.fastq.gz
-rw-r--r-- 1 jelmer PAS0471 1.4G Aug 9 16:33 X10785_Cruz-MonserrateZ_ASPC1_RASD1_V1N_1_S26_R2_001.fastq.gzSeveral algorithms and their associated shell commands can compute checksums. Like in our case, you’ll most often see md5 checksums accompany genomic data files, which can be computed and checked with the md5sum command (the newer SHA-1 checksums can be computer and checked with the very similar shasum command).
Checksums consist of hexadecimal characters only: numbers and the letters a-f.
We typically compute or check checksums for one or more files, but we can even do it for a string of text — the example below demonstrates that the slightest change in a string (or file alike) will generate a completely different checksum:
echo "bioinformatics is fun" | md5sum010b5ebf7e207330de0e3fb0ff17a85a -echo "bioinformatic is fun" | md5sum45cc2b76c02b973494954fd664fc0456 -Let’s take a look at our checksums — the file has one row per file and two columns, the first with the checksum and the second with the corresponding file name:
head -n 4 /fs/ess/PAS0471/jelmer/assist/2023-08_hy/data/fastq/md5.txt54224841f172e016245843d4a8dbd9fd X10790_Cruz-MonserrateZ_Panc1_vec_V1N_1_S31_R2_001.fastq.gz
cf22012ae8c223a309cff4b6182c7d62 X10790_Cruz-MonserrateZ_Panc1_vec_V1N_1_S31_R1_001.fastq.gz
647a4a15c0d55e56dd347cf295723f22 X10797_Cruz-MonserrateZ_Miapaca2_RASD1_V1N_1_S38_R2_001.fastq.gz
ce5d444f8f9d87d325dbe9bc09ef0470 X10797_Cruz-MonserrateZ_Miapaca2_RASD1_V1N_1_S38_R1_001.fastq.gzThis file was created by the folks at the sequencing facility, and now that we have the data at OSC and are ready to analyze it, we can check if they are still fully intact and didn’t –for example– get incompletely transferred.
I have done this check for the original files, but this takes a little while, and for a quick exercise, we can now do so with our subsampled FASTQ files. First, let’s copy a file md5.txt from the demo directory, which has the checksums for the subsampled FASTQ files as I created them:
cp /fs/ess/PAS0471/demo/202307_rnaseq/data/fastq/md5sums.txt data/fastq/To check whether the checksums for one or more files in a file correspond to those for the files, we can run mdsum -c <mdsum-file>, and should do so while inside the dir with the files of interest4. For example:
cd data/fastq
md5sum -c md5sums.txt
ASPC1_A178V_R1.fastq.gz: OK
ASPC1_A178V_R2.fastq.gz: OK
ASPC1_G31V_R1.fastq.gz: OK
ASPC1_G31V_R2.fastq.gz: OK
Miapaca2_A178V_R1.fastq.gz: OK
Miapaca2_A178V_R2.fastq.gz: OK
Miapaca2_G31V_R1.fastq.gz: OK
Miapaca2_G31V_R2.fastq.gz: OKIf there were any differences, the md5sum command would clearly warn you about them, as you can see in the exercise below.
Let’s compute a checksum for the README.md file and save it in a file:
# Assuming you went into data/fastq above;
# you need to be in /fs/ess/PAS0471/$USER/rnaseq-intro
cd ../..

md5sum README.md > md5sum_for_README.txt

cat md5sum_for_README.txt
d4c4a8df4870f68808553ac0f5484aa3 README.mdNow, let’s add a line to our README.md that says where the reference genome files are:
# (You'll need single quotes like below, or the shell will interpret the backticks)
echo 'Files for the GRCh38.p14 human genome are in the `data/ref` dir' >> README.md

tail -n 3 README.md
and columns specifying the read direction, sample ID, cell line, and variant.
Files for the GRCh38.p14 human genome are in the `data/ref` dirFinally, let’s check the checksum, and watch it fail:
md5sum -c md5sum_for_README.txtREADME.md: FAILED
md5sum: WARNING: 1 computed checksum did NOT matchFootnotes
Though long-read technologies like Oxford Nanopore Technologies and especially PacBio are picking up steam, since these can sequence transcripts in full.↩︎
In some cases, most often when you simply do a lot of sequencing for each sample, you’ll get more than one pair of files: one pair for each “lane” of the sequencer on which the sample was sequenced.↩︎
And they would fail in a possibly worse way because you might overlook the problem:
wc -lwill return a count yet this is not the number of lines for the uncompressed file, whereas a text search withgrepmay “falsely” return nothing while that text is present in the uncompressed file.↩︎This technically depends on how the file names are shown in the text file with the checksums: if there are just file names without directories (or
./<filename>, etc.), you’ll have to be in the dir with the files to runmd5sum -c. (This in turn depends on from where the checksums were generated: if you generate them while in the dir with the focal files, which is the only sensible way to do this, that’s how they will be displayed.)↩︎