echo README_"$today"_final.txtOverview of next steps, and shell variables & for loops
Starting with a bird’s-eye view of how we will be running CLI bioinformatics programs
Overview & setting up
In this session, we’ll start by looking ahead a bit. You will get an bird’s eye view of how, during the first part of the RNAseq analysis (going from reads to a count table). we will be running bioinformatics programs with command-line interfaces (CLIs) This meant to give an overview of the fundamentals we still need to cover before we can start running these analyses.
Then, we’ll talk about the first of those remaining fundamental topics: shell variables and for loops. The next few sessions will cover the remaining ones:
Start VS Code and open your folder
As always, we’ll be working in VS Code — if you don’t already have a session open, see below how to do so.
Make sure to open your /fs/ess/PAS0471/<user>/rnaseq_intro dir, either by using the Open Folder menu item, or by clicking on this dir when it appears in the Welcome tab.
Starting VS Code at OSC - with a Terminal (Click to expand)
Log in to OSC’s OnDemand portal at https://ondemand.osc.edu.
In the blue top bar, select
Interactive Appsand then near the bottom of the dropdown menu, clickCode Server.In the form that appears on a new page:
- Select an appropriate OSC project (here:
PAS0471) - For this session, select
/fs/ess/PAS0471as the starting directory - Make sure that
Number of hoursis at least2 - Click
Launch.
- Select an appropriate OSC project (here:
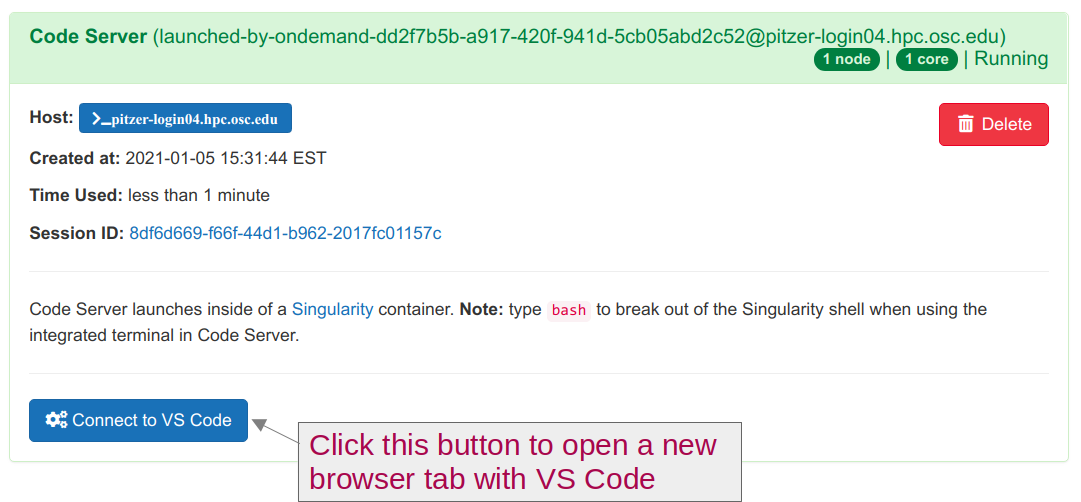
On the next page, once the top bar of the box has turned green and says
Runnning, clickConnect to VS Code.
Open a Terminal by clicking =>
Terminal=>New Terminal. (Or use one of the keyboard shortcuts: Ctrl+` (backtick) or Ctrl+Shift+C.)In the
Welcometab underRecent, you should see your/fs/ess/PAS0471/<user>/rnaseq_introdir listed: click on that to open it. Alternatively, use =>File=>Open Folderto open that dir in VS Code.
Don’t have your own dir with the data? (Click to expand)
If you missed the last session, or deleted your rnaseq_intro dir entirely, run these commands to get a (fresh) copy of all files you should have so far:
mkdir -p /fs/ess/PAS0471/$USER/rnaseq_intro
cp -r /fs/ess/PAS0471/demo/202307_rnaseq /fs/ess/PAS0471/$USER/rnaseq_intro
And if you do have an rnaseq_intro dir, but you want to start over because you moved or removed some of the files while practicing, then delete the dir before your run the commands above:
rm -r /fs/ess/PAS0471/$USER/rnaseq_introYou should have at least the following files in this dir:
/fs/ess/PAS0471/demo/202307_rnaseq
├── data
│   └── fastq
│       ├── ASPC1_A178V_R1.fastq.gz
│       ├── ASPC1_A178V_R2.fastq.gz
│       ├── ASPC1_G31V_R1.fastq.gz
│       ├── ASPC1_G31V_R2.fastq.gz
│       ├── md5sums.txt
│       ├── Miapaca2_A178V_R1.fastq.gz
│       ├── Miapaca2_A178V_R2.fastq.gz
│       ├── Miapaca2_G31V_R1.fastq.gz
│       └── Miapaca2_G31V_R2.fastq.gz
├── metadata
│   └── meta.tsv
└── README.md
│   └── ref
│       ├── GCF_000001405.40.fna
│       ├── GCF_000001405.40.gtf
1 Running CLI bioinformatics programs at OSC: an overview
As pointed out earlier, bioinformatics software (programs) that we use to analyze genomic data are typically run from the command line. That is, they have a “command-line interface” (CLI) rather than a “graphical user interface” (GUI), and are run using command line expressions that are structurally very similar to how we’ve been using basic Unix shell commands.
Here, we’ll use the program FastQC as an example, which performs quality control (QC) on a FASTQ file, and is often the very first step when analyzing a newly sequenced genomics dataset.
1.1 Running a CLI program interactively
When we run a bioinformatics program at OSC, we’ll always have to first make the program available to us. We will cover that in more in detail in the session Software at OSC — but here is how you can do this for FastQC:
# Load the OSC "module" for FastQC, so we can use this program
module load fastqc
Next, we could run FastQC for one of our FASTQ files as follows:
# First create the output dir
mkdir -p results/fastqc

# Tell FastQC about the output dir with --outdir, and pass the file name as an argument
fastqc --outdir results/fastqc data/fastq/ASPC1_A178V_R1.fastq.gz
Started analysis of ASPC1_A178V_R1.fastq.gz
Approx 5% complete for ASPC1_A178V_R1.fastq.gz
Approx 10% complete for ASPC1_A178V_R1.fastq.gz
Approx 15% complete for ASPC1_A178V_R1.fastq.gz
# [...truncated]
Approx 95% complete for ASPC1_A178V_R1.fastq.gz
Approx 100% complete for ASPC1_A178V_R1.fastq.gz
Analysis complete for ASPC1_A178V_R1.fastq.gzls -lh results/fastqctotal 736K
-rw-r--r-- 1 jelmer PAS0471 266K Aug 15 10:39 ASPC1_A178V_R1_fastqc.html
-rw-r--r-- 1 jelmer PAS0471 456K Aug 15 10:39 ASPC1_A178V_R1_fastqc.zipThat seems to have worked! We have two output files, including an HTML file that contains figures with all the results for this one FASTQ file.
So should we simply repeat this for the rest of our FASTQ files? I.e., we could create and run a fastqc command 7 more times, each time passing a different input file as the argument. That seems a bit tedious, and remember that the full dataset contains even more files…
Note
For completeness’ sake, I should mention that it is in fact possible to pass multiple files as argument to fastqc. If we did that, we’d only need to run FastQC once, and would not need the approach shown below, where we use a loop.
However, using a loop is a very general approach, and is necessary for the many programs that can only run one FASTQ file or one sample at a time. When using a supercomputer like OSC, this is also by far the most time-efficient approach, because it allows each sample/file to be processed in parallel rather than consecutively.
1.2 Looping over input files
We can avoid using a very similar command a whole bunch of times by using a loop.
Further down on this page, we will learn all about for loops. Here, we’ll again just see a quick example, and it is not yet important to understand the details of the code below, which will “loop over” all FASTQ files in the data/fastq dir, and run FastQC for one file at a time:
for fastq_file in data/fastq/*fastq.gz; do
    fastqc --outdir results/fastqc "$fastq_file"
done
Started analysis of ASPC1_A178V_R1.fastq.gz
Approx 5% complete for ASPC1_A178V_R1.fastq.gz
# [...]
Started analysis of ASPC1_A178V_R2.fastq.gz
Approx 5% complete for ASPC1_A178V_R2.fastq.gz
# [...]
Started analysis of ASPC1_G31V_R1.fastq.gz
Approx 5% complete for ASPC1_G31V_R1.fastq.gz
# [...]
# [Output for all remaining files follows...]That’s a lot better than repeating a similar line of codes many times — and the loop code would be exactly the same regardless of whether we had 8 or 200 FASTQ files!
However, recall that our full dataset also has much larger FASTQ files. A FastQC run on one of these will take several minutes, so our loop might take a while to finish (and note that some of the programs we’ll run later take much longer than this). Most of all, when we run the program interactively and consecutively like this, we are not making use of the supercomputer’s strengths at all: this is basically like running it on our own laptop, since each FastQC run happens consecutively.
1.3 Running the program with a shell script
We should instead submit a separate compute job for each FastQC run, and these can then all run in parallel (i.e., at the same time) on different OSC compute nodes. Making the switch from interactively running FastQC to submitting each run as a compute job will involve two steps:
- Putting the code to run FastQC inside a shell script
- Submitting that shell script to the OSC compute job queue with
sbatch(rather than directly running it)
We will cover the basics of shell scripts in the session on shell scripts — for now, you just need to know that these scripts are small text files (with the extension .sh) that basically contain the same kind of shell code we’ve been running interactively, with some added bells and whistles.
If for now we just assume we had created such a script, then we can modify our loop code as follows to run FastQC through a script, instead of including the command to run the program directly in the loop:
# Don't run this - meant as an example only (you don't have this script yet)
for fastq_file in data/fastq/*fastq.gz; do
    bash scripts/fastqc.sh "$fastq_file"
done
Started analysis of ASPC1_A178V_R1.fastq.gz
Approx 5% complete for ASPC1_A178V_R1.fastq.gz
# [...]
Started analysis of ASPC1_A178V_R2.fastq.gz
Approx 5% complete for ASPC1_A178V_R2.fastq.gz
# [...]
Started analysis of ASPC1_G31V_R1.fastq.gz
Approx 5% complete for ASPC1_G31V_R1.fastq.gz
# [...]
# [Output for all remaining files follows...]However, running that loop would still make FastQC run sequentially on the node that we are at, instead of in parallel on different compute nodes. With the fastqc.sh script, we’ve set ourselves up to be able to submit batch jobs, but just using this script in itself does not change much.
1.4 Submitting the script to the job scheduler (many times)
To run our script in parallel, we will use the sbatch command, which will submit the script to the Slurm job scheduler in every iteration of the loop (i.e., as many times as we have input files):
# Don't run this - meant as an example only (you don't have this script yet)
for fastq_file in data/fastq/*fastq.gz; do
    sbatch --account=PAS0471 scripts/fastqc.sh "$fastq_file"
done
Submitted batch job 23510054
Submitted batch job 23510055
# [Output truncated...]We will learn about sbatch and associated commands, as well as the different options you can use to specify the resources you want to request (how much time, how many cores, etc), in the session on Slurm compute jobs.
1.5 Summarizing what we need to learn about
Making software available
At OSC, a bunch of bioinformatics programs are installed system-wide, but they still need to be “loaded” viamodule load. This collection of programs is unfortunately not comprehensive and we also need another approach, as we’ll see in the session on Software at OSC.Writing shell scripts
Putting the code to run individual bioinformatics programs inside small shell scripts allows us to submit them to the Slurm job scheduler. Using scripts (as opposed to typing or pasting commands into the terminal directly) is more generally useful, e.g. for long-running commands or programs, and is also a good way to save your code and keep it organized and clear. We’ll talk about shell scripts in the next session.Submitting scripts to the Slurm job scheduler
Submitting scripts as Slurm batch jobs at OSC allows us, for example, to run the same analysis for different samples simultaneously. We’ll see this in more detail in the session on Slurm jobs.forloops and variables
forloops will allow you to repeat operations — specifically, we will later use them to submit many scripts at the same time, one per input file or sample. Using variables will allow you to run scripts flexibly, with different input files and settings; they are also used in loops. We’ll talk about these in the sections below.
2 Variables
In programming, we use variables for things that:
- We refer to repeatedly and/or
- Are subject to change.
These tend to be settings like the paths to input and output files, and parameter values for programs. Using variables makes it easier to change such settings. We also need to understand variables to work with loops and scripts.
2.1 Assigning and referencing variables
To assign a value to a variable in the shell (in short: to assign a variable), use the syntax variable_name=value:
# Assign the value "beach" to a variable with the name "location":
location=beach

# Assign the value "200" to a variable with the name "n_lines":
n_lines=200
There can not be any spaces around the equals sign (
=)!
To reference a variable (i.e., to access its value), you need to put a dollar sign $ in front of its name. As before with the environment variable $HOME, we’ll use the echo command to see what values our variables contain:
echo $locationbeachecho $n_lines200Conveniently, we can use variables in lots of contexts, as if we had directly typed their values:
input_file=data/fastq/ASPC1_A178V_R1.fastq.gz

ls -lh $input_file
-rw-r--r-- 1 jelmer PAS0471 4.1M Aug 1 18:05 data/fastq/ASPC1_A178V_R1.fastq.gz
Rules and tips for naming variables
Variable names:
- Can contain letters, numbers, and underscores
- Cannot contain spaces, periods, or other special symbols
- Cannot start with a number
Try to make your variable names descriptive, like $input_file above, as opposed to say $x and $myvar.
There are multiple ways of distinguishing words in the absence of spaces, such as $inputFile and $input_file: I prefer the latter, which is called “snake case”.
2.2 Quoting variables
Above, we learned that a variable name cannot contain spaces. But what happens if our variable’s value contains spaces? First off, when we try to assign the variable without using quotes, we get an error:
today=Thu, Aug 18Aug: command not found
Why do you think we got this error?
The shell tried to assign everything up to the first space (i.e., Thu,) to today. After that, since we used a space, it assumed the next word (Aug) was something else: specifically, it interpreted that as a command.
But it works when we quote (with double quotes, "...") the entire string that makes up the value:
today="Thu, Aug 18"
echo $today
Thu, Aug 18Now, let’s try to reference this variable in another context. For example, we can try make a new file with today’s date:
cd sandbox

touch README_$today.txt
ls
# The output should include the following files:
18.txt
Aug
README_Thu,
What went wrong here?
Again, the shell split the value of $today in 3 parts separated by a space (this is called “field splitting”): as a result, three files were created.
Like with assignment, our problems can be avoided by quoting a variable when we reference it. This tells the shell it shouldn’t perform so-called “field splitting” on the variable’s value. Put another way, the quotes takes away the special meaning of the space as a separator inside the variable’s value:
touch README_"$today".txt

ls -1
# The output should include the following file:
README_Thu, Aug 18.txtIt is good practice to quote variables when you reference them: it never hurts, and avoids unexpected surprises.
Where does a variable name end? (Click to expand)
Another issue we can run into when we don’t quote variables is that we can’t explicitly define where a variable name ends within a longer string of text:
echo README_$today_final.txtREADME_.txt
What went wrong here? (Hint: check the coloring highlighting above)
Following a
$, the shell will stop interpreting characters as being part of the variable name only when it encounters a character that cannot be part of a variable name, such as a space or a period.Since variable names can contain underscores, it will look for the variable
$today_final, which does not exist.Importantly, the shell does not error out when you reference a non-existing variable – it basically ignores it, such that
README_$today_final.txtbecomesREADME_.txt, as if we hadn’t referenced any variable.
Quoting solves this issue, too:
README_Thu, Aug 18_final.txt
Quoting as “escaping” special meaning & and double vs. single quotes (Click to expand)
By double-quoting a variable, we are essentially escaping (or “turning off”) the default special meaning of the space as a separator, and are asking the shell to interpret it as a literal space.
Similarly, double quotes will escape other “special characters”, such as shell wildcards. Compare:
echo * # This will echo/list all files in the current working dir (!)18.txt Aug README_Thu, README_Thu, Aug 18.txtecho "*" # This will simply print the "*" character *However, as we saw above, double quotes not turn off the special meaning of $ (which is to denote a string as a variable):
echo "$today" # Double quotes do not escape the special meaning of $Thu, Aug 18…but single quotes will:
echo '$today' # Single quotes do escape the special meaning of $$today3 For loops
Loops are a universal element of programming languages, and are used to repeat operations, such as when you want to run the same script or command for multiple files.
Here, we’ll only cover the most common type of loop: the for loop. A for loop iterates over a collection, such as a list of files: that is, is allows you to perform one or more actions for each element in the collection, one element at a time.
3.1 for loop syntax and mechanics
Let’s see a first example, where our “collection” is just a very short list of numbers (1, 2, and 3) that we define on the fly:
for a_number in 1 2 3; do
    echo "In this iteration of the loop, the number is $a_number"
    echo "--------"
done
In this iteration of the loop, the number is 1
--------
In this iteration of the loop, the number is 2
--------
In this iteration of the loop, the number is 3
--------The indented lines between do and done contain the code that is being executed as many times as there are items in the collection: in this case 3 times, as you can tell from the output above.
On the first and last, unindented lines, for loops contain the following mandatory keywords:
| Keyword | Purpose |
|---|---|
for |
After for, we set the variable name (an arbitrary name; above we used a_number) |
in |
After in, we specify the collection (list of items) we are looping over |
do |
After do, we have one ore more lines specifying what to do with each item |
done |
Tells the shell we are done with the loop |
A semicolon
; (as used before do) separates two commands on a single line (Click to expand)
A semicolon separates two commands written on a single line – for instance, instead of:
mkdir results
cd results
…you could equivalently type:
mkdir results; cd resultsThe ; in the for loop syntax has the same function, and as such, an alternative way to format a for loop is:
for a_number in 1 2 3
do
    echo "In this iteration of the loop, the number is $a_number"
done
But that’s one line longer and a bit awkwardly asymmetric.
Here are two key things to understand about for loops — we touched on these above, but they are worth digging into a bit more:
First, in each iteration of the loop, one element in the collection is being assigned to the variable specified after for. In the example above, we used a_number as the variable name, so that variable contained 1 when the loop ran for the first time, 2 when it ran for the second time, and 3 when it ran for the third and last time.
This variable even continues to exist outside of the loop, and will have the last value that was assigned to it in the loop:
echo $a_number3
Second, the loop runs sequentially for each item in the collection, and will run exactly as many times as there are items in the collection.
The following example, where we let the computer sleep for 1 second before printing the date and time with the date command, demonstrates that the loop is being executed sequentially (not in parallel). When you run it, you should notice a slight pause after the output of each iteration is printed, and you can see that the output of date differs by one second each time:
for a_number in 1 2 3; do
    echo "In this iteration of the loop, the number is $a_number"
    date              # Print the date and time
    echo "--------"
    sleep 1           # Let the computer sleep for 1 second
done
In this iteration of the loop, the number is 1
Tue Aug 15 13:30:16 EDT 2023
--------
In this iteration of the loop, the number is 2
Tue Aug 15 13:30:17 EDT 2023
--------
In this iteration of the loop, the number is 3
Tue Aug 15 13:30:18 EDT 2023 On Your Own: A simple loop
Create a loop that will print:
morel is an Ohio mushroom
destroying_angel is an Ohio mushroom
eyelash_cup is an Ohio mushroom
Hints (Click to expand)
Just like we looped over 3 numbers above (
1,2, and3), you want to loop over the three mushroom names,morel,destroying_angel, andeyelash_cup.Notice that when we specify the collection “manually”, like we did above with numbers, the elements are simply separated by a space.
Solution (Click to expand)
for mushroom in morel destroying_angel eyelash_cup; do
    echo "$mushroom is an Ohio mushroom"
done
morel is an Ohio mushroom
destroying_angel is an Ohio mushroom
eyelash_cup is an Ohio mushroom3.2 Looping over files with globbing
In practice, it is rare to manually list the collection of items we want to loop over, like we did above with the numbers 1-3 and a few types of mushroom in the exercise. Instead, we commonly loop over files directly using globbing:
cd /fs/ess/PAS0471/$USER/rnaseq_intro

for fastq_file in data/fastq/*fastq.gz; do
    echo "Now processing FASTQ file $fastq_file..."
    # [Code to analyze the FASTQ file...]
done
Now processing FASTQ file data/fastq/ASPC1_A178V_R1.fastq.gz...
Now processing FASTQ file data/fastq/ASPC1_A178V_R2.fastq.gz...
Now processing FASTQ file data/fastq/ASPC1_G31V_R1.fastq.gz...
Now processing FASTQ file data/fastq/ASPC1_G31V_R2.fastq.gz...
Now processing FASTQ file data/fastq/Miapaca2_A178V_R1.fastq.gz...
Now processing FASTQ file data/fastq/Miapaca2_A178V_R2.fastq.gz...
Now processing FASTQ file data/fastq/Miapaca2_G31V_R1.fastq.gz...
Now processing FASTQ file data/fastq/Miapaca2_G31V_R2.fastq.gz...This technique is extremely useful. Take a moment to realize that to get the list of files, we’re not running a separate ls and storing the results: as mentioned before, a globbing pattern directly selects files. You could also use your globbing / wild card skills to narrow down the file selection:
Perhaps we only want to select R1 FASTQ files (forward reads):
for fastq_file in data/raw/*_R1.fastq.gz; do
    # [Some file processing...]
done
Or our FASTQ files are tucked away in sample-specific folders:
# With default shell settings, '**' will traverse one dir level
# E.g., files are in 'results/trim/sampleA/', 'results/trim/sampleB/', etc.
for fastq_file in results/trim/**/*_R1.fastq.gz; do
    # [Some file processing...]
done
4 At-home reading: Command substitution
If you want to, for example, store the result of a command in a variable, or be able to print this result in an echo statement, you can use a construct called “command substitution”. To do so, you just need to wrap the command inside $().
Let’s see an example. As you know, the date command will print the current date and time:
dateThu Oct 5 16:29:15 EDT 2023If we try to store the date in a variable directly, it doesn’t work: the literal string “date” is stored, not the output of the command:
today=date
echo "$today"dateThat’s why we need command substitution with $():
today=$(date)
echo "$today"
Thu Oct 5 16:29:15 EDT 2023One practical example of using command substitution is when you want to automatically include the current date in a file name. First, note that we can use date +%F to print the date in YYYY-MM-DD format, and omit the time:
date +%F2023-10-05Let’s use that in a command substitution — but a bit differently than before: we use the command substitution $(date +%F) directly in our touch command, rather than first assigning it to a variable:
cd sandbox

# Create a file with our $today variable:
touch README_"$(date +%F)".txt

ls
# Output should include a file like this (the actual date will vary, of course!):
README_2023-08-15.txtAmong many other uses, command substitution is handy when you want your script to report some results, or when a next step in the script depends on a previous result. We’ll come across it a few times in our shell scripts later on.
On Your Own: Command substitution
Say we wanted to store and report the number of lines in a FASTQ file, which, as discussed before, tells us how many reads are in it (there are 4 lines per read).
As we’ve also seen before, wc -l gets you the number of lines, and if you pipe input into wc -l, it won’t include the filename — this is useful for what you’ll want to do below:
cd /fs/ess/PAS0471/$USER/rnaseq_intro

zcat data/fastq/ASPC1_A178V_R1.fastq.gz | wc -l400000Use command substitution to store the output of the last command in a variable, and then use an echo command to print:
The file has 30387 lines
Solution
n_lines=$(zcat data/fastq/ASPC1_A178V_R1.fastq.gz | wc -l)
echo "The file $n_lines lines"
The file 400000 linesNote: You don’t have to quote variables inside a quoted echo call, since it’s, well, already quoted. If you also quote the variables, you will in fact unquote it, although that shouldn’t pose a problem inside echo statements.