sbatch [sbatch-options] myscript.sh [script-arguments]Slurm batch jobs
Submitting and monitoring shell scripts as Slurm batch jobs
Overview & setting up
We have so far been working interactively at OSC, issuing our commands directly in the terminal. But in order to run some actual genomics analyses, we will want to run scripts non-interactively and submit them to the compute job queue at OSC.
Automated scheduling software allows hundreds of people with different requirements to access compute nodes effectively and fairly. For this purpose, OSC uses the Slurm scheduler (Simple Linux Utility for Resource Management).
A temporary reservation of resources on compute nodes is called a compute job. What are the options to start a compute job at OSC?
- “Interactive Apps” — We can start programs with GUIs, such as VS Code, RStudio or Jupyter Notebook on the OnDemand website, and they will run in a browser window.
- Interactive shell jobs — Start a interactive shell on a compute node.
- Batch (non-interactive) jobs — Run a script on a compute node without ever going to that node yourself.
We’ve already worked a lot with the VS Code Interactive App, and the at-home reading at the bottom of this page will talk about interactive shell jobs. But what we’re most interested in here is running batch jobs, which will be the focus of this session.
Start VS Code and open your folder
As always, we’ll be working in VS Code — if you don’t already have a session open, see below how to do so.
Make sure to open your /fs/ess/PAS0471/<user>/rnaseq_intro dir, either by using the Open Folder menu item, or by clicking on this dir when it appears in the Welcome tab.
Starting VS Code at OSC - with a Terminal (Click to expand)
Log in to OSC’s OnDemand portal at https://ondemand.osc.edu.
In the blue top bar, select
Interactive Appsand then near the bottom of the dropdown menu, clickCode Server.In the form that appears on a new page:
- Select an appropriate OSC project (here:
PAS0471) - For this session, select
/fs/ess/PAS0471as the starting directory - Make sure that
Number of hoursis at least2 - Click
Launch.
- Select an appropriate OSC project (here:
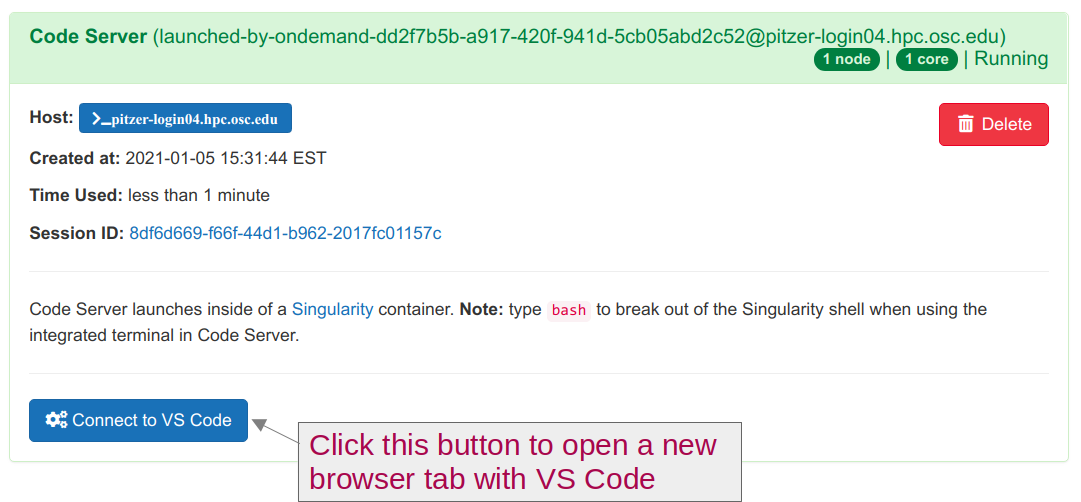
On the next page, once the top bar of the box has turned green and says
Runnning, clickConnect to VS Code.
Open a Terminal by clicking =>
Terminal=>New Terminal. (Or use one of the keyboard shortcuts: Ctrl+` (backtick) or Ctrl+Shift+C.)In the
Welcometab underRecent, you should see your/fs/ess/PAS0471/<user>/rnaseq_introdir listed: click on that to open it. Alternatively, use =>File=>Open Folderto open that dir in VS Code.
Don’t have your own dir with the data? (Click to expand)
If you missed the last session, or deleted your rnaseq_intro dir entirely, run these commands to get a (fresh) copy of all files you should have so far:
mkdir -p /fs/ess/PAS0471/$USER/rnaseq_intro
cp -r /fs/ess/PAS0471/demo/202307_rnaseq /fs/ess/PAS0471/$USER/rnaseq_intro
And if you do have an rnaseq_intro dir, but you want to start over because you moved or removed some of the files while practicing, then delete the dir before your run the commands above:
rm -r /fs/ess/PAS0471/$USER/rnaseq_introYou should have at least the following files in this dir:
/fs/ess/PAS0471/demo/202307_rnaseq
├── data
│   └── fastq
│       ├── ASPC1_A178V_R1.fastq.gz
│       ├── ASPC1_A178V_R2.fastq.gz
│       ├── ASPC1_G31V_R1.fastq.gz
│       ├── ASPC1_G31V_R2.fastq.gz
│       ├── md5sums.txt
│       ├── Miapaca2_A178V_R1.fastq.gz
│       ├── Miapaca2_A178V_R2.fastq.gz
│       ├── Miapaca2_G31V_R1.fastq.gz
│       └── Miapaca2_G31V_R2.fastq.gz
├── metadata
│   └── meta.tsv
└── README.md
│   └── ref
│       ├── GCF_000001405.40.fna
│       ├── GCF_000001405.40.gtf
1 Getting started with Slurm batch jobs
In requesting batch jobs, we are asking the Slurm scheduler to run a script on a compute node1. When doing so, our own prompt stays in our current shell at our current node (whether that’s a login or compute node), and the script will run on a compute node “out of sight”. This means that after we have submitted a batch job, it would continue running even if we log off from OSC or shut down our computer.
Also, as we’ll discuss in more detail below:
- Script output that would normally be printed to screen (“standard out”) will end up in a “log” file
- There are commands for e.g. monitoring whether the job is already/still running, and cancelling the job.
1.1 The sbatch command
We use Slurm’s sbatch command to submit a batch job. Recall from the Bash scripting session that we can run a Bash script as follows:
bash sandbox/printname.sh Jane DoeFirst name: Jane
Last name: Doe
Can’t find yesterday’s
printname.sh script?
- Open a new file in the
VS Codeeditor ( =>File=>New File) and save it asprintname.sh - Copy the code below into the script:
#!/bin/bash
set -euo pipefail

first_name=$1
last_name=$2

echo "First name: $first_name"
echo "Last name: $last_name"
The above command ran the script on our current node. To instead submit the script to the Slurm queue, we start by simply replacing bash by sbatch:
sbatch sandbox/printname.sh Jane Doesrun: error: ERROR: Job invalid: Must specify account for job
srun: error: Unable to allocate resources: Unspecified errorHowever, that didn’t work. As the error message “Must specify account for job” tries to tell us, we need to indicate which OSC Project (or as Slurm puts it, “account”) we want to use for this compute job.
To specify the project/account, we can use the --account= option followed by the OSC Project number:
sbatch --account=PAS0471 sandbox/printname.sh Jane DoeSubmitted batch job 12431935This means that our job was successfully submitted (No further output will be printed to your screen - we’ll talk more about that below). The job has a unique identifier among all compute jobs by all users at OSC, and we can use this number to monitor and manage it. All of us will therefore see a different job number pop up.
sbatch options and script arguments
As you perhaps noticed in the command above, we can use sbatch options and script arguments in one command, in the following order:
But, depending on the details of the script itself, all combinations of using sbatch options and script arguments are possible:
sbatch printname.sh                             # No options/arguments for either
sbatch printname.sh Jane Doe                    # Script arguments but no sbatch option
sbatch --account=PAS0471 printname.sh           # sbatch option but no script arguments
sbatch --account=PAS0471 printname.sh Jane Doe  # Both sbatch option and script arguments
Not using the --account option, as in the first two examples above, is possible when we specify this option inside the script, as we’ll see below.
1.2 Adding sbatch options in scripts
The --account= option is just one of out of many options we can use when reserving a compute job, but is the only one that always has to be specified (including for batch jobs and for Interactive Apps).
Defaults exist for all other options, such as the amount of time (1 hour) and the number of cores (1). These options are all specified in the same way for interactive and batch jobs, and we’ll dive into them below.
Instead of specifying Slurm/sbatch options on the command-line when we submit the script, we can also add these options inside the script.
This is handy because even though we have so far only seen the account= option, you often want to specify several options. That would lead to very long sbatch commands. Additionally, it can be practical to store a script’s typical Slurm options along with the script itself, so you don’t have to remember them.
We add the options in the script using another type of special comment line akin to the shebang line, marked by #SBATCH. The equivalent of adding --account=PAS0471 after sbatch on the command line is a line in a script that reads #SBATCH --account=PAS0471.
Just like the shebang line, the #SBATCH line(s) should be at the top of the script. Let’s add one such line to the printname.sh script, such that the first few lines read:
#!/bin/bash
#SBATCH --account=PAS0471

set -euo pipefail

# (This is a partial script, don't run this directly in the terminal)
After having added this to the script, we can run our earlier sbatch command without options:
sbatch printname.sh Jane DoeSubmitted batch job 12431942
After we submit the batch job, we immediately get our prompt back. Everything else (job queuing and running) will happen out of our immediate view. This allows us to submit many jobs at the same time — we don’t have to wait for other jobs to finish (or even to start).
sbatch option precedence
Any sbatch option provided on the command line will override the equivalent option provided inside the script. This is sensible: we can provide “defaults” inside the script, and change one or more of those when needed on the command line.
Running a script with
#SBATCH in other contexts
Because #SBATCH lines are special comment lines, they will simply be ignored and not throw any errors when you run a script that contains them in other contexts: when not running them as a batch job at OSC, or even when running them on a computer without Slurm installed.
1.3 Where does the output go?
Above, we saw that when we ran the printname.sh script directly, its output was printed to the screen, whereas when we submitted it as a batch job, all that was sprinted to screen was Submitted batch job 12431942. So where did our output go?
Our output ended up in a file called slurm-12431942.out: that is, slurm-<job-number>.out. Since each job number is unique to a given job, your file would have a different number in its name. We might call this type of file a Slurm log file.
Any idea why we might not want batch job output printed to screen, even if we could? (Click to expand)
The power of submitting batch jobs is that you can submit many at once — e.g. one per sample, running the same script. If the output from all those scripts ends up on your screen, things become a big mess, and you have no lasting record of what happened.
Let’s take a look at the contents of the Slurm log file with the cat command:
# (Replace the number in the file name with whatever you got! - check with 'ls')
cat slurm-12431942.out
First name: Jane
Last name: DoeThis file simply contains the output of the script that was printed to screen when we ran it with bash — nothing more and nothing less.
It’s important to conceptually distinguish between two overall types of output that a script may have:
Output that is printed to screen when we directly run a script, such as what was produced by our
echostatements, by any errors that may occur, and possibly by a program that we run in the script. These are the so-called “standard output” and “standard error” streams (see the box further down on this page). As we saw, this output ends up in the Slurm log file when we submit the script as a batch job.Output of commands inside the script that we redirect to a file (
> myfile.txt) or that automatically goes to an output file rather than being printed to screen. This type of output will always end up in the very same files regardless of whether we run the script directly (withbash) or as a batch job (withsbatch).
The working directory stays the same
Batch jobs start in the directory that they were submitted from: that is, your working directory remains the same.
2 Monitoring batch jobs
2.1 A sleepy script for practice
Let’s use the following short script to practice monitoring and managing batch and other compute jobs. Open a new file in the VS Code editor ( => File => New File) and save it as sandbox/sleep.sh, then copy the following into it:
#!/bin/bash
#SBATCH --account=PAS0471

echo "I will sleep for 30 seconds" > sleep.txt
sleep 30s
echo "I'm awake! Done with script sleep.sh"
Your turn: Batch job output recap
Predict what would happen if you submit the sleep.sh script as a batch job (using sbatch sandbox/sleep.sh):
- How many output files will this batch job produce?
- What will be in each of those files?
- In which directory will the file(s) appear?
- In terms of output, what would have been different if we had run the script directly, i.e. using the command
bash sandbox/sleep.sh?
Then, can test your predictions by running the script.
Solutions (Click to expand)
The script will produce 2 files:
slurm-<job-number>.out: The Slurm log file, containing output that would have otherwise been printed to the screensleep.txt: Containing the output that we redirected to this file in the script
They will contain:
slurm-<job-number>.out: I’m awake! Done with script sleep.shsleep.txt: “I will sleep for 30 seconds”
Both files will end up in your current working directory. Slurm log files always go to the directory from which you submitted the job. Slurm jobs also run from the directory from which you submitted your job, and since we redirected the output simply to
sleep.txt, that file was created in our working directory.If we had run the script directly, the
slept.txtwould have also been created with the same content, but “All done!” would have been printed to the screen.
2.2 Checking the status of our job
After we submit a job, it may be initially be waiting to be allocated resources: i.e., it may be “queued” or “pending”. Then, the job will start running, and at some point it will stop running, either because the script ran into and error, or because it completed.
How can we check the status of our batch job? We can do so using the Slurm command squeue -u $USER -l, in which:
- Our username is specified with the
-uoption (without this, we would see everyone’s jobs) - We used the environment variable
$USERso that the very same code will work for everyone (you can also simply type your username if that’s shorter or easier). - We’ve added the
-l(lowercase L, not the number 1!) option to get more verbose (“long”) output.
Let’s try that:
squeue -u $USER -lMon Aug 21 15:47:42 2023
JOBID PARTITION NAME USER STATE TIME TIME_LIMI NODES NODELIST(REASON)
23640814 condo-osu ondemand jelmer RUNNING 6:34 2:00:00 1 p0133After a line with the date and time, and a header line, you should see some information about a single compute job, as shown above: this is the Interactive App job that runs VS Code. That’s not a “batch” job, but it is a compute job, and all compute jobs are listed here. In the table, we can see the following pieces of information about each job:
JOBID— the job ID number,PARTITION— type of queue - here, we can tell it was submitted through OnDemand- The
NAMEof the job - The
USERwho submitted the job - The
STATEof the job, which is usually eitherPENDING(queued) orRUNNING. (As soon as a job finished, it will disappear from this list!) TIME— for how long the job has been running (here as minutes:seconds)- The
TIME_LIMIT— the amount of time you reserved for the job (here as hours:minutes:seconds) - The number of
NODESreserved for the job NODELIST(REASON)— When a job is running, this will show the ID of the node on which it is running. When a job is pending, it will (sort of) say why it is pending.
Let’s also try this after submitting our sleep.sh script as a batch job:
sbatch sandbox/sleep.shSubmitted batch job 12431945We may be able to catch the STATE being PENDING before the job starts:
squeue -u $USER -lMon Aug 21 15:48:26 2023
JOBID PARTITION NAME USER STATE TIME TIME_LIMI NODES NODELIST(REASON)
12520046 serial-40 sleep.sh jelmer PENDING 0:00 1:00:00 1 (None)
23640814 condo-osu ondemand jelmer RUNNING 7:12 2:00:00 1 p0133But soon enough it should say RUNNING in the STATE column:
squeue -u $USER -lMon Aug 21 15:48:39 2023
JOBID PARTITION NAME USER STATE TIME TIME_LIMI NODES NODELIST(REASON)
12520046 condo-osu sleep.sh jelmer RUNNING 0:12 1:00:00 1 p0133
23640814 condo-osu ondemand jelmer RUNNING 8:15 2:00:00 1 p0133The script should finish after 30 seconds (our command was sleep 30s), after which the job will immediately disappear from the squeue listing — only pending and running jobs are shown:
squeue -u $USER -lMon Aug 21 15:49:26 2023
JOBID PARTITION NAME USER STATE TIME TIME_LIMI NODES NODELIST(REASON)
23640814 condo-osu ondemand jelmer RUNNING 9:02 2:00:00 1 p0133But we need to make sure our script ran successfully! We can do so by checking our output file(s) (see also the In Closing section below). As is usual also when we submit scripts that run bioinformatics programs, we’ll have a file that was directly created by the command inside the script (here, sleep.sh), and a Slurm log file with the script’s standard output and standard error (which would normally be printed to screen):
cat sleep.txtI will sleep for 30 secondscat slurm-12520046.outI'm awake! Done with script sleep.sh2.3 Cancelling jobs (and other monitoring/managing commands)
Sometimes, you want to cancel one or more jobs, because you realize you made a mistake in the script or you used the wrong input files. You can do so using scancel:
scancel 2979968        # Cancel job number 2979968
scancel -u $USER       # Cancel all your jobs
Other job monitoring commands and options
Check only a specific job by specifying the job ID, e.g
2979968:squeue -j 2979968Only show running (not pending) jobs:
squeue -u $USER -t RUNNINGUpdate Slurm directives for a job that has already been submitted (this can only been done before the job has started running):
scontrol update job=<jobID> timeLimit=5:00:00Hold and release a pending (queued) job, e.g. when needing to update input file before it starts running:
scontrol hold jobID        # Job won't start running until released
scontrol release jobID     # Job is free to start
You can see more details about any running or finished jobs, including the amount of time it ran for:
scontrol show job 2526085   # For job 2526085

# UserId=jelmer(33227) GroupId=PAS0471(3773) MCS_label=N/A
# Priority=200005206 Nice=0 Account=pas0471 QOS=pitzer-default
# JobState=RUNNING Reason=None Dependency=(null)
# Requeue=1 Restarts=0 BatchFlag=1 Reboot=0 ExitCode=0:0
# RunTime=00:02:00 TimeLimit=01:00:00 TimeMin=N/A
# SubmitTime=2020-12-14T14:32:44 EligibleTime=2020-12-14T14:32:44
# AccrueTime=2020-12-14T14:32:44
# StartTime=2020-12-14T14:32:47 EndTime=2020-12-14T15:32:47 Deadline=N/A
# SuspendTime=None SecsPreSuspend=0 LastSchedEval=2020-12-14T14:32:47
# Partition=serial-40core AllocNode:Sid=pitzer-login01:57954
# [...]
3 Common sbatch options
First off, note that many Slurm options have a corresponding long (--account=PAS0471) and short format (-A PAS0471), which can generally be used interchangeably. For clarity, we’ll stick to long format options here.
3.1 --account: The OSC project
As seen above. When submitting a batch job, always specify the OSC project (“account”).
3.2 --time: Time limit (“wall time”)
Use the --time option to specify the maximum amount of time your job will run for. Your job gets killed as soon as it hits the specified time limit!
Wall time is a term meant to distinguish it from, say “core hours”: if a job runs for 2 hour and used 8 cores, the wall time was 2 hours and the number of core hours was 2 x 8 = 16. Some notes:
- You will only be charged for the time your job actually used, not what you reserved.
- The default time limit is 1 hour. Acceptable time formats include:
minutes(e.g.60=> 60 minutes)hours:minutes:seconds(e.g.1:00:00=> 60 minutes)days-hours(e.g.2-12=> two-and-a-half days)
- For single-node jobs, up to 168 hours (7 days) can be requested. If that’s not enough, you can request access to the
longserialqueue for jobs of up to 336 hours (14 days).
An example, where we ask for 1 hour:
#!/bin/bash
#SBATCH --time=1:00:00
When in doubt, ask for more time
If you are uncertain about how much time your job will take (i.e., how long it will take for your script / the program in your script to finish), then ask for more or even much more time than you think you will need. This is because queuing times are generally not long at OSC, and because you won’t be charged for reserved-but-not-used time.
That said, in general, the “bigger” (more time, more cores, more memory) your job is, the more likely it is that it will be pending for an appreciable amount of time. Smaller jobs (requesting up to a few hours and cores) will almost always start running nearly instantly. Even big jobs (requesting, say, a day or more and 10 or more cores) will often do so, but during busy times, you might have to wait for a while.
Your turn: exceed the time limit
Modify the sleep.sh script to make it run longer than the time you request for it with --time. (Take into account that it does not seem to be possible to effectively request a job that runs for less than 1 minute.)
If you succeed in exceeding the time limit, an error message will be printed — where do you think it will go? After waiting for the job to be killed after 60 seconds, check if you were correct and what the exact error message is.
Solution (Click to expand)
This script would do the trick, where we request 1 minute of walltime while we let the script sleep for 80 seconds:
#!/bin/bash
#SBATCH --account=PAS0471
#SBATCH --time=1

echo "I will sleep for 80 seconds" > sleep.txt
sleep 80s
echo "I'm awake! Done with script sleep.sh"
This would result in the following type of error:
slurmstepd: error: *** JOB 23641567 ON p0133 CANCELLED AT 2023-08-21T16:35:24 DUE TO TIME LIMIT ***3.3 Cores (& nodes and tasks)
There are several options to specify the number of nodes (≈ computers), cores, or “tasks” (processes). These are separate but related options, and this is where things can get confusing!
- Slurm for the most part uses “core” and “CPU” interchangeably2. More generally, “thread” is also commonly used interchangeably with core/CPU3.
Running a program that uses multiple threads/cores/CPUs (“multi-threading”) is common. In such cases, specify the number of threads/cores/CPUs
nwith--cpus-per-task=n(and keep--nodesand--ntasksat their defaults of 1).The program you’re running may have an argument like
--coresor--threads, which you should then set tonas well.
Uncommon cases
- Only ask for more than one node when a program is parallelized with e.g. “MPI”, which is uncommon in bioinformatics.
- For jobs with multiple processes (tasks), use
--ntasks=nor--ntasks-per-node=n— also quite rare!
| Resource/use | short | long | default |
|---|---|---|---|
| Nr. of cores/CPUs/threads (per task) | -c 1 |
--cpus-per-task=1 |
1 |
| Nr. of “tasks” (processes) | -n 1 |
--ntasks=1 |
1 |
| Nr. of tasks per node | - | --ntasks-per-node=1 |
1 |
| Nr. of nodes | -N 1 |
--nodes=1 |
1 |
An example, where we ask for 2 CPUs/cores/threads:
#!/bin/bash
#SBATCH --cpus-per-task=2
3.4 --mem: RAM memory
Use the --mem option to specify the maximum amount of RAM (Random Access Memory) that your job can use:
- The default amount is 4 GB per core that you reserve. This is often enough, so it is fairly common to omit the
--memoption. - The default unit is MB (MegaBytes) — append
Gfor GB (i.e.100means 100 MB,10Gmeans 10 GB). - Like with the time limit, your job gets killed when it hits the memory limit. Whereas you get a very clear Slurm error message when you hit the time limit (as seen in the exercise above), hitting the memory limit can result in a variety of errors, but look for keywords such as
Killed,Out of Memory/OOM, andCore Dumped, as well as actual “dumped cores” in your working dir (large files with names likecore.<number>, these can be deleted).
For example, to request 20 GB of RAM:
#!/bin/bash
#SBATCH --mem=20G
3.5 --output: Slurm log files
As we saw above, by default, all output from a script that would normally be printed to screen will end up in a Slurm log file when we submit the script as a batch job. This file will be created in the directory from which you submitted the script, and will be called slurm-<job-number>.out, e.g. slurm-12431942.out.
But it is possible to change the name of this file. For instance, it can be useful to include the name of the program that the script runs, so that it’s easier to recognize this file later.
We can do this with the --output option, e.g. --output=slurm-fastqc.out if we were running FastQC.
However, you’ll generally want to keep the batch job number in the file name too4. Since we won’t know the batch job number in advance, we need a trick here — and that is to use %j, which represents the batch job number:
#!/bin/bash
#SBATCH --output=slurm-fastqc-%j.out
stdout and stderr
By default, two output streams “standard output” (stdout) and “standard error” (stderr) are printed to screen and therefore also both end up in the same Slurm log file, but it is possible to separate them into different files.
Because stderr, as you might have guessed, often contains error messages, it could be useful to have those in a separate file. You can make that happen with the --error option, e.g. --error=slurm-fastqc-%j.err.
However, reality is more messy: some programs print their main output not to a file but to standard out, and their logging output, errors and regular messages alike, to standard error. Yet other programs use stdout or stderr for all messages.
I therefore usually only specify --output, such that both streams end up in that file.
3.6 --mail-type: Receive emails upon completion or error
TBA
4 In closing: making sure your jobs ran successfully
Overall strategy to monitor your batch jobs — we’ll get some practice with this in the next few sessions!
Check the queue (with
squeue) or check for Slurm log files (withls) to see whether your job(s) have started.Once the jobs are no longer listed in the queue, they will have finished: either successfully or because of an error.
When you’ve submitted many jobs that run the same script for different samples, carefully read the full Slurm log file for at least 1 one of them.
Then, check whether you have the expected number of output files produced by the script or the program your script ran, like processed FASTQ files. It’s also good to check whether they all have at least non-zero file sizes with
ls -lh.The combination of using strict Bash settings (
set -euo pipefail) and printing a line that marks the end of the script (echo "Done with script") makes it easy to spot scripts that somehow failed, because they won’t have that marker line at the end of the Slurm log file. We’ll see next week how you can quickly check this even when you have a whole bunch of log files.Using
mail-type=FAILwill also make it easy to detect failed jobs, especially in cases where you submitted say 100+ jobs and only one or a few of those failed. Avoid having Slurm send you emails upon regular completion (mail-type=ALL/mail-type=END) except for jobs that run for hours, otherwise you will get inundated with emails and will quickly srart ignoring them.
At-home reading: sbatch option overview & interactive jobs
Table with sbatch options
This includes all the discussed options, and a couple more useful ones:
| Resource/use | short | long | default |
|---|---|---|---|
| Project to be billed | -A PAS0471 |
--account=PAS0471 |
N/A |
| Time limit | -t 4:00:00 |
--time=4:00:00 |
1:00:00 |
| Nr of nodes | -N 1 |
--nodes=1 |
1 |
| Nr of cores | -c 1 |
--cpus-per-task=1 |
1 |
| Nr of “tasks” (processes) | -n 1 |
--ntasks=1 |
1 |
| Nr of tasks per node | - | --ntasks-per-node |
1 |
| Memory limit per node | - | --mem=4G |
(4G) |
| Log output file (%j = job number) | -o |
--output=slurm-fastqc-%j.out |
|
| Error output (stderr) | -e |
--error=slurm-fastqc-%j.err |
|
| Job name (displayed in the queue) | - | --job-name=fastqc |
|
| Partition (=queue type) | - | --partition=longserial --partition=hugemem |
|
| Get email when job starts, ends, fails, or all of the above |
- | --mail-type=START --mail-type=END --mail-type=FAIL --mail-type=ALL |
|
| Let job begin at/after specific time | - | --begin=2021-02-01T12:00:00 |
|
| Let job begin after other job is done | - | --dependency=afterany:123456 |
Interactive shell jobs
Interactive shell jobs will grant you interactive shell access on a compute node. Working in an interactive shell job is operationally identical to working on a login node as we’ve been doing so far, but the difference is that it’s now okay to use significant computing resources. (How much and for how long depends on what you reserve.)
Using srun
A couple of different commands can be used to start an interactive shell job. I prefer the general srun command5, which we can use with --pty /bin/bash added to get an interactive Bash shell.
srun --account=PAS0471 --pty /bin/bashsrun: job 12431932 queued and waiting for resources
srun: job 12431932 has been allocated resources
[…regular login info, such as quota, not shown…]
[jelmer@p0133 PAS0471]$
There we go! First some Slurm scheduling info was printed to screen: initially, the job was queued, and then it was “allocated resources”: that is, computing resources such as a compute node were reserved for the job. After that:
The job starts and because we’ve reserved an interactive shell job, a new Bash shell is initiated: for that reason, we get to see our regular login info once again.
We have now moved to the compute node at which our interactive job is running, so you should have a different
pnumber in your prompt (And if you were on a login node before -but this is never the case if you are running VS Code through OnDemand-, your prompt switched from something like[jelmer@pitzer-login04 PAS0471]$).
Footnotes
Other options:
sallocworks almost identically tosrun, whereassinteractiveis an OSC convenience wrapper but with more limited options.↩︎Even though technically, one CPU often contains multiple cores.↩︎
Even though technically, one core often contains multiple threads.↩︎
For instance, we might be running the FastQC script multiple times, and otherwise those would all have the same name and be overwritten.↩︎
Other options:
sallocworks almost identically tosrun, whereassinteractiveis an OSC convenience wrapper but with more limited options.↩︎