#!/bin/bash
set -euo pipefail
first_name=$1
last_name=$2
echo "This script will print a first and a last name"
echo "First name: $first_name"
echo "Last name: $last_name"
# (Note: this is a script. Don't enter this directly in your terminal.)Shell Scripting
Overview & setting up
Shell scripts enable us to run sets of commands non-interactively, which is useful:
When a set of commands takes a long time to run and/or should be run many times.
To help keep our code clean and clear by using separate scripts for individual parts of our analysis pipeline.
To run our analyses as Slurm batch jobs at OSC, which will for instance to allow us to run analyses simultaneously for different samples.
Scripts form the basis for analysis pipelines and if we code things cleverly, it should be straightforward to rerun much of our project workflow after removing or adding some samples, with different parameter settings, and possibly even for an entirely different dataset.
Start VS Code and open your folder
As always, we’ll be working in VS Code — if you don’t already have a session open, see below how to do so.
Make sure to open your /fs/ess/PAS0471/<user>/rnaseq_intro dir, either by using the Open Folder menu item, or by clicking on this dir when it appears in the Welcome tab.
Starting VS Code at OSC - with a Terminal (Click to expand)
Log in to OSC’s OnDemand portal at https://ondemand.osc.edu.
In the blue top bar, select
Interactive Appsand then near the bottom of the dropdown menu, clickCode Server.In the form that appears on a new page:
- Select an appropriate OSC project (here:
PAS0471) - For this session, select
/fs/ess/PAS0471as the starting directory - Make sure that
Number of hoursis at least2 - Click
Launch.
- Select an appropriate OSC project (here:
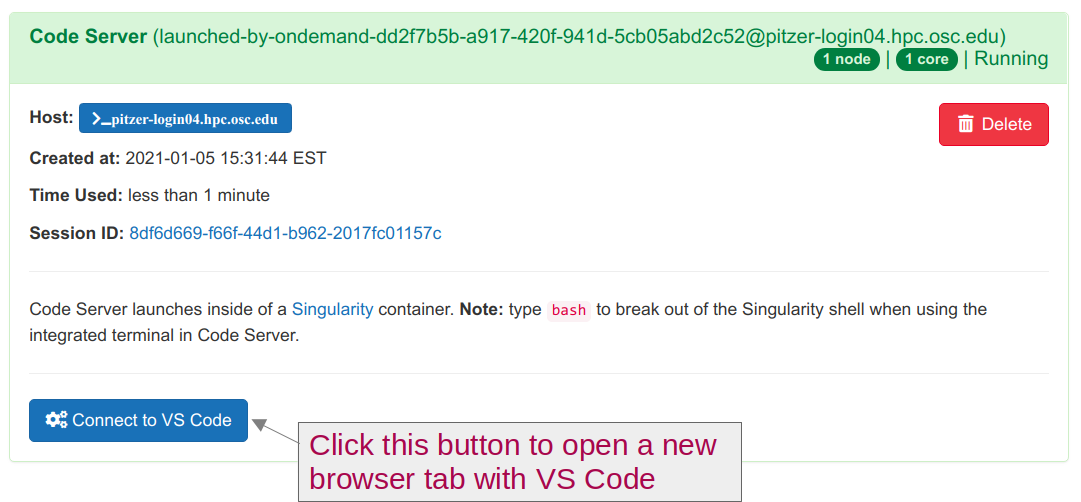
On the next page, once the top bar of the box has turned green and says
Runnning, clickConnect to VS Code.
Open a Terminal by clicking =>
Terminal=>New Terminal. (Or use one of the keyboard shortcuts: Ctrl+` (backtick) or Ctrl+Shift+C.)In the
Welcometab underRecent, you should see your/fs/ess/PAS0471/<user>/rnaseq_introdir listed: click on that to open it. Alternatively, use =>File=>Open Folderto open that dir in VS Code.
Don’t have your own dir with the data? (Click to expand)
If you missed the last session, or deleted your rnaseq_intro dir entirely, run these commands to get a (fresh) copy of all files you should have so far:
mkdir -p /fs/ess/PAS0471/$USER/rnaseq_intro
cp -r /fs/ess/PAS0471/demo/202307_rnaseq /fs/ess/PAS0471/$USER/rnaseq_intro
And if you do have an rnaseq_intro dir, but you want to start over because you moved or removed some of the files while practicing, then delete the dir before your run the commands above:
rm -r /fs/ess/PAS0471/$USER/rnaseq_introYou should have at least the following files in this dir:
/fs/ess/PAS0471/demo/202307_rnaseq
├── data
│   └── fastq
│       ├── ASPC1_A178V_R1.fastq.gz
│       ├── ASPC1_A178V_R2.fastq.gz
│       ├── ASPC1_G31V_R1.fastq.gz
│       ├── ASPC1_G31V_R2.fastq.gz
│       ├── md5sums.txt
│       ├── Miapaca2_A178V_R1.fastq.gz
│       ├── Miapaca2_A178V_R2.fastq.gz
│       ├── Miapaca2_G31V_R1.fastq.gz
│       └── Miapaca2_G31V_R2.fastq.gz
├── metadata
│   └── meta.tsv
└── README.md
│   └── ref
│       ├── GCF_000001405.40.fna
│       ├── GCF_000001405.40.gtf
1 A basic shell script
1.1 Our first script
We’ll be writing our shell scripts in the editor pane of VS Code. To create our first one, open a new file in the VS Code editor ( => File => New File) and save it as printname.sh within the sandbox dir (shell scripts most commonly have the extension .sh).
Then, type or paste the following inside the script in your editor pane (and not in the terminal):
echo "This script will print a first and a last name"
Auto Save in VS Code
Any changes you make to this and other files in the editor pane should be immediately, automatically saved by VS Code. If that’s not happening for some reason, you should see an indication of unsaved changes like a large black dot next to the script’s file name in the editor pane tab header (if that’s the case, see the box below on how to fix this).
Auto Save not happening? (Click to expand)
If the file is not auto-saving, you can always save it manually (including with Ctrl/Cmd+S) like you would do in other programs.
However, it may be convenient to turn Auto Save on: press Ctrl/Cmd+Shift+S to open the Command Palette and type “Auto Save”. You should see an option “Toggle Auto Save”: click on that.
Shell scripts mostly contain the same regular Unix shell (specifically, Bash shell) code that we have gotten familiar with, but have so far directly typed in the terminal. As such, our single line with an echo command already consitutes a functional shell script! One way of running the script is by typing bash followed by the path to the script:
bash sandbox/printname.shThis script will print a first and a last nameThat worked! Although of course, the script doesn’t yet print any names like it “promises” to do, but we will add that functionality in a little bit.
First, though, we’ll learn about two header lines that are good practice to add to every shell script.
1.2 Shebang line
We use a so-called “shebang” line as the first line of a script to indicate which language our script uses. More specifically, this line tell the computer where to find the binary (executable) that will run our script.
Such a line starts with #!, basically marking it as a special type of comment. After that, we provide the location to the relevant program: in our case Bash (which is the specific type of shell we are using), which itself is just a program with a binary (executable) file that is located at /bin/bash on Linux and Mac computers.
#!/bin/bashWhile not always strictly necessary, adding a shebang line to every shell script is good practice, especially when we want to submit our script to OSC’s Slurm queue.
1.3 Shell script settings
Another boilerplate line that is good practice to add to your shell scripts will change some default Bash settings to safer alternatives.
Bad default shell settings
The following two default settings of the Bash shell are bad ideas inside scripts:
First, as we’ve seen previously, when you reference a variable that does not exist, the shell will just replace that with nothing, and will not complain:
echo "Hello, my name is $myname ..."Hello, my name is ...In scripts, this can lead to all sorts of downstream problems, because you very likely tried and failed to do something with an existing variable (e.g. you misspelled its name, or forgot to assign it altogether). Even more problematically, this can lead to potentially very destructive file removal, as the box below illustrates.
Accidental file removal with unset variables (Click to expand)
The shell’s default behavior of ignoring (instead of giving an error) the referencing of unset variables can make you accidentally remove files as follows — and this is especially likely to happen inside scripts where we more commonly use variables and are not working interactively:
Using a variable, we try to remove some temporary files whose names start with
tmp_:temp_prefix="temp_" rm "$tmp_prefix"* # DON'T TRY THIS!Using a variable, we try to remove a temporary directory:
tempdir=output/tmp

rm -r $tmpdir/*      # DON'T TRY THIS!
Above, the text specified the intent of the commands. What would have actually happened?
In both examples, there is a similar typo: temp vs. tmp, which means that we are referencing a (likely) non-existent variable.
In the first example,
rm "$tmp_prefix"*would have been interpreted asrm *, because the non-existent variable is simply ignored. Therefore, we would have removed all files in the current working directory.In the second example, along similar lines,
rm -rf $tmpdir/*would have been interpreted asrm -rf /*. Horrifyingly, this would attempt to remove the entire filesystem: recall that a leading/in a path is a computer’s root directory. (-rmakes the removal recursive and-fmakes forces removal).
Before you get too scared of creating terrible damage, note that at OSC, you would not be able to remove any essential files (and more generally, any files that are not yours unless you’ve explicitly been given permission for this), since you don’t have the permissions to do so. On your own computer, this could be more genuinely dangerous, though even there, you would not be able to remove operating system files without specifically requesting “admin” rights.
Second, a Bash script keeps running after encountering errors. That is, if an error is encountered when running, say, line 2 of a script, any remaining lines in the script will nevertheless be executed.
In the best case, this is a waste of computer resources, and in worse cases, it can lead to all kinds of unintended consequences. Additionally, if your script prints a lot of output, you might not notice an error somewhere in the middle if it doesn’t produce more errors downstream. But the downstream results from what we at that point might call a “zombie script” can still be completely wrong.
Safer settings
The following three settings will make your Bash scripts more robust and safer. With these settings, the script terminates1 if:
set -u— An unset (non-existent) variable is referenced.set -e— Almost any error occurs.set -o pipefail— An error occurs in a shell “pipeline” (e.g.,sort | uniq).
We can change all of these settings in one line in a script:
set -e -u -o pipefail # (For in a script - don't run in the terminal)Or even more concisely:
set -euo pipefail # (For in a script - don't run in the terminal)1.4 Adding the header lines to our script
Let’s add these lines to our printname.sh script, so it will now contain the following:
#!/bin/bash
set -euo pipefail

echo "This script will print a first and a last name"
And let’s run it again:
bash sandbox/printname.shThis script will print a first and a last nameThat didn’t change anything to the output, but at least we confirmed that the script still works.
Running the script without using the
bash command (Click to expand)
Because our script has a shebang line, we have taken one step towards being able to execute the script without the bash command, simply using:
sandbox/printname.sh(Or if the script was in our current working dir, using ./printname.sh. In that case the ./ is necessary to make it explicit that we are referring to a file name: otherwise, when running just printname.sh, the shell would look for a command or program of that name, and wouldn’t be able to find it.)
However, this would also require us to “make the script executable”, which is beyond the scope of this material. But I’m mentioning it here because you might see this way of running scripts being used elsewhere.
2 Command-line arguments for scripts
2.1 Calling a script with arguments
When you call a script to run it, you can pass command-line arguments to it, such as a file to operate on.
This is much like when you provide a command like ls with arguments:
# Run ls without arguments:
ls

# Pass 1 filename as an argument to ls:
ls data/sampleA.fastq.gz

# Pass 2 filenames as arguments to ls, separated by spaces:
ls data/sampleA.fastq.gz data/sampleB.fastq.gz

# (No need to run any of this, they are just syntax examples)
And here is what it looks like to pass arguments to scripts:
# Run scripts without any arguments:
bash fastqc.sh                            # (Fictional script)
bash sandbox/printname.sh

# Run scripts with 1 or 2 arguments:
bash fastqc.sh data/sampleA.fastq.gz      # 1 argument, a filename
bash sandbox/printname.sh John Doe        # 2 arguments, strings representing names

# (No need to run any of this, they are just syntax examples)
In the next section, we’ll see what happens inside the script with the arguments we pass to it.
2.2 Placeholder variables
Inside the script, any command-line arguments that you pass to it are automatically available in “placeholder” variables. Any first argument will be assigned to the variable $1, any second argument will be assigned to $2, any third argument will be assigned to $3, and so on.
In the calls to fastqc.sh and printname.sh above, what are the placeholder variables and their values?
In
bash fastqc.sh data/sampleA.fastq.gz, a single argument,data/sampleA.fastq.gz, is passed to the script, and will be assigned to$1.In
bash sandbox/printname.sh John Doe, two arguments are passed to the script: the first one (John) will be stored in$1, and the second one (Doe) in$2.
However, these placeholder variables are not automagically used — the arguments passed to a script are merely made available in these variables. So, unless we explicitly include code in the script to do something with these variables, nothing else happens.
Therefore, let’s add some code to our printname.sh script to “process” any first and last name that are passed to the script. For now, our script will simply echo the placeholder variables, so that we can see what happens:
#!/bin/bash
set -euo pipefail

echo "This script will print a first and a last name"
echo "First name: $1"
echo "Last name: $2"

# (Note: this is a script. Don't enter this directly in your terminal.)
Next, we’ll run the script, passing the arguments John and Doe:
bash sandbox/printname.sh John DoeThis script will print a first and a last name
First name: John
Last name: DoeOn Your Own: Command-line arguments
In each case below, think about what might happen before you run the script. Then, run it, and if you didn’t make a successful prediction, try to figure out what happened instead.
Run the script (
sandbox/printname.sh) without passing arguments to it. (Keep in mind that we have theset -euo pipefailline in the script.)Deactivate (“comment out”) the line with
setsettings by inserting a#as the first character of that line. Then, run the script again without passing arguments to it.Double-quote
John Doewhen you run the script, i.e. runbash sandbox/printname.sh "John Doe"
To get back to where we were, remove the # you inserted in the script in step 2 above.
Solutions
- The script will error out because we are referencing variables that don’t exist: since we didn’t pass command-line arguments to the script, the
$1and$2have not been set.
bash sandbox/printname.shprintname.sh: line 4: $1: unbound variable
- The script will run in its entirety and not throw any errors, because we are now using default Bash settings such that referencing non-existent variables does not throw an error. Of course, no names are printed either, since we didn’t specify any:
bash sandbox/printname.shecho "First name:"
echo "Last name:"Being commented out, the set line should read:
#set -euo pipefail- Because we are quoting
"John Doe", both names are passed as a single argument and both names end up in$1, the “first name”:
bash sandbox/printname.sh "John Doe"echo "First name: John Doe"
echo "Last name:"2.3 Copying placeholders to variables with descriptive names
While you can use the $1-style placeholder variables throughout your script, I find it very useful to copy them to more descriptively named variables as follows:
Using descriptively named variables in your scripts has several advantages. It will make your script easier to understand for others and for yourself. It will also make it less likely that you make errors in your script in which you use the wrong variable in the wrong place.
Other variables that are automatically available inside scripts
$0contains the script’s file name$#contains the number of command-line arguments passed to the script
On Your Own: A script to print a specific line
Write a script that prints a specific line (identified by line number) from a file.
- Open a new file and save it as
sandbox/printline.sh - Start with the shebang and
setlines - Your script takes two arguments: a file name (
$1) and a line number ($2) - Copy the
$1and$2variables to descriptively named variables - To print a specific line, think how you might combine
headandtailto do this. If you’re at a loss, feel free to check out the top solution box. - Test the script by printing line 4 from
metadata/meta.tsv.
Solution: how to print a specific line number (Click to expand)
For example, to print line 4 of metadata/meta.tsv directly:
head -n 4 metadata/meta.tsv | tail -n 1How this command works:
head -n 4 metadata/meta.tsvwill print the first 4 lines ofmetadata/meta.tsv- We pipe those 4 lines into the
tailcommand - We ask
tailto just print the last line of its input, which will in this case be line 4 of the original input file.
Full solution (Click to expand)
#!/bin/bash
set -euo pipefail

input_file=$1
line_nr=$2

head -n "$line_nr" "$input_file" | tail -n 1
To run the script and make it print the 4th line of meta.tsv:
bash sandbox/printline.sh metadata/meta.tsv 4ASPC1_G31V ASPC1 G31V3 Script variations and enhancements
In this section, we will change our printline.sh script and a similar small utility script to make their behavior more like scripts that run a bioinformatics program: the script’s main output will end up in a file, but it prints extensive “logging” notes to the screen, so we can monitor what we’re doing.
3.1 A script to serve as a starting point
We’ve learned that the head command prints the first lines of a file, whereas the tail command prints the last lines. Sometimes it’s nice to be able to quickly see “both ends” of a file, so let’s write a little script that can do that for us, as a starting point for the next few modifications.
Open a new file, save it as sandbox/headtail.sh, and add the following code to it:
#!/bin/bash
set -euo pipefail

input_file=$1

# Print the first and last 2 lines of a file, separated by a line with "---"
head -n 2 "$input_file"
echo "---"
tail -n 2 "$input_file"

# (Note: this is a script. Don't enter this directly in your terminal.)
Next, let’s run our headtail.sh script:
bash sandbox/headtail.sh metadata/meta.tsvsample_id cell_line variant
ASPC1_A178V ASPC1 A178V
---
Miapaca2_G31V Miapaca2 G31V
Miapaca2_G31V Miapaca2 G31V3.2 Redirecting output to a file
So far, the output of our scripts was printed to screen:
- In
printname.sh, we simplyecho’d, inside sentences, the arguments passed to the script. - In
headtail.sh, we printed the first and last few lines of a file with theheadandtailcommands.
All this output was printed to screen because that is the default output mode of Unix commands, and this works the same way regardless of whether those commands are typed and run interactively in the shell, or are run inside a script.
Along those same lines, we have already learned that we can “redirect” output to a file using > (write/overwrite) and >> (append) when we run shell commands — and this, too, works exactly the same way inside a script.
When working with genomics data, we commonly have files as input, and new/modified files as output. Let’s practice with this and modify our headtail.sh script so that it writes output to a file.
We’ll make the following changes:
We will have the script accept a second argument: the output file name2.
We will redirect the output of our
head,echo, andtailcommands to the output file. We’ll have to append (using>>) in the last two commands.
#!/bin/bash
set -euo pipefail

input_file=$1
output_file=$2

# Print the first and last 2 lines of a file, separated by a line with "---"
head -n 2 "$input_file" > "$output_file"
echo "---" >> "$output_file"
tail -n 2 "$input_file" >> "$output_file"

# (Note: this is a script. Don't enter this directly in your terminal.)
Now we run the script again, this time also passing the name of an output file:
bash sandbox/headtail.sh metadata/meta.tsv sandbox/samples_headtail.txtThe script will no longer print any output to screen, and our output should instead be in sandbox/samples_headtail.txt:
# Check that the file exists and was just modified:
ls -lh sandbox/samples_headtail.txt
-rw-r--r-- 1 jelmer PAS0471 112 Aug 16 16:45 sandbox/samples_headtail.txt# Print the contents of the file to screen
cat sandbox/samples_headtail.txtsample_id cell_line variant
ASPC1_A178V ASPC1 A178V
---
Miapaca2_G31V Miapaca2 G31V
Miapaca2_G31V Miapaca2 G31V3.3 Report what’s happening
It is often useful to have your scripts “report” or “log” what is going on. Let’s keep thinking about a script that has one or more files as its main output (again, like most bioinformatics programs do). But instead of having no output printed to screen at all, we’ll print some logging output to screen. For instance:
- At what date and time did we run this script
- Which arguments were passed to the script
- What are the output files
- Perhaps even summaries of the output.
All of this can help with troubleshooting and record-keeping3. Let’s try this with our headtail.sh script.
#!/bin/bash
set -euo pipefail

# Copy placeholder variables
input_file=$1
output_file=$2

# Initial logging
echo "# Starting script headtail.sh" # Print name of script
date                                 # Print date & time
echo "# Input file:   $input_file"
echo "# Output file:  $output_file"
echo                                 # Empty line to separate initial & final logging

# Print the first and last 2 lines of a file, separated by a line with "---"
head -n 2 "$input_file" > "$output_file"
echo "---" >> "$output_file"
tail -n 2 "$input_file" >> "$output_file"

# Final logging
echo "# Listing the output file:"
ls -lh "$output_file"
echo "# Done with script headtail.sh"
date

# (Note: this is a script. Don't enter this directly in your terminal.)
A couple of notes about the lines that were added to the script above:
Running
dateat the end of the script (as well as at the beginning) allows you to check for how long the script ranPrinting the input and output files (and the command-line arguments more generally) can be particularly useful for troubleshooting
We printed a “marker line” like
Done with script, indicating that the end of the script was reached. This is handy due to oursetsettings: seeing this line printed means that no errors were encountered.I also added some comment lines like “Initial logging” to make the script easier to read, and such comments can be made more extensive to really explain what is being done.
Let’s run the script again:
bash sandbox/headtail.sh metadata/meta.tsv sandbox/tmp.txt# Starting script sandbox/headtail.sh
Wed Aug 16 21:12:28 EDT 2023
# Input file: metadata/meta.tsv
# Output file: sandbox/tmp.txt
# Listing the output file:
-rw-r--r-- 1 jelmer PAS0471 112 Aug 16 21:12 sandbox/tmp.txt
# Done with script sandbox/headtail.sh
Wed Aug 16 21:12:28 EDT 2023The script printed some details for the output file, but not its contents. Let’s take a look at the output file, though, to make sure the script worked:
cat sandbox/tmp.txtsample_id cell_line variant
ASPC1_A178V ASPC1 A178V
---
Miapaca2_G31V Miapaca2 G31V
Miapaca2_G31V Miapaca2 G31Vecho, echo?
The extensive logging output (echo statements) may seem silly for our little headtail.sh script, and it is at some level: a tiny utility script like this would ideally work much like a regular Unix shell command, and just print the main output and no logging output.
However, this kind of fairly extensive logging is in fact useful when running scripts that execute long-running bioinformatics programs, and can eventually be a time-saver because it makes it easier to spot problems and helps with record-keeping. This is especially true for long-running scripts, or scripts that you often reuse and perhaps share with others.
On Your Own: A fanciful script
Modify your printline.sh script to:
- Redirect the main output (the printed line) to a file
- The name of this output file should not be “hardcoded” in the script, but should be passed as an argument to the script, like we did above with
headtail.sh - Add a bit of logging —
echostatements,date, etc, similar to what we did above withheadtail.sh - Add some comments to describe what the code in the script is doing
The original
printline.sh script (Click to expand)
cat sandbox/printline.sh#!/bin/bash
set -euo pipefail
input_file=$1
line_nr=$2
head -n "$line_nr" "$input_file" | tail -n 1
(One possible) solution (Click to expand)
#!/bin/bash
set -euo pipefail

# Copy placeholder variables
input_file=$1
output_file=$2
line_nr=$3

# Initial logging
echo "# Starting script printline.sh"
date
echo "# Input file:   $input_file"
echo "# Output file:  $output_file"
echo "# Line number:  $line_nr"
echo

# Print 1 specific line from the input file and redirect to an output file
head -n "$line_nr" "$input_file" | tail -n 1 > $output_file

# Final logging
echo "# Listing the output file:"
ls -lh "$output_file"
echo "# Done with script printline.sh"
date
To run the script with the additional argument:
bash sandbox/printline.sh metadata/meta.tsv sandbox/meta_line.tsv 4# Starting script printline.sh
Wed Aug 16 21:27:48 EDT 2023
# Input file: metadata/meta.tsv
# Output file: sandbox/meta_line.tsv
# Line number: 4
# Listing the output file:
-rw-r--r-- 1 jelmer PAS0471 22 Aug 16 21:27 sandbox/meta_line.tsv
# Done with script printline.sh
Wed Aug 16 21:27:48 EDT 2023Footnotes
With an appropriate error message↩︎
Of course, we could also simply write the output to a predefined (“hardcoded”) file name such as
out.txt, but in general, it’s better practice to keep this flexible via an argument.↩︎We’ll see in the upcoming Slurm module that we when submit scripts to the OSC queue (rather than running them directly), the output of scripts that is normally printed to screen, will instead go to a sort of “log” file. So, your script’s reporting will end up in this file.↩︎