The Unix Shell - Part II
Working with files and directories
Overview & setting up
In this session, we will continue learning about the Unix shell. Specifically, we will focus on:
- Commands for file and directory organization, such as copying, moving, renaming, and deleting
- Selecting multiple files with wildcards (“globbing”)
- Viewing text files
- Redirecting the output of commands to files
- Keyboard shortcuts, counting lines, and environment variables
As always, we’ll be working in VS Code — if you don’t already have a session open, see below how to do so.
- Log in to OSC’s OnDemand portal at https://ondemand.osc.edu.
- In the blue top bar, select
Interactive Appsand then near the bottom of the dropdown menu, clickCode Server. - In the form that appears on a new page:
- Select an appropriate OSC project (here:
PAS0471) - For this session, select
/fs/ess/PAS0471as the starting directory - Make sure that
Number of hoursis at least2 - Click
Launch.
- Select an appropriate OSC project (here:
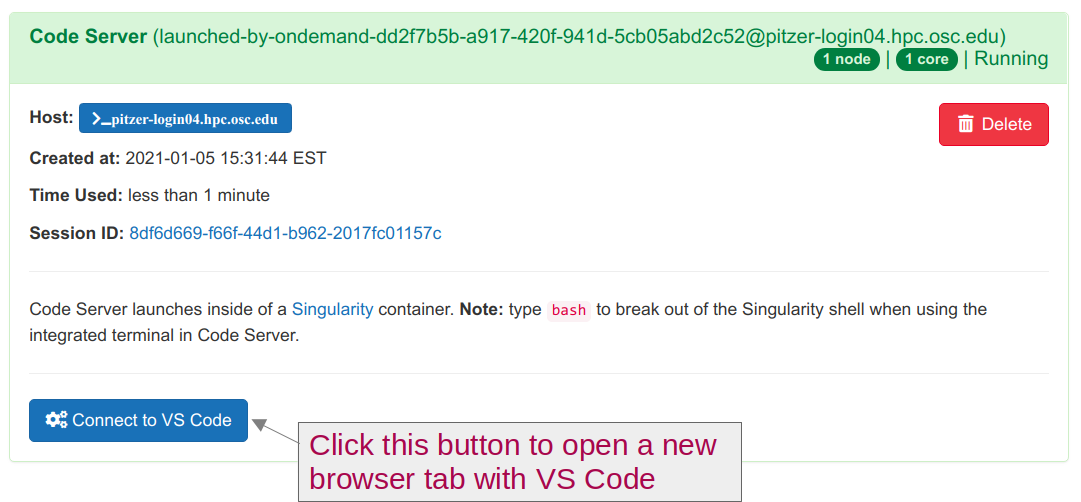
- On the next page, once the top bar of the box has turned green and says
Runnning, clickConnect to VS Code.
- Open a Terminal by clicking =>
Terminal=>New Terminal. (Or use one of the keyboard shortcuts: Ctrl+` (backtick) or Ctrl+Shift+C.) - For now, your working directory doesn’t matter — we’ll change it in a bit.
1 Some commands and features to get you up to speed
We’ll start with a few miscellaneous shell commands and features that we’ll either use again later on in today’s session, or that are just good to know about sooner rather than later.
1.1 Counting lines with wc -l
The wc (short for wordcount) command can count things like the number of characters, words, and lines in a text file. Getting a line count for files is often especially useful, certainly for genomic data files: for example, the number of reads in a FASTQ file is simply the number of lines divided by 4, and other file types like GFF (an annotation format) have one entry per line.
To get just the line count, we should use the -l option of wc — let’s count the number of lines in the metadata file in /fs/ess/PAS0471/demo/202307_rnaseq/:
wc -l /fs/ess/PAS0471/demo/202307_rnaseq/metadata/meta.tsv9 /fs/ess/PAS0471/demo/202307_rnaseq/metadata/meta.tsv1.2 Keyboard shortcuts
Using keyboard shortcuts can make your life in the Unix shell a lot easier. Below, we’ll see a couple particularly useful ones. For more, see the keyboard shortcuts reference page on this website.
Command history & faster cursor movement
It’s common to re-execute command line expressions, and even more common to make slight changes to a previously executed one. To cycle through your command history and retrieve previous commands1 you can ⇧ and ⇩.
If you hit the ⇧ (up arrow) once, you’ll get your most recent command, and if you keep hitting it, you’ll go further back. The⇩ (down arrow) will go the other way: towards the present.
For example, say that we wanted to see what the output of the wc command is when we omit the -l option. At the prompt, press ⇧ once to retrieve your previous wc command. Then, edit it to remove the -l, and press Enter:
wc /fs/ess/PAS0471/demo/202307_rnaseq/metadata/meta.tsv9 27 236 /fs/ess/PAS0471/demo/202307_rnaseq/metadata/meta.tsvA few other tips while you’re trying this — perhaps practice this a few times:
To execute a command, you can press Enter regardless of where your cursor is on the line; it does not need to be at the end of the line.
After pressing ⇧, you needed to move to almost the beginning of the line to make your edit (removing
-l). There are two ways to speed up your cursor movements:If you keep Ctrl (Windows) or Option (Mac) pressed while using the left (and right) arrows to move your cursor on the line, you will move one “word”, rather than one character, at a time!
If you press Ctrl+A, you will move all the way to the beginning of the line (and Ctrl+E will move you to the end of the line).
Use man wc or wc --help to figure out what the three counts mean
Solution
The three numbers returned by wc when we don’t give it any options are: the number of lines, words, and bytes, respectively.
wc -c.
Cancel and kill
It is also common to want to cancel a running command or get out of a “hanging” prompt, and you can do so with Ctrl+C.
If you accidentally omit a file name with a command like wc that requires an argument2, something odd happens — you move to a new line in the terminal but don’t get your regular prompt back; it appears to “hang”. Try it:
wcTo get out of this, press Ctrl+C to cancel the partial command, and get your prompt back. There are several other ways you might accidentally try to execute incomplete commands, such as forgetting to close parentheses or quotes, and in some cases, you don’t even know what the problem is. Just press Ctrl+C and then take a close look at your command to find the problem.
Another type of situation where Ctrl+C is useful is when you execute a command that does actually run, but you realize, for example, that there is a mistake in the command (wrong input file!), or that the command will take way too long to run interactively. Ctrl+C will then “kill” (cancel) the running process. A somewhat silly example is the sleep command, which you can use to make the computer wait between successive commands:
# This will "run" for 60 seconds, after which you get your prompt back
sleep 60s
# Press Ctrl + C to get your prompt back sooner!^C1.3 Environment variables and the echo command
In computer languages, “variables” store information. When we reference a shell variable to retrieve its value, we have to put a $ in front of its name (unlike in say R or Python) — for instance, we reference a variable with the name x as $x3.
In later sessions, we’ll see how we can create our own variables, and we will be using these a lot! But the Unix shell also has a number of pre-existing variables, which are called environment variables and have ALL-CAPS names. For example, the variable $HOME contains the path to your Home directory, and the variable $USER contains your username.
How can we examine the value of variables? Just typing, e.g., $USER at the prompt will not work: as pointed out in the previous session, every command line expression should start with a command, and a variable is not a command. Instead, we should use the echo command, which simply prints whatever text you give it:
# You don't have to use quotes (" "), at least here, but it's good practice
echo "Hello there"
Hello thereWe’ll also be using the echo command a lot, such as by letting our shell scripts report progress and the values of variables. If we use echo with a(n environment) variable like $USER, the variable’s value will be printed:
# The shell will replace $USER by its value, so echo will just see 'jelmer'
echo "$USER"jelmerYour Turn: echo and environment variables
Print “Hello there <user>” to the screen
(i.e.,<user>should be replaced by your actual username).Use an environment variable mentioned above to move to your Home directory, and then move back to where you were (as seen last time).
Hints for the second question (click here)
Recall from the previous session that:
- The command
cdwill change your working directory cd -will move back to your previous directory
Solutions (click here)
- Print “Hello there <user>” to the screen:
# (This would also work without the " " quotes)
echo "Hello there $USER"
Hello there jelmer- Use an environment variable to move to your Home directory, check that it worked, then move back to where you were:
# Move to your Home directory
cd $HOME

# Print the working directory
pwd
#> /users/PAS0471/jelmer

# Move back to your previous working directory
cd -
2 Commands for file organization
Below, we’ll learn about the key commands for directory and file organization: mkdir (create dirs), cp (copy), mv (move and rename), and rm (remove). But first off, why do we need to learn this when VS Code and the OnDemand website itself have file browsers with this kind of functionality?
- We’ll regularly want to use these commands non-interactively in our shell scripts
- These commands are often a more efficient way to organize files
- They provide a good way to get more familiar with the Unix shell and how Unix commands work
- It’s good to know these basics and be prepared for situations where you do not have access to OnDemand/VS Code.
2.1 Create dirs with mkdir (and files with touch)
The mkdir command creates new directories: you can give it one or more arguments to create one or more directories. Create one for yourself, with your username, in /fs/ess/PAS0471:
mkdir /fs/ess/PAS0471/$USERNow, move to that directory:
cd /fs/ess/PAS0471/$USERNext, we’ll create a directory for these introductory sessions and go there:
mkdir rnaseq_intro
cd rnaseq_intro       # Use Tab completion
Let’s switch VS Code to this directory: click => File => Open Folder, and select /fs/ess/PAS0471/<user>/rnaseq_intro. You’ll have to open a Terminal window again, too.
/fs/ess/PAS0471/<user>/rnaseq_intro (with <user> replaced by your username) is going to be your working dir for upcoming sessions too, so you should always open/reload VS Code in that dir.
Finally, let’s make several dirs at once — this is how I usually structure my research project directories:
mkdir data metadata results scripts sandboxRecursive mkdir
By default, mkdir does not work recursively: it will refuse to make a dir inside a dir that does not (yet) exist. And if you try to do so, the resulting error might confuse you:
mkdir sandbox/2023/08mkdir: cannot create directory ‘sandbox/2023/08’: No such file or directoryWhy won’t you do your job,
mkdir!?
Instead, we need to use the -p option to mkdir:
mkdir -p sandbox/2023/08In general, Unix commands are designed to be powerful and to do exactly what you asked, but non-recursive default behaviors (we will see this with the commands to copy (cp) and delete (rm) files as well) are an exception to this. We can assume that the developers thought that recursive default behaviors were just too risky.
-p will also suppress any errors (Click to expand)
The -p also changes mkdir’s behavior when you try to create a dir that already exists.
By default, it will give an error:
# Note: we (should have) just created this dir above, so it already exists
mkdir sandbox/2023/08
mkdir: cannot create directory ‘sandbox/2023/08’: File existsWith -p, it doesn’t complain (but won’t do anything, like overwriting, either):
mkdir -p sandbox/2023/08 # Should not give any outputAs we’ll see later, all of this makes mkdir -p ideal for non-interactive usage in shell scripts.
Create new files with touch
As we have learned the command to make new dirs, you may be wondering what the equivalent command is to make new, empty files: it is touch.
# Create three new, empty files:
touch file1 file2 file3
This command isn’t as commonly used as mkdir because we usually create new files on the fly with command output redirection, which we’ll learn about below. But it’s certainly useful to create dummy files to practice your shell skills.4
2.2 Copy files and dirs with cp
Above, you created your own directory — now, let’s get you a copy of the partial RNAseq dataset in /fs/ess/PAS0471/demo/202307_rnaseq/ that we’ll be working with throughout these sessions.
The cp command copies files and/or directories from one location to another. It has two required arguments: what you want to copy (the source), and where you want to copy it to (the destination). So, we can summarize its basic syntax as cp <source> <destination>.
We’ll start by copying a file with some metadata on the RNAseq samples:
cp -v /fs/ess/PAS0471/demo/202307_rnaseq/metadata/meta.tsv metadata/‘/fs/ess/PAS0471/demo/202307_rnaseq/metadata/meta.tsv’ -> ‘metadata/meta.tsv’This told cp to copy the metadata file into the metadata dir you created earlier.
-v option for verbose
We used the -v option, short for verbose, to make cp tell us what it did:
- Recall that by default, Unix commands are generally silent when performing actions like this.
- But many commands have a verbose option (nearly always
-v) to make them tell us what they did, which can be very useful.
Like mkdir, cp is not recursive by default. If you want to copy a directory and all of its contents, we need to use its -r option5. We’ll use that option to copy the dir with FASTQ files:
cp -rv /fs/ess/PAS0471/demo/202307_rnaseq/data/fastq data/‘/fs/ess/PAS0471/demo/202307_rnaseq/data/fastq’ -> ‘data/fastq’
‘/fs/ess/PAS0471/demo/202307_rnaseq/data/fastq/Miapaca2_A178V_R1.fastq.gz’ -> ‘data/fastq/Miapaca2_A178V_R1.fastq.gz’
‘/fs/ess/PAS0471/demo/202307_rnaseq/data/fastq/ASPC1_G31V_R2.fastq.gz’ -> ‘data/fastq/ASPC1_G31V_R2.fastq.gz’
‘/fs/ess/PAS0471/demo/202307_rnaseq/data/fastq/ASPC1_A178V_R2.fastq.gz’ -> ‘data/fastq/ASPC1_A178V_R2.fastq.gz’
‘/fs/ess/PAS0471/demo/202307_rnaseq/data/fastq/ASPC1_G31V_R1.fastq.gz’ -> ‘data/fastq/ASPC1_G31V_R1.fastq.gz’
‘/fs/ess/PAS0471/demo/202307_rnaseq/data/fastq/ASPC1_A178V_R1.fastq.gz’ -> ‘data/fastq/ASPC1_A178V_R1.fastq.gz’
‘/fs/ess/PAS0471/demo/202307_rnaseq/data/fastq/Miapaca2_A178V_R2.fastq.gz’ -> ‘data/fastq/Miapaca2_A178V_R2.fastq.gz’
‘/fs/ess/PAS0471/demo/202307_rnaseq/data/fastq/Miapaca2_G31V_R1.fastq.gz’ -> ‘data/fastq/Miapaca2_G31V_R1.fastq.gz’
‘/fs/ess/PAS0471/demo/202307_rnaseq/data/fastq/Miapaca2_G31V_R2.fastq.gz’ -> ‘data/fastq/Miapaca2_G31V_R2.fastq.gz’Let’s get an overview of the files we now have in our rnaseq_intro dir:
tree -C # Your own output should have colors.
├── data
│ └── fastq
│ ├── ASPC1_A178V_R1.fastq.gz
│ ├── ASPC1_A178V_R2.fastq.gz
│ ├── ASPC1_G31V_R1.fastq.gz
│ ├── ASPC1_G31V_R2.fastq.gz
│ ├── Miapaca2_A178V_R1.fastq.gz
│ ├── Miapaca2_A178V_R2.fastq.gz
│ ├── Miapaca2_G31V_R1.fastq.gz
│ └── Miapaca2_G31V_R2.fastq.gz
├── metadata
│ └── meta.tsv
├── results
├── sandbox
│ └── 2023
│ └── 08
└── scripts
8 directories, 9 files2.3 Moving with mv, and general cp/mv tips
The mv command is nearly identical to the cp command, except that it:
- Moves rather than copies files and/or dirs
- Works recursively by default
We’ll use this section to learn a few more things about the usage of both these commands.
By default, both
mvandcpwill overwrite files without warning! Use the-i(forinteractive) option to make it let you confirm before overwriting anything (that option also exists forrm, where you’ll practice with it).There is no separate command for renaming, because both
cpandmvallow you to provide a different name for the target. Thus, if used as follows,mvfunctions merely as a renamer:mv meta.tsv meta_version2.tsvAnd we can move and rename at the same time as well — let’s do that to restore our original location and name for the metadata file:
mv meta_version2.tsv metadata/meta.tsvUse the
.notation for the current working dir if you want to copy/move something there:cp -v /fs/ess/PAS0471/demo/202307_rnaseq/README.md .‘/fs/ess/PAS0471/demo/202307_rnaseq/README.md’ -> ‘README.md’
cp and mv
If the destination is:
An existing dir, the file(s) will keep their original names.
Not an existing dir, the path specifies the new name of the file or dir, depending on what the source is.
However, neither command will create “additional, intermediate” directories, so
mv metadata/meta.tsv metadata/misc/meta.tsvwould not work ifmetadata/miscdoesn’t already exist.
Your Turn: Practice with mv
In which directory (in terms of a relative path from your working dir) would the FASTQ files end up with each of the following commands?
mv data/fastq data/fastq_filesmv data/fastq fastqmv data/fastq .
What if you wanted to move the FASTQ files directly into your current working directory (from data/fastq)?
(You should know how to do this 1-by-1 but we have not yet seen the special character you can use to do this for all files at once — see the hint.)
Hint for the last question (click here)
You can use the asterisk (star) symbol * to select all files in a directory.
* later. In short, it is one of a few shell wildcards used to expand to filenames, and this one specifically matches any number of any character, and as such will match all possible filenames when used by itself.)
Solutions (click here)
In which directory (in terms of relative path from your working dir) will the FASTQ files end up with each of the following commands?
mv data/fastq data/fastq_files— in the dirfastq_files(we’ve really just renamed the dirfastqtofastq_files)mv data/fastq fastq— infastq(because our source is a dir, so is the destination)mv data/fastq .— infastqalso! (we’d need the syntax shown below to move the individual files directly into our current dir)
What if you wanted to move the FASTQ files directly into your current working directory?
For one file:
mv data/fastq/ASPC1_A178V_R1.fastq.gz .For all files:
mv data/fastq/* .2.4 Intermezzo: the trouble with spaces in file names
In the Unix shell, spaces are essentially special characters that are used to separate commands, options, and arguments — with the latter often being one or more file names.
For example, one of our earlier mkdir commands, mkdir data metadata results scripts sandbox, created five separate dirs instead of one dir with four spaces in it.
Therefore, to create or refer to a file or directory name with a space in it, you need some special notation. Two different methods are available: quoting the entire file name, and “escaping” the special meaning of the space:
# Method 1: Put quotes around the entire file name:
mkdir "my new dir"

# Method 2: Escape the special meaning of spaces by preceding them with a backslash
mkdir my\ new\ dir2
Let’s see what we have now:
ls -1 # The "-1" (dash one) option to ls lists each entry on its own linedata
metadata
my new dir
my new dir2In any situation where we refer to file or dir names that contain spaces, we’ll need quotes or escaping — consider this failing command:
cd my new dirbash: cd: my: No such file or directorySimilarly, ls will fail as follows:
ls my new dirls: cannot access my: No such file or directory
ls: cannot access new: No such file or directory
ls: cannot access dir: No such file or directoryWhy does cd produce one error while ls produces three?
Solution (click here)
cd tried to move to non-existing dir my, and ignored the arguments new and dir, since it only accepts one argument.
ls accepts multiple arguments and will try to list all 3 listed items, none of which happens to exist.
Fortunately, tab completion will insert backspaces for you — type cd my and press Tab:
# After typing cd and pressing tab, the line should complete as follows:
cd my\ new\ dir

# Let's move back up:
cd ..
Nevertheless, the moral of the story is that you should always avoid spaces in file names when working at OSC. In fact, you should do so in any project that uses the Unix shell or any coding. If you need to separate words, then use underscores (_), dashes (-), and/or capitalization. For example:
mkdir my_new_dir     # "snake" case
mkdir my-new-dir     # "kebab" case
mkdir myNewDir # "camel" caseIt’s also a good idea to avoid characters other than letters, numbers, and underscores (_), dashes (-), and periods (.) in dir and file names.
Ideally, you’d only use the . to separate the extension (i.e., the abbreviation that indicates the type of file, like txt or tsv) from the rest of the file name, but it is (unfortunately) also common to use . as a “word separator” — e.g. my_file.filtered.sorted.txt.
Finally, avoid using a number as the first character in a file or dir name.
2.5 Removing files with rm
Our final command in this series is rm, which removes (deletes) files and directories.
One important thing to note upfront is that rm will permanently and irreversibly delete files without the typical “intermediate step” of placing them in a trash bin, like you are used to with your personal computer. With a healthy dosis of fear installed, let’s dive in.
To remove one or more files, you can simply pass the file names as arguments to rm as with previous commands. We will also use the -v (verbose) option to have it tell us what it did:
# This assumes you ran `touch file1 file2 file3` earlier on; do so now if needed
rm -v file1            # Remove 1 file
removed ‘file1’rm -v file2 file3 # Remove 2 filesremoved ‘file2’
removed ‘file3’(If it seems cumbersome to type a bunch of file names, we’ll see below how you can use a Shell wildcard to select many files at once.)
Recursive rm
As a safety measure, rm will by default only delete files and not directories or their contents — i.e., like mkdir and cp, it refuses to act recursively by default. To remove dirs and their contents, use the -r option:
# You should have these from 2.4 (if not, run: mkdir "my new dir" "my new dir2")
rm -r "my new dir" "my new dir2"
removed directory: ‘my new dir’
removed directory: ‘my new dir2’You should obviously be quite careful with rm -r! If you’d run it on say your personal dir within PAS0471, /fs/ess/PAS0471/<user>, after working in there for months on different projects, it would remove all of those files in one fell swoop! (Though luckily, OSC does keep backups in the project dirs.)
Preventing disaster
To make it less likely for bad things to happen, here are some measures you can take as well as a built-in feature worth pointing out:
- If you’re worried about a specific removal you are about to perform, you could use
rm -i(short forinteractive) to have remove ask you to confirm the removal of every dir and file, though this is not practical for dirs with lots of files:
# Make some files for this exercise
mkdir sandbox/remove_test
touch sandbox/remove_test/a1 sandbox/remove_test/a2 sandbox/remove_test/a3

# Now remove them interactively, press 'y' (or 'n') for every question
rm -ri sandbox/remove_test
rm: descend into directory sandbox/remove_test? y
rm: remove regular empty file sandbox/remove_test/a1’? y
rm: remove regular empty file sandbox/remove_test/a2’? y
rm: remove regular empty file sandbox/remove_test/a3’? yYou can write-protect important files, as we’ll see in the next session.
You can use
rmdirwhenever a dir you want to remove should be empty. That command will only remove empty dirs, and fails on non-empty dirs!Finally, it may be assuring to learn that you will not be able to remove other people’s files at OSC (since you do not have “write permission” for them)6. For example, the file below was created by me and you won’t be able to remove (or edit) it:
rm /fs/ess/PAS0471/demo/202307_rnaseq/README.mdrm: cannot remove ‘/fs/ess/PAS0471/demo/202307_rnaseq/README.md’: Permission denied3 Globbing with shell wildcard expansion
Shell wildcard expansion is a very useful technique to select files. Selecting files with wildcard expansion is called globbing.
3.1 Shell wildcards
In the term “wildcard expansion”, wildcard refers to a few symbols that have a special meaning: specifically, they match certain characters in file names. (We’ll see below what expansion refers to.)
Here, we’ll only talk about the most-used wildcard, *, in detail. But for the sake of completeness, I list them all below:
| Wildcard | Matches |
|---|---|
* |
Any number of any character, including nothing |
? |
Any single character |
[] and [^] |
One or none (^) of the “character set” within the brackets |
3.2 Using the * wildcard
Here are some file matching examples with * — if we are in our directory data/fastq, then:
| Pattern | Matches files whose names… | Matches in our dir |
|---|---|---|
*fastq.gz |
End in “.fastq.gz” | All files (but this patterns is useful to select files by extension) |
A* |
Start with a capital “A” | Files for the ASPC1 samples |
*_R1* |
Contain “_R1” | Files with forward reads |
* |
Anything7 | All files |
In the above, note that:
Because
*matches “zero characters” as well,A*also matches a file whose name is justA,*fastq.gzalso matches justfastq.gz, and*_R1*also matches just_R1.As a whole, the expressions with a wildcard need to match the entire filename, which is why, for example, you need
*s on both sides of_R1in the last example to match any file that contains this string.
It’s also useful to realize that wildcard expansion (e.g., the expansion of *fastq.gz to all FASTQ files in the working dir) is done by the shell itself, and not by any specific command. As a consequence, we can use shell wildcards with any command that takes file names as arguments — for example:
echo data/fastq/A*R1.fastq.gzdata/fastq/ASPC1_A178V_R1.fastq.gz data/fastq/ASPC1_G31V_R1.fastq.gzls data/fastq/A*R1.fastq.gzdata/fastq/ASPC1_A178V_R1.fastq.gz data/fastq/ASPC1_G31V_R1.fastq.gz# Note that these are line-counts of the compressed file, not reflecting the # of reads
wc -l data/fastq/A*R1.fastq.gzwc -l data/fastq/A*R1.fastq.gz
15358 data/fastq/ASPC1_A178V_R1.fastq.gz
14974 data/fastq/ASPC1_G31V_R1.fastq.gz
30332 totalYour Turn: practice with *
What pattern would you use if you wanted to select:
FASTQ files for all
A178Vsamples in our dirdata/fastqIn a fictional example (we don’t have plain FASTQ files), all gzipped (
.fastq.gz) and plain FASTQ files (.fastq) at the same time?
Solutions (click here)
data/fastq/*A178V*(We’ll need a*on either side of our pattern, because the file names neither start not end with the pattern.)data/fastq/*.fastq*(Recall that the*will also match nothing, so this will also match files whose name end in.fastq, i.e. plain FASTQ files)
For those of you who know some regular expressions from coding in e.g. R, Python, or from advanced usage of GUI-based text editors like jEdit: wildcards are conceptually similar to these, but the * and ? symbols don’t have the same meaning, and there are way fewer shell wildcards than regular expression symbols.
In particular, note that . is not a shell wildcard and thus represents a literal period when globbing.
We can also use regular expressions in the Shell, but this is functionality included in several specific commands, like grep and sed, and is not a form of shell expansion.
3.3 Everyday usage of globbing
It is very common to use globbing to move (mv), copy (cp), or remove (rm) multiple files at once.
Because a * by itself matches all files, it can for example be useful if you want to copy the entire contents of a directory into your working dir (recall the exercise in 2.3):
# You can run this if you want, but then remove the copied FASTQ files afterwards
cp data/fastq/* .
A few more globbing examples:
cp -v data/fastq/*Miapaca*_R1* . # Copy 3 FASTQ files to your working dir ‘data/fastq/Miapaca2_A178V_R1.fastq.gz’ -> ‘./Miapaca2_A178V_R1.fastq.gz’
‘data/fastq/Miapaca2_G31V_R1.fastq.gz’ -> ‘./Miapaca2_G31V_R1.fastq.gz’rm -v *fastq.gz # Remove all FASTQ files in your working dirremoved ‘Miapaca2_A178V_R1.fastq.gz’
removed ‘Miapaca2_G31V_R1.fastq.gz’In next sessions, we’ll also use globbing a lot to select files to loop over.
Globbing does not work recursively by default, so ls *fastq.gz would only return gzipped FASTQ files in your current working dir.
After running some bionformatics program, it’s relatively common to have FASTQ files in a separate directory for each sample. In cases like that, you can use ** to match any directory. For example, in the pattern below, the ** would “traverse” the fastq dir within the data dir:
ls data/**/*fastq.gzdata/fastq/ASPC1_A178V_R1.fastq.gz data/fastq/ASPC1_G31V_R1.fastq.gz data/fastq/Miapaca2_A178V_R1.fastq.gz data/fastq/Miapaca2_G31V_R1.fastq.gz
data/fastq/ASPC1_A178V_R2.fastq.gz data/fastq/ASPC1_G31V_R2.fastq.gz data/fastq/Miapaca2_A178V_R2.fastq.gz data/fastq/Miapaca2_G31V_R2.fastq.gzBut ** itself is not recursive either by default and only “traverses a single level”, so you’d need the following to list any FASTQ files that are exactly two levels deep from your current working dir:
ls **/**/*fastq.gzdata/fastq/ASPC1_A178V_R1.fastq.gz data/fastq/ASPC1_G31V_R1.fastq.gz data/fastq/Miapaca2_A178V_R1.fastq.gz data/fastq/Miapaca2_G31V_R1.fastq.gz
data/fastq/ASPC1_A178V_R2.fastq.gz data/fastq/ASPC1_G31V_R2.fastq.gz data/fastq/Miapaca2_A178V_R2.fastq.gz data/fastq/Miapaca2_G31V_R2.fastq.gzWhile this would not find them:
ls **/*fastq.gzls: cannot access **/*fastq.gz: No such file or directoryHowever, you can make ** recursive by turning on the globstar option:
shopt -s globstar     # Turn on 'globstar'

ls **/*fastq.gz
data/fastq/ASPC1_A178V_R1.fastq.gz data/fastq/ASPC1_G31V_R1.fastq.gz data/fastq/Miapaca2_A178V_R1.fastq.gz data/fastq/Miapaca2_G31V_R1.fastq.gz
data/fastq/ASPC1_A178V_R2.fastq.gz data/fastq/ASPC1_G31V_R2.fastq.gz data/fastq/Miapaca2_A178V_R2.fastq.gz data/fastq/Miapaca2_G31V_R2.fastq.gzWith globstar turned on, the pattern above would find gzipped FASTQ files no matter how many dir levels deep they are (including when they are in your current working dir).
4 Viewing text files
Here, I’ll give a quick overview of the most common commands to view text files in the shell.
Several of these commands are especially useful to look at (very) large files, such as genomic data files, and we’ll talk more about them in the next session.
For smaller text files, you might also choose to open them in the editor pane in VS Code. You can do so by finding and clicking on them in the Explorer in the side bar. Additionally, when you list files in the shell in VS Code, you can hold Ctrl (Windows) or Command (Mac) and then click on a file name (you should see it being underlined before you click)!
Unlike the shell, VS Code is also able to open image files (e.g. .png, .jpg) and PDFs this way — and as we’ll see later, you can even render HTML files in the editor pane.
VS Code also handles the viewing of large text files better than most visual text editors, but I would still recommend to mostly view genomic-scale data files in the shell instead.
4.1 cat
The cat (short for concatenate) command will print the full contents of a file. It is therefore mostly conventient for smaller files, since the contents of very large files will just stream by on your screen.
For example, let’s take a look at the README.md file in your working dir:
# If you don't have this file, first run:
# cp -v /fs/ess/PAS0471/demo/202307_rnaseq/README.md .
cat README.md
# README for /fs/ess/PAS0471/demo/202307_rnaseq
This directory contains files from an RNAseq project by the Montserrate-Cruz lab,
meant to demonstrate Unix shell basics.
In the `data/fastq` directory, there are 8 gzipped FASTQ files for 4 samples
(the sequencing was done in a paired-end fashion and each sample has a file with
forward reads (`_R1.fastq.gz`) and a file with reverse reads (`_R2.fastq.gz`)).
To be able to demonstrate Unix shell and bioinformatics basics,
those 8 files do not represent the full dataset for the experiment in question.
Files are present for only 4 of the 18 samples,
and the individual files are much smaller than the originals:
100,000 reads were randomly sub-sampled
(the original files contained ~30 million reads each).
A very simple metadata TSV (tab-separated values) text file is present in
`metadata/meta.tsv`, with one row per input file,
and columns specifying the read direction, sample ID, cell line, and variant..md = Markdown (Click to expand)
.md is the extension for “Markdown” files. Markdown is a very simple but still quite powerful text “Markup language” (e.g. HTML and LaTeX being much more complicated ones). This website is also made with a file type that is a Markdown variant.
But because of Markdown’s simplicity, a Markdown file can look very similar to a plain text file. The only Markdown features used in the README file are backticks around file names, so they will show up in code font, and #, which will create a Level 1 header.
4.2 head and tail
The twin commands head and tail will print the first and last lines, respectively, of a file — this can be very useful to preview the contents of larger files.
By default, head and tail will print up to 10 lines of a file:
head metadata/meta.tsvsample_id cell_line variant
ASPC1_A178V ASPC1 A178V
ASPC1_A178V ASPC1 A178V
ASPC1_G31V ASPC1 G31V
ASPC1_G31V ASPC1 G31V
Miapaca2_A178V Miapaca2 A178V
Miapaca2_A178V  Miapaca2        A178V
Miapaca2_G31V   Miapaca2        G31V
Miapaca2_G31V Miapaca2 G31VBut meta.tsv only has 9 lines, so we got 9 instead. We can use the -n argument to modify the number of lines that is being printed:
tail -n 3 metadata/meta.tsvMiapaca2_A178V Miapaca2 A178V
Miapaca2_G31V Miapaca2 G31V
Miapaca2_G31V Miapaca2 G31V4.3 less
Another very handy command to view medium to large text files is less, which opens up a text file within your shell in a “pager”. That is, you will not get your prompt back until you press q to quit less, but you can e.g. scroll/move around in the file.
Besides scrolling with your mouse, its easiest to move around with up and down arrows and, if you have them, PgUp and PgDn (also, u will move up half a page and d will move down half a page).
If you find yourself scrolling down and down to try and reach the end of the file, you can instead press G to go to the very end right away (and g to go back to the top).
Try it with one of the FASTQ files (we’ll go into more detail next time!):
less data/fastq/ASPC1_A178V_R1.fastq.gz5 Command output redirection
As mentioned earlier, Unix commands nearly always print their output to the screen. But you can also “redirect” the output to a file or to another command.
5.1 Plain redirection with >
With “>”, we redirect output to a file:
- If the file doesn’t exist, it will be created.
- If the file does exist, any contents will be overwritten.
echo "My first line" > test.txtcat test.txtMy first lineOf course, redirection works not just with echo, but with every single command (or bioinformatics program) that prints output to screen:
ls > my_files_on_2023-08-04.txtcat my_files_on_2023-08-04.txt # Use tab completiondata
metadata
my_files_on_20230803.txt
README.md
test.txt5.2 Appending with >>
With “>>”, we append the output to a file (that is, it won’t overwrite any existing content like >):
echo "My second line" >> test.txtcat test.txtMy first line
My second lineAnd to circle back to >, demonstrating how this will overwrite contents:
echo "My third line overwrote the first two!" > test.txtcat test.txtMy third line overwrote the first two!5.3 The pipe
A third way of redirecting command output is quite different from the previous two — the | (pipe) takes the output of one command and “pipes” it as input for a subsequent command.
# This will tell us how many files and dirs are in our current working dir
ls -l | wc -l6In the example above, the output of the ls command (i.e., a list of files and dirs) was not printed to screen but piped to the wc -l command, which then counted the number of lines in the input it received through the pipe.
This also reveals, then, that wc accepts input in two ways:
- One ore more files, whose names are passed as arguments (
wc -l README.md) - So-called “standard input”, a “stream” of input directly passed to the command, most commonly via the pipe (
cat README.md | wc -l).
And this is true not just for wc, but for almost any shell command that accepts input data to operate on.
Pipes are incredibly useful because they avoid the need write/read intermediate files — this saves typing and also makes the operation much quicker.
Another example, where we combine shell wildcards with output redirection, demonstrates how simple and powerful the Unix shell can be (and why the cat command is named after concatenation).
Imagine you had a thousand FASTA files in a dir fastas, and wanted to combine all of them, back-to-back, into a single file (“multi-FASTA” files, i.e. FASTA files with multiple sequences, indeed just consist of multiple FASTA entries concatenated). This simple command would do that — and would be very fast even for really large files:
# (Fictitious example, you don't have a dir 'fastas')
cat fastas/*.fa > combined.fa
Imagine trying to create such a concatenated file in a regular text editor with a graphical user interface!
While we have not noticed it so far, Unix commands –and many bioinformatics command-line tools alike– actually separate “regular” output (called “standard output”) from error messages (“standard error”).
Without redirection, this is not obvious because both types of output are then printed to screen. But look what happens when we run ls with a non-existing file name as an argument, and redirect the output:
ls -lh non_existent_file > my_file_list.txtls: cannot access non_existent_file: No such file or directorycat my_file_list.txt The error message (standard error) was not redirected to the output file, but printed to the screen!
Or consider this example:
ls -lh README.md non_existent_file > another_file_list.txtls: cannot access non_existent_file: No such file or directorycat another_file_list.txt-rw-r--r-- 1 jelmer PAS0471 964 Jul 27 17:48 README.mdIn the example above, the ls command produced both standard out (the successful file listing of README.md) and standard error (the error message for non_existent_file), and:
- Standard output was redirected to the file
- Standard error was printed to screen.
Of course, there is also a way to redirect standard error. We’ll at least see this in the context of standard out and standard error redirection for Slurm batch jobs.
At-home reading: reference pages & further resources
Shell reference pages on this site
Further resources for learning the Unix shell
- OSC’s UNIX Basics
- https://www.learnenough.com/command-line-tutorial
- https://cvw.cac.cornell.edu/Linux/
- http://www.ee.surrey.ac.uk/Teaching/Unix/
- https://www.udacity.com/course/linux-command-line-basics--ud595
- http://moo.nac.uci.edu/~hjm/How_Programs_Work_On_Linux.html
Footnotes
From now on, I will refer to command-line expressions, with which I mean everything you type in the shell until the next Enter as simply a command. “Command”, then, can refer to either a command’s name (e.g.
ls) or a full command line expression (e.g.ls -lh path/to/dir) — this is potentially confusing but common usage and the context should usually make the meaning clear.↩︎Though we will see later that you can also “pipe in” input to
wcand many other commands, in which case it does not need a file name as an argument, since you are providing data for it to operate on in a different way.↩︎The advantage of this is that it makes it very easy to recognize variables inside scripts and so on!↩︎
When you use
touchon existing files, all it will do is change the timestamp that the file was most recently modified: hence the name of this command.↩︎-ris a common option name for recursive behaviour among Unix commands (mkdiris an exception with its-p).↩︎At least not by default, the person who created the file can change this.↩︎
However, it will not match so-called “hidden files” whose names start with a
..↩︎