Data management and transfer
Week 9 – lecture B

1 Introduction
1.1 Learning goals
- How you can manage your data and share it after publication
- How to transfer files between OSC and other computers like your own
- How to download files at the command-line
- How to manage file permissions
1.2 Getting ready
- At https://ondemand.osc.edu, start a VS Code session in
/fs/ess/PAS2880/users/$USER
2 Raw data management
In general, any type of raw data from your research is extremely valuable. There are the results of your experiment, and may have been labor-intensive and expensive to produce.
In the examples in this course, raw data has been in the form of FASTQ files. More generally with (epi)genomics and transcriptomics projects, your main piece of raw data will be a set of sequence files, most commonly in FASTQ format. However, similar principles apply with other types of data/files.
2.1 Key recommendations
Never delete your raw data. It doesn’t matter if you “finished” your downstream analyses, or produced processed FASTQ files that you personally find more useful: your ground truth will always be the raw data. These ensure that your results can be reproduced by yourself and others, and they allow for a modified re-analysis of the data after e.g. new methods or relevant data become available.
Keep multiple copies of your raw data. You should always keep two or more copies of your raw data, ideally in at least two different physical locations. So, even if your data mainly lives on OSC, also keep a copy elsewhere. And on OSC, you should never only store files in a scratch dir, since these dirs are periodically deleted.
Share your raw data publicly after publication. Most journals and funding agencies nowadays require that research data is made publicly available after publication of the results. While this is somewhat of a novelty for some types of data, sequencing data has long been expected to be shared publicly.
Also:
- Keep track of data provenance and metadata
- When and from where was the data obtained/received?
- What metadata exists for each sample?
- Use standard and preferably plain-text file formats
- To avoid accidents, consider making your data read-only with file permissions (covered below)
- After downloading or when sharing key data, consider using “checksums” to check that files were transferred entirely (bonus material)
- Keep track of data provenance and metadata
2.2 Details about sharing data and other files
By the end of 2025, all federally-funded research must make articles and data publicly available immediately upon journal publication with no waiting periods allowed.
— Federal Research Policy Guide from OSU’s Enterprise for Research, Innovation and Knowledge
Platforms for sharing data
- Raw sequences from high-throughput sequencing, such as FASTQ files, must be uploaded to NCBI’s Sequence Read Archive (SRA)
- Some results should also be uploaded to NCBI, such as genome assemblies and annotations, and gene expression count tables (Geno Expression Omnibus, GEO)
- (Other) results and data can, and are increasingly required to upon publication, be shared via general data repositories like Dryad and Zenodo
- Code can be shared via GitHub (or similar platforms like GitLab and Bitbucket), ideally with a permanent Digital Object Identifier (DOI) via Zenodo’s GitHub integration 1
Data Management Plans (DMPs), which specify how you are planning to manage and share your data, have recently also become required by major funding agencies:
A DMP is currently required for all competitive grant programs of the United States Department of Agriculture and the National Science Foundation.
— Grünwald et al. (2024)
For more and OSU-specific information about data management and sharing, OSU’s Research Commons has guides and offers consultations.
3 File transfer to and from OSC
3.1 Should I keep my OSC and local directories synced and how?
You can’t keep files synced between OSC and your local computer in a fully automatic way like with OneDrive or Dropbox. And because the amount of data on OSC is typically very large, you may not want to either. Instead, here is a good strategy:
- Keep the files you have under version control (code, etc.) synced via Git/GitHub
- Periodically sync all or a selection of other files with the data transfer methods discussed below
Data syncing is especially important when you do analyses both at OSC and on your local computer for a given project. To reduce this friction, I recommend that for projects for which you need OSC, you instead try to do all your work there. When you do that, it even works to keep entirely separate sets of files at OSC and your local computer – for example, you may keep only the manuscript and related files on your local computer (and/or OneDrive/Teams), and everything else at OSC.
3.2 Overview of transfer options
In week 1, you learned that you can upload and download files from OSC in the OnDemand Files menu. However, that method is only suitable for relatively small transfers. Here is a table with methods to transfer files between your computer and OSC:
| Method | Transfer size | CLI or GUI | Ease of use | Flexibility/options |
|---|---|---|---|---|
| OnDemand Files menu | smaller (<1GB) | GUI | Easy | Limited |
| Remote transfer commands | smaller (<1GB) | CLI | Moderate | Extensive |
| SFTP | larger (>1GB) | Either | Moderate | Extensive |
| Globus | larger (>1GB) | GUI | Moderate | Extensive |
3.3 FileZilla: a GUI-based SFTP client
Here, we’ll go over what is probably overall the most convenient and versatile way to transfer files to and from OSC, since it works for transfers of any size, and is easy and quick: file transfer with a GUI-based SFTP client. There are several such programs, but I can recommend FileZilla 2. Let’s give that a try!
- Install FileZilla
For OSU-managed computers:
Open the “Software Center” (Windows) or “Ohio State Application Self Service” (Mac), search for “FileZilla”, and click the install button.For personal computers:
Go to the FileZilla download page — it should automatically display a big green download button for your operating system: click on that, then install the program, and open it.
- Connect to OSC
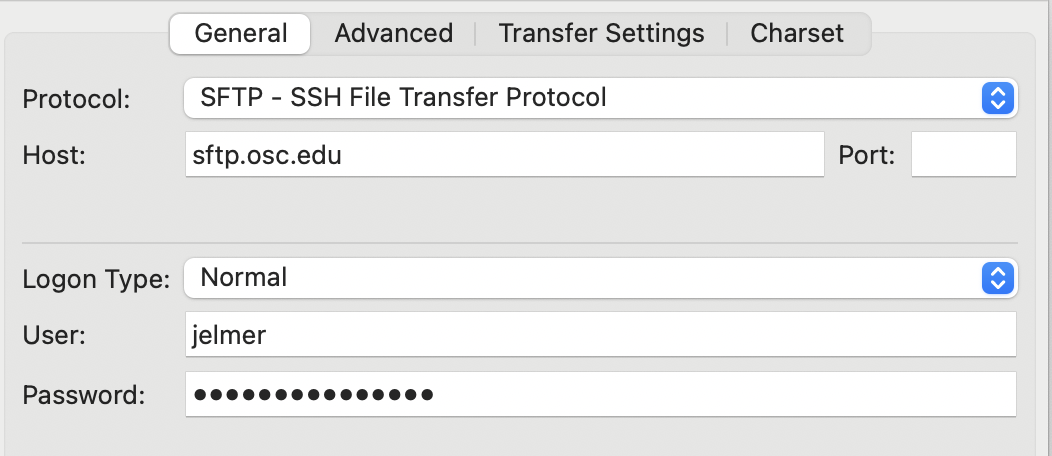
Open FileZilla. To connect it to OSC, find the Site Manager: clickFilein the top menu bar and thenSite Manager3. In the Site Manager, enter/select the following:- Protocol: “SFTP - SSH File Transfer Protocol”
- Host:
sftp.osc.edu(leave the Port box empty) - Logon Type: Make sure “Normal” is selected
- User: Type your OSC username
- Password: Enter your OSC password
- Click the “Connect” button at the bottom to connect to OSC
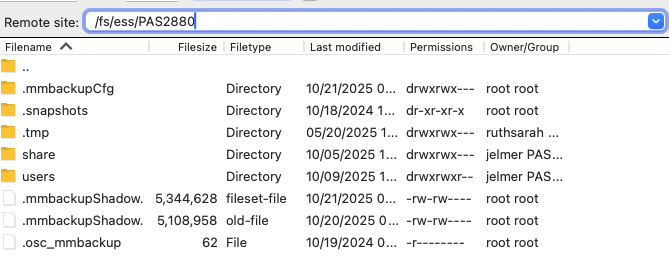
- The connection interface
Once connected, your main screen is split with a local file explorer on the left, and a remote file explorer on the right:

- Changing directories
You can change directories in either file explorer. At OSC, your default location is your Home dir within/users/, but you can type a path in the top bar to e.g. go to/fs/ess/PAS2880– and from there you can further click your way to your personal dir there.
- Transferring files
Transferring dirs and files in either direction is as simple as dragging and dropping them to the other side!
Exercise: File transfer with FileZilla
Try to download some files from /fs/ess/PAS2880/users/$USER to your local computer, and vice versa.
4 Downloading files at the command line
When you need to get large files from public repositories like NCBI (e.g. reference genome files, raw reads from the SRA), I would recommend to download them directly to OSC using commands (instead of downloading to your own computer and then transferring to OSC). Not only is this quicker once you know how to, it is also much more reproducible: in your Markdown documentation files, you can store the exact commands used to obtain the data.
4.1 wget
You can download files from a URL using the wget command. It has many options, but basic usage is quite simple:
# This will download the file at the URL to your current working dir
wget <URL>
As an example, say that you want to download the reference genome FASTA file for Culex pipiens, the focal species of the Garrigós et al. (2025) RNA-Seq data set we’ve been working with. We actually do need to do this because my garrigos-data repo contains only the GTF annotation file, and not the assembly file, which wasn’t included due to its large size.
The files for that genome can be found at this NCBI FTP webpage:
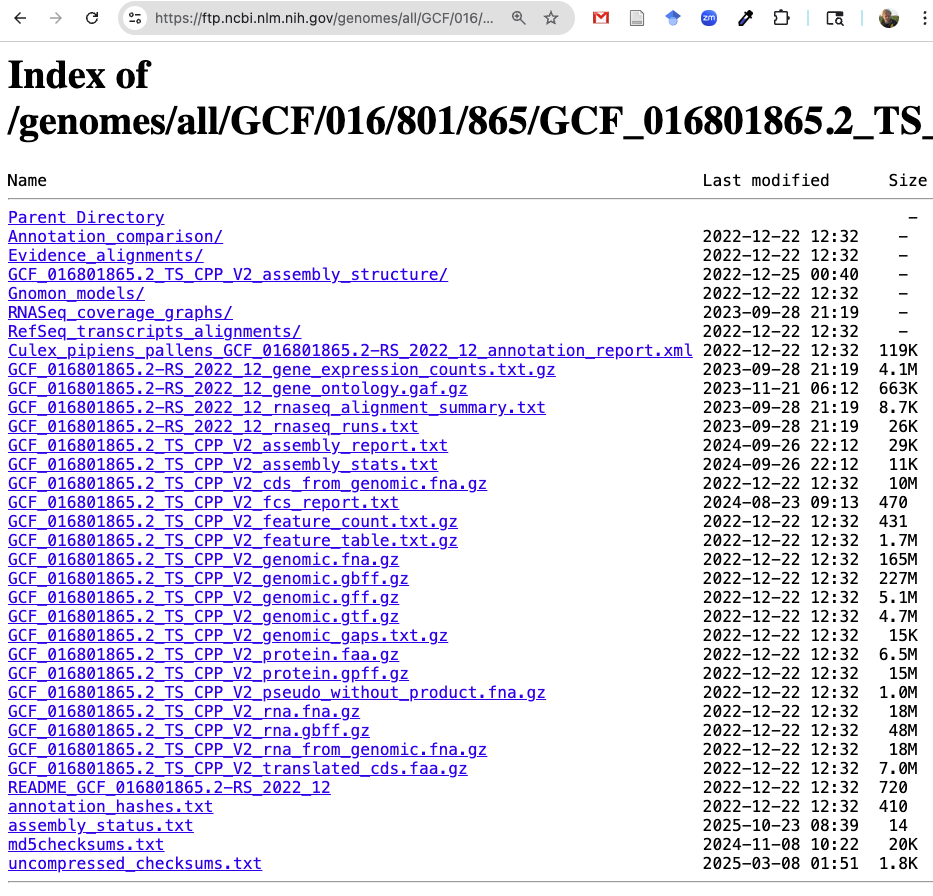
You can right-click on any of the files there and then click “Copy Link Address” (or similar, depending on your browser).
Go ahead and copy the URL to the assembly FASTA (
.fna.gz) file.Type
wgetand Space in your terminal, paste the URL, and execute the command:wget https://ftp.ncbi.nlm.nih.gov/genomes/all/GCF/016/801/865/GCF_016801865.2_TS_CPP_V2/GCF_016801865.2_TS_CPP_V2_genomic.fna.gz--2025-10-23 10:19:04-- https://ftp.ncbi.nlm.nih.gov/genomes/all/GCF/016/801/865/GCF_016801865.2_TS_CPP_V2/GCF_016801865.2_TS_CPP_V2_genomic.fna.gz Resolving ftp.ncbi.nlm.nih.gov (ftp.ncbi.nlm.nih.gov)... 130.14.250.13, 130.14.250.10, 130.14.250.7, ... Connecting to ftp.ncbi.nlm.nih.gov (ftp.ncbi.nlm.nih.gov)|130.14.250.13|:443... connected. HTTP request sent, awaiting response... 200 OK Length: 172904433 (165M) [application/x-gzip] Saving to: ‘GCF_016801865.2_TS_CPP_V2_genomic.fna.gz’ GCF_016801865.2_TS_CPP_V2_genomic.fna.gz 100%[===============================================================================================================>] 164.89M 28.5MB/s in 7.2s 2025-10-23 10:19:12 (23.0 MB/s) - ‘GCF_016801865.2_TS_CPP_V2_genomic.fna.gz’ saved [172904433/172904433]As you saw,
wgetis quite chatty and prints a bunch of logging and progress to the screen. If that all looked good, list the downloaded file:ls -lh-rw-rw----+ 1 jelmer PAS0471 165M Dec 22 2022 GCF_016801865.2_TS_CPP_V2_genomic.fna.gzMove it to your
garrigos-datadir:mv -v GCF_016801865.2_TS_CPP_V2_genomic.fna.gz garrigos-data/refCreate a new README file…
touch garrigos-data/ref/README.md…and in it, add a note about how you obtained the file:
Downloaded reference genome FASTA from NCBI on 2025-10-23 with:

```bash
wget https://ftp.ncbi.nlm.nih.gov/genomes/all/GCF/016/801/865/GCF_016801865.2_TS_CPP_V2/GCF_016801865.2_TS_CPP_V2_genomic.fna.gz
```
You can use
wgets-Poption to directly download to a different dir, for example:# This would download the file into a dir 'data/ref': wget -P data/ref <URL>Another commonly used downloading command is
curl– both have similar functionality, so you don’t really need to learn both. But you may see examples withcurlelsewhere.
For reference genome downloads, NCBI also has a relatively new and very useful portal called “datasets” that also includes a CLI tool with the same name. This tool is very useful if you want to download multiple or many genomes – for example, it allows you to download all available genomes of say a certain genus with a single command.
For downloads from the Sequence Read Archive (SRA), which contains high-throughput sequencing reads, you can use tools like fasterq-dump and dl-fastq. Also handy is the simple SRA explorer website, where you can enter an NCBI accession number and it will give you download links.
- Go to the genome part of NCBI’s datasets portal https://www.ncbi.nlm.nih.gov/datasets/genome/
- Type in the name of a species (or other taxonomic level)
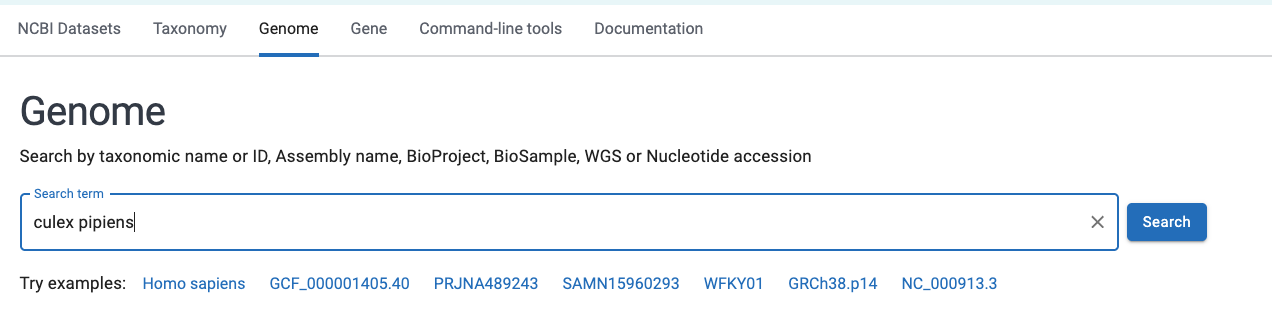
- Select an appropriate taxonomic match within the search box, and press Enter. You will get a list of available genomes:

- All else being equal (e.g. the appropriate subspecies), it is generally a good idea to pick the “Reference” genome which is highlighted with a green checkmark, i.e.
TS_CPP_V2in the screenshot above. Click on the name of the desired genome, and you will see a page like this:
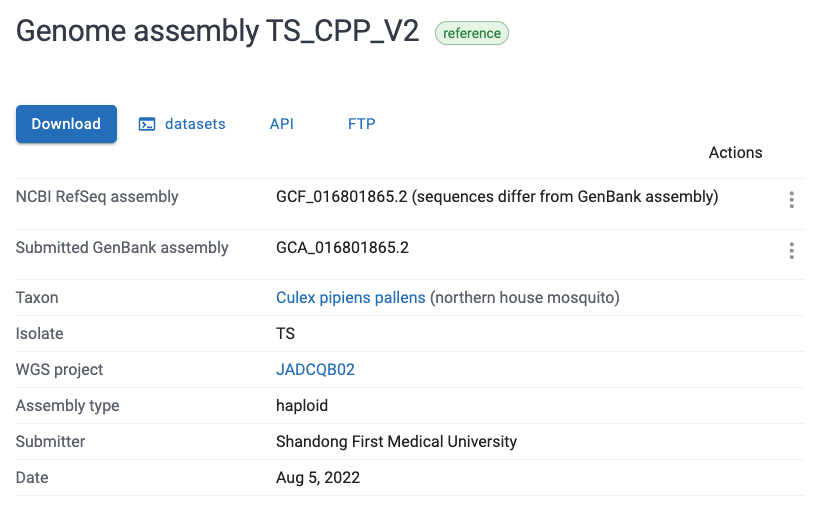
- There are multiple ways of downloading, but the FTP page we downloaded from can be accessed by clicking the “FTP” button shown in the screenshot above.
5 File permissions
5.1 Introduction to file permissions
File “permissions” are what different categories of users are permitted to do with files and dirs. Being able to view and modify file permissions is useful when you:
- Want to make your data read-only to prevent accidental modification or deletion
- Need to share files with other users at OSC
There are three different file permissions that can be independently controlled:
- Read (
r) permissions allow you to read and copy files/dirs - Write (
w) permissions allow you to move, rename, modify, overwrite, or delete - Execute (
x) permissions allow you to directly execute a file (see the box below)
While it is possible to set permissions for individual users, they are most easily and commonly set for three different user categories:
- Owner (or “user”) (
u) — By default, this the person that created the file or dir. This includes cases where this person merely copied or downloaded files: e.g., after you have copied someone else’s FASTQ files, you are the owner of these copies. - Group (
g) — At OSC, the group category is at the OSC Project level - Other (
o) — Any other user
Executing a file means running it as a program/command. For example, when we run the FastQC program with the command fastqc, we are really executing a binary (executable) file somewhere on the system. Similarly, self-written shell scripts can be executed if they have execute permissions set.
5.2 Viewing file permissions
To show file permissions, use ls with the -l (long format) option that we’ve seen before, which should show you something like this:
ls -lh garrigos-datatotal 2.5K
drwxrwx---+ 2 jelmer PAS0471 4.0K Sep 9 13:46 fastq
drwxrwx---+ 2 jelmer PAS0471 4.0K Sep 9 13:46 meta
-rw-rw----+ 1 jelmer PAS0471 2.3K Sep 9 13:46 README.md
drwxrwx---+ 2 jelmer PAS0471 4.0K Sep 9 13:46 ref
drwxrwx---+ 2 jelmer PAS0471 4.0K Sep 16 13:26 sandboxWith annotations:
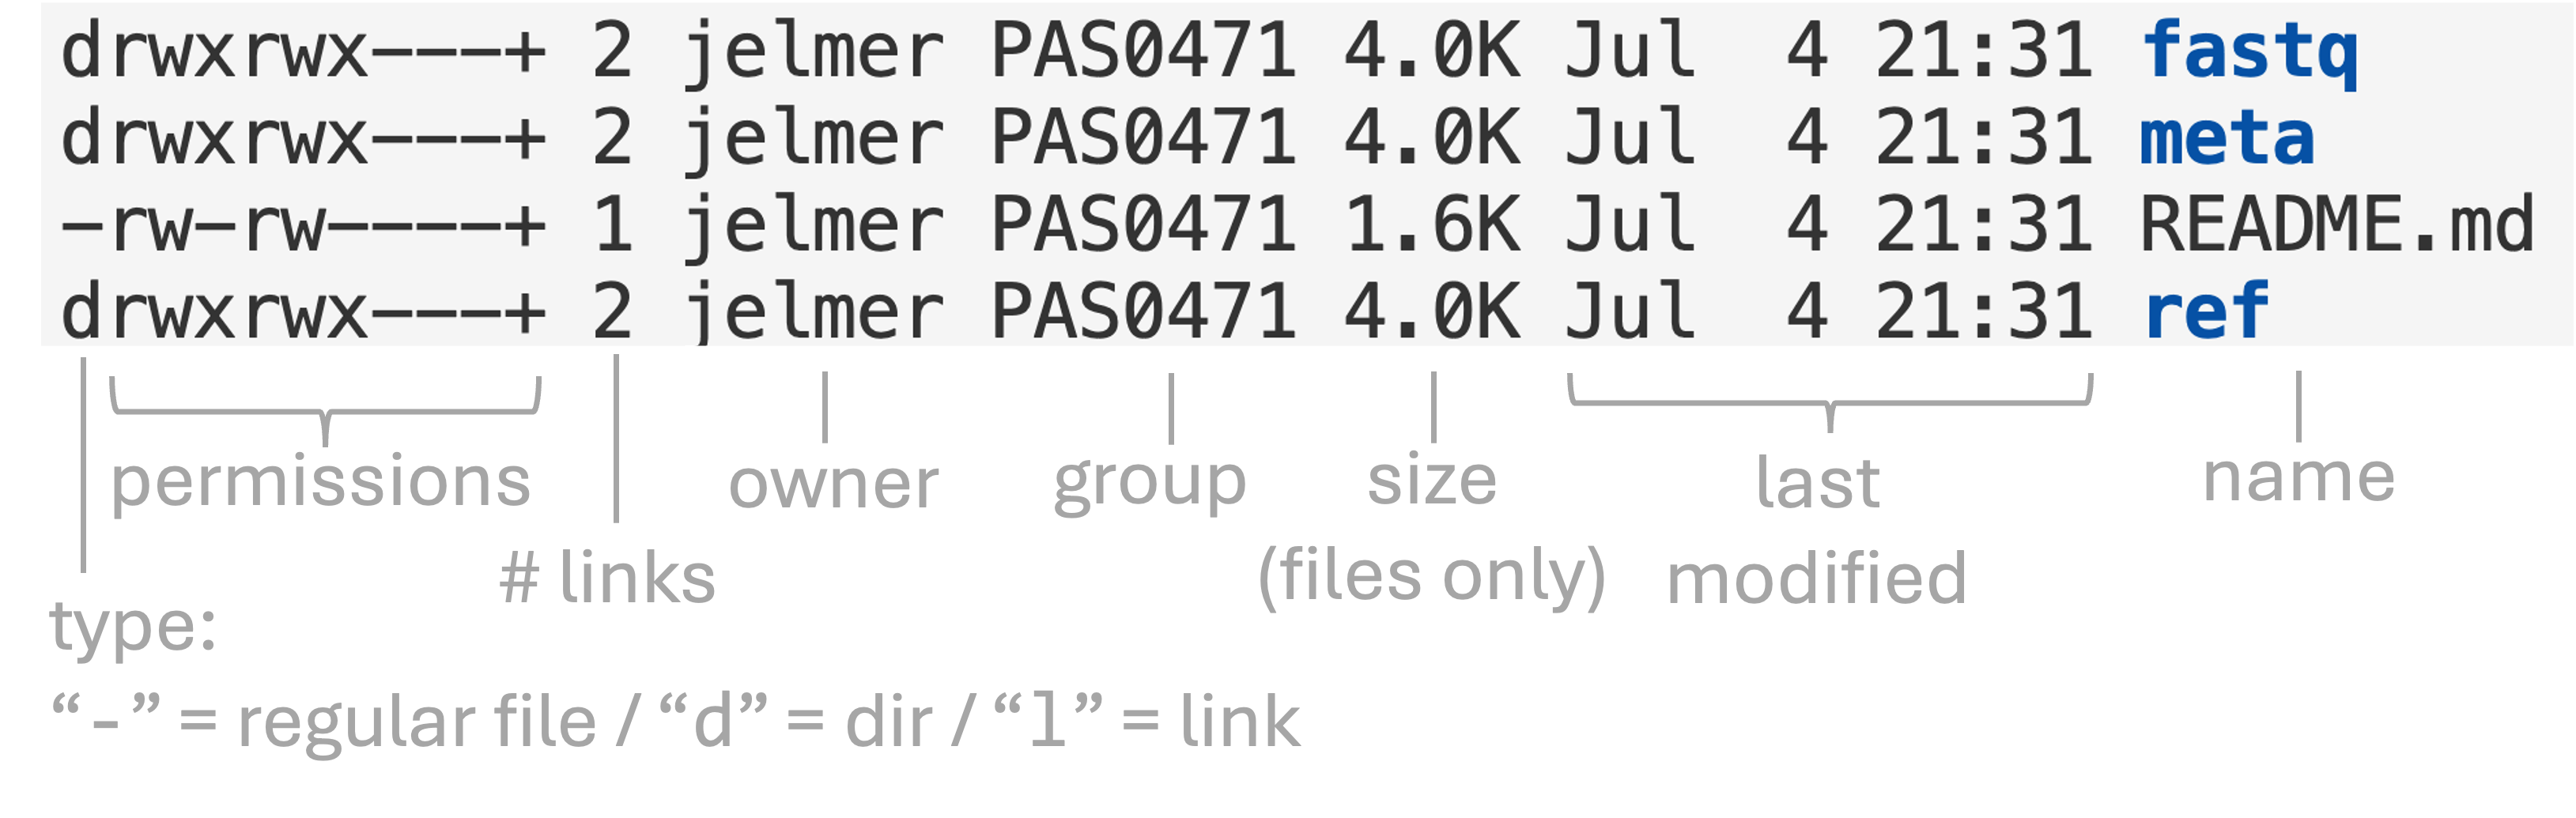
When you create a file in the PAS2880 project dir, its “group” will include all members of the OSC project PAS2880. That is true even if the primary group displayed in the ls -l output shown below is a different one, e.g. PAS0471 for me (my personal default group at OSC).
Here is an overview of the file permission notation in ls -l output:

In the two lines above:
rwxrwxr-xmeans: read, write, and execute permissions are set for the owner (firstrwx) and the group (secondrwx), and read and execute but not write permissions for others (r-xat the end).rw-rw-r--means: read and write but not execute permissions are set for both the owner (firstrw-) and the group (secondrw-), and only read permissions for others (r--at the end).
Most commonly, files and dirs that you create at OSC will by default have:
- Read permissions for owner (you) and group
- Write permissions only for owner (you)
However, this is not always the case, and I am personally sometimes vexed by file permissions at OSC. For instance, in our PAS2880 project, the default permissions appear to include write permissions for the group. I think because this is an “Educational” project but am not certain about that.
More generally, by default:
- OSC users that are not members of a specific project can’t access that project’s file in
/fs/ess/and/fs/scratchat all. - Other OSC users cannot access your personal Home dir files – so it’s never a good idea to keep files there that should be accessible to collaborators.
Exercise: Viewing file permissions
Check the file permissions in your Home dir.
5.3 Changing file permissions
Let’s create a file to play around with file permissions:
# Create a test file
cd sandbox
touch testfile.txt

# Check the default permissions
ls -l testfile.txt
-rw-rw----+ 1 jelmer PAS0471 0 Mar 7 13:36 testfile.txtTo change a file’s permissions, you can use the chmod command. There are two main ways to use this command, one of which uses symbols as follows:
+: add a permission-: remove a permission=: set a permission to
These are used with both the kind of permission (r / w / x) and the user category (a / u / g / o). For example, a+r means that for all, you add (+) read permissions. Let’s see some commands:
To add read (
r) permissions for all (a):chmod a+r testfile.txt ls -l testfile.txt-rw-rw-r--+ 1 jelmer PAS0471 0 Mar 7 13:40 testfile.txtTo set read + write + execute (
rwx) permissions for all (a):chmod a=rwx testfile.txt ls -l testfile.txt-rwxrwxrwx+ 1 jelmer PAS2880 0 Mar 7 13:36 testfile.txtBecause the file is now “executable”, its name should display in green in your terminal.
To remove write (
w) permissions for others (o):# chmod <who>-<permission-to-remove>: chmod o-w testfile.txt ls -l testfile.txt-rwxrwxr-x+ 1 jelmer PAS2880 0 Mar 7 13:36 testfile.txt
chmod alternatively accepts a series of 3 numbers (for user, group, and others, respectively) to set permissions, where each permission is “worth” the following number of points:
| Nr | Permission |
|---|---|
| 1 | x |
| 2 | w |
| 4 | r |
| Nr | Permission |
|---|---|
| 5 | r + x |
| 6 | r + w |
| 7 | r + w + x |
For example, to set read + write + execute permissions for all:
chmod 777 testfile.txtTo set read + write + execute permissions for yourself, and only read permission for the group and others:
chmod 744 file.txtchmod is not recursive by default: you need the -R option to change permissions throughout a dir hierarchy. For example:
chmod -R g+r my-dirOne tricky and confusing aspect of file permissions is that to be able to view/list a directory’s content, you need execute permissions for the dir! This is something to take into account when you want to grant others access to your project e.g. at OSC.
To set execute permissions for everyone but only for dirs throughout a dir hierarchy, use an X (uppercase x):
chmod -R a+X my-dir5.4 Making your data read-only
Now, let’s see how you can make your data read-only. Here, we’ll work with the files in the garrigos-data/fastq/ dir, so let’s check the initial permissions first:
cd ..
ls -l garrigos-data/fastq/ | head -n 3
total 963552
-rw-rw----+ 1 jelmer PAS0471 21266097 Sep 9 13:46 ERR10802863_R1.fastq.gz
-rw-rw----+ 1 jelmer PAS0471 22700521 Sep 9 13:46 ERR10802863_R2.fastq.gzTo make this data read-only, you can for example run:
# Allow only read permissions for all users
chmod a=r garrigos-data/fastq/*
After running this command, let’s check the permissions:
ls -l garrigos-data/fastq/ | head -n 3total 963552
-r--r--r--+ 1 jelmer PAS0471 21266097 Sep 9 13:46 ERR10802863_R1.fastq.gz
-r--r--r--+ 1 jelmer PAS0471 22700521 Sep 9 13:46 ERR10802863_R2.fastq.gzWhat happens when you try to remove write-protected files?
rm garrigos-data/fastq/*rm: remove write-protected regular empty file ‘garrigos-data/fastq/ERR10802863_R1.fastq.gz’?You’ll be prompted for every file! If you answer y (yes), you can still remove them. But note that people other than the file’s owners cannot override file permissions (unless they are system administrators).
rm -f
Instead of interactively approving the removal of each write-protected file, you can also use the -f (force) option with rm.
For example, if you try to remove a dir that contains a Git repo, even if it isn’t your own, you would have to confirm the removal of many write-protected files:
rm -r garrigos-data/rm: remove write-protected regular file 'garrigos-data/.git/objects/pack/pack-b1b2783f93b7c1f77f508f07e971dee5c0d39958.rev'? y
rm: remove write-protected regular file 'garrigos-data/.git/objects/pack/pack-b1b2783f93b7c1f77f508f07e971dee5c0d39958.idx'? y
rm: remove write-protected regular file 'garrigos-data/.git/objects/pack/pack-b1b2783f93b7c1f77f508f07e971dee5c0d39958.pack'? Adding the -f flag will skip these prompts and remove the files directly:
rm -rf garrigos-data/However, you must be careful when using the -f option to prevent accidental removal of files.
# In case you need to re-download the repo after playing around with file permissions:
# git clone https://github.com/jelmerp/garrigos-data
Exercise: Changing file permissions
For this exercise, you will be divided into pairs. In each pair, choose one person (the Owner) to first create a test file and manipulate its permissions, and another (the Collaborator) to try to access and modify that file. After the first round, you will switch roles.
In each round:
- The Owner creates a test file in their
sandbox/dir, types a line of text in it (doesn’t matter what), and lets the Collaborator know its path - The Collaborator tries to
catthe file - The Owner changes the file’s permissions to make it read-only for everyone but themself
- The Collaborator again tries to
catthe file - If you want, you can try additional permission changes
6 Recap
In this lecture, you have learned about best practices for managing and sharing your data, and the following practical applications:
- File transfer to and from OSC with FileZilla (and what other options exist)
- Downloading files at the command line with
wget - Viewing and changing file permissions with
ls -landchmod
References
Footnotes
Journals may in some cases require code to be shared via the abovementioned general repositories like Dryad as well, where they (or especially their documentation) are subject to manual quality control.↩︎
E.g. because it works on all operating systems and has a more intuitive user interface than CyberDuck, another very commonly used program that works both on Mac and Windows.↩︎
There is a also an icon in the far top-left to access this menu. Additionally, there is a “Quickconnect” bar, but I’ve not managed to connect to OSC with that.↩︎