Working with files in the Unix shell I:
The shell as a file browser
Week 3 – lecture A

1 Introduction
1.1 Overview & learning goals for the rest of the week
We’ll pick up where we left off last week, continuing with basic Unix shell commands. We will focus on commands that operate on files and dirs. Specifically, you will learn to use the Unix shell to:
- Create, copy, move, rename and delete directories and files (this lecture)
- Select multiple files with a shell wildcard (this lecture)
- View the contents of text files in various ways (next lecture)
- Use redirection and the pipe to flexibly process the output of commands (next lecture)
- Search within, manipulate, and extract information from text files (next lecture)
1.2 Lecture context & overview
GUI-based file browsers (such as “Finder” on Mac, “File Explorer” on Windows, and the interface we saw in OSC OnDemand’s File menu) can perform operations like listing, creating, moving, renaming, copying and removing files and folders. Here, you will learn to use Unix shell commands that can perform these actions.
Why do I need to learn to do these relatively trivial tasks in the shell? 🤨
- This will help you to get more comfortable with working in the shell.
- These commands are useful to learn how the shell works generally, and how commands are structured.
- With practice, using the shell is faster and more powerful than a GUI file browser (certainly at OSU).
- You may eventually run into situations where a GUI file browser is not available.
1.3 Getting ready
Start a VS Code session
- Log in to OSC’s OnDemand portal at https://ondemand.osc.edu
- In the blue top bar, select
Interactive Appsand near the bottom, clickCode Server - Fill out the form as follows:
- Cluster:
pitzer - Account:
PAS2880 - Number of hours:
2 - Working Directory:
/fs/ess/PAS2880/user/<username>(replace<username>with your user name) - App Code Server version:
4.8.3
- Cluster:
- Click
Launch - Click the
Connect to VS Codebutton once it appears - In VS Code, open a terminal by clicking =>
Terminal=>New Terminal1 - Check that your are in
/fs/ess/PAS2880/users/$USERby typingpwdin the terminal.
(Recall that$USERis a variable that represents your username. If you’re not in that dir, it may be listed underRecentsin theGet Starteddocument – if so, click on that entry. Otherwise, clickFile>Open Folderand type/select/fs/ess/PAS2880/users/$USER.)
Open a Markdown file for notes
I recommend that you create and open a Markdown file to keep notes on what we’re doing in this session:
- Click >
File>New File - Save the file inside
/fs/ess/PAS2880/users/$USER/week03, e.g. aslectureB.md
2 Additional VS Code functionality and setup
Try a few color themes
- Access the “Color Themes” option by clicking (bottom left) >
Color Theme. - Try out a color few themes and see pick one you like!
Options for the Side Bar
The narrow side bar (Activity Bar) contains the following icons to toggle (wide/Primary) Side Bar options:
- Explorer: File browser & outline for the active file
- Search: For recursive searches across all files in the active folder
- Source Control: To work with version control (Git; next week)
- Debugger (we won’t work with this)
- Extensions: To install extensions (up next!)
Install two VS Code extensions
In the narrow side bar, click the Extensions icon. In the Extensions pane that now makes up the wide side bar, search for and then install the following two extensions:
- shellcheck (by simonwong) — this will check your shell scripts later on!
- Rainbow CSV (by mechatroner) — make CSV/TSV files easier to view with column-based colors
Downloading files
In the Explorer in the side bar, you can right click on any file, and among the options shown, you should see “Download…”. Click on that to download the file to your computer!Auto Save
To turn on the auto-saving of documents in the editor, click >File=> “Auto Save” (shows a checkmark when activated).The Command Palette
To access any menu option that is available in VS Code, the so-called “Command Palette” can be handy. To access the Command Palette, click and thenCommand Palette(or press F1 or Ctrl/⌘+Shift+P). To use it, start typing something to search for an option.Toggling (hiding/showing) the side bars
If you want to save some screen space while coding along in class, you may want to occasionally hide the side bars:- In >
View>Appearanceyou can toggle both theActivity Barand thePrimary Side Bar. - Or use keyboard shortcuts:
- Ctrl/⌘+B for the primary/wide side bar
- Ctrl+Shift+B for the activity/narrow side bar
- In >
Keyboard shortcuts
For a single-page PDF overview of keyboard shortcuts for your operating system: =>Help=>Keyboard Shortcut Reference. (Or for direct links to these PDFs: Windows / Mac / Linux.)
3 Download the practice dataset
You will now download the practice/example dataset from @garrigós2025 we’ve discussed. First, make sure you are in /fs/ess/PAS2880/users/$USER (recall: $USER is an environment variable whose value is your user name).
pwd/fs/ess/PAS2880/users/jelmerThen, use the git clone command (there is a space between git and clone2) to download a repository on GitHub that has our practice dataset:
git clone https://github.com/jelmerp/garrigos-dataCloning into 'garrigos-data'...
remote: Enumerating objects: 52, done.
remote: Total 52 (delta 0), reused 0 (delta 0), pack-reused 52 (from 1)
Receiving objects: 100% (52/52), 945.76 MiB | 132.14 MiB/s, done.
Updating files: 100% (47/47), done.This may take 10 or so seconds, since it will download almost 1 GB of data.
Finally, move into the dir that was just downloaded:
cd garrigos-data4 ls and tree to list
4.1 ls
The ls command, short for list, will list files and directories — by default those in your current working dir:
lsfastq meta README.md refls output colors
The ls output above does not show the different colors you should see in your shell — the most common ones are:
- Entries in blue are directories (
fastq,meta, andrefabove) - Entries in black are regular files (
README.mdabove) - Entries in red are compressed files (we’ll see examples of this soon).
(Some of these depend on the color scheme of your terminal / VS Code. E.g., in dark themes, regular text files are in white.)
You can use an argument to change the dir (or file) that ls operates on, and you can use options to change how it shows the output. Let’s start with an option, -l (lowercase L):
ls -l total 2
drwxr-x---+ 2 jelmer PAS0471 4096 Nov 24 2024 fastq
drwxr-x---+ 2 jelmer PAS0471 4096 Nov 13 2024 meta
-rw-rw----+ 1 jelmer PAS0471 1539 Nov 13 2024 README.md
drwxr-x---+ 2 jelmer PAS0471 4096 Jul 4 20:52 refThe same items as before were printed, but now in a different format: one item per line, with additional information such as the date and time that each file was last modified, and the file sizes in bytes directly to the left of the date.
Let’s add another option, -h:
ls -lhtotal 2.0K
drwxr-x---+ 2 jelmer PAS0471 4.0K Nov 24 2024 fastq
drwxr-x---+ 2 jelmer PAS0471 4.0K Nov 13 2024 meta
-rw-rw----+ 1 jelmer PAS0471 1.6K Nov 13 2024 README.md
drwxr-x---+ 2 jelmer PAS0471 4.0K Jul 4 20:52 ref
How does the output differ after adding -h, and what do you think that means? (Click to see the answer)
The only difference is in the format of the column reporting the sizes of the items listed.
We now have “Human-readable filesizes” (hence-h), where sizes on the scale of kilobytes will be shown with Ks, of megabytes with Ms, and of gigabytes with Gs. That can be useful especially for large files.
ls output (Click to expand)
The following image shows what each column in long-format ls represents:
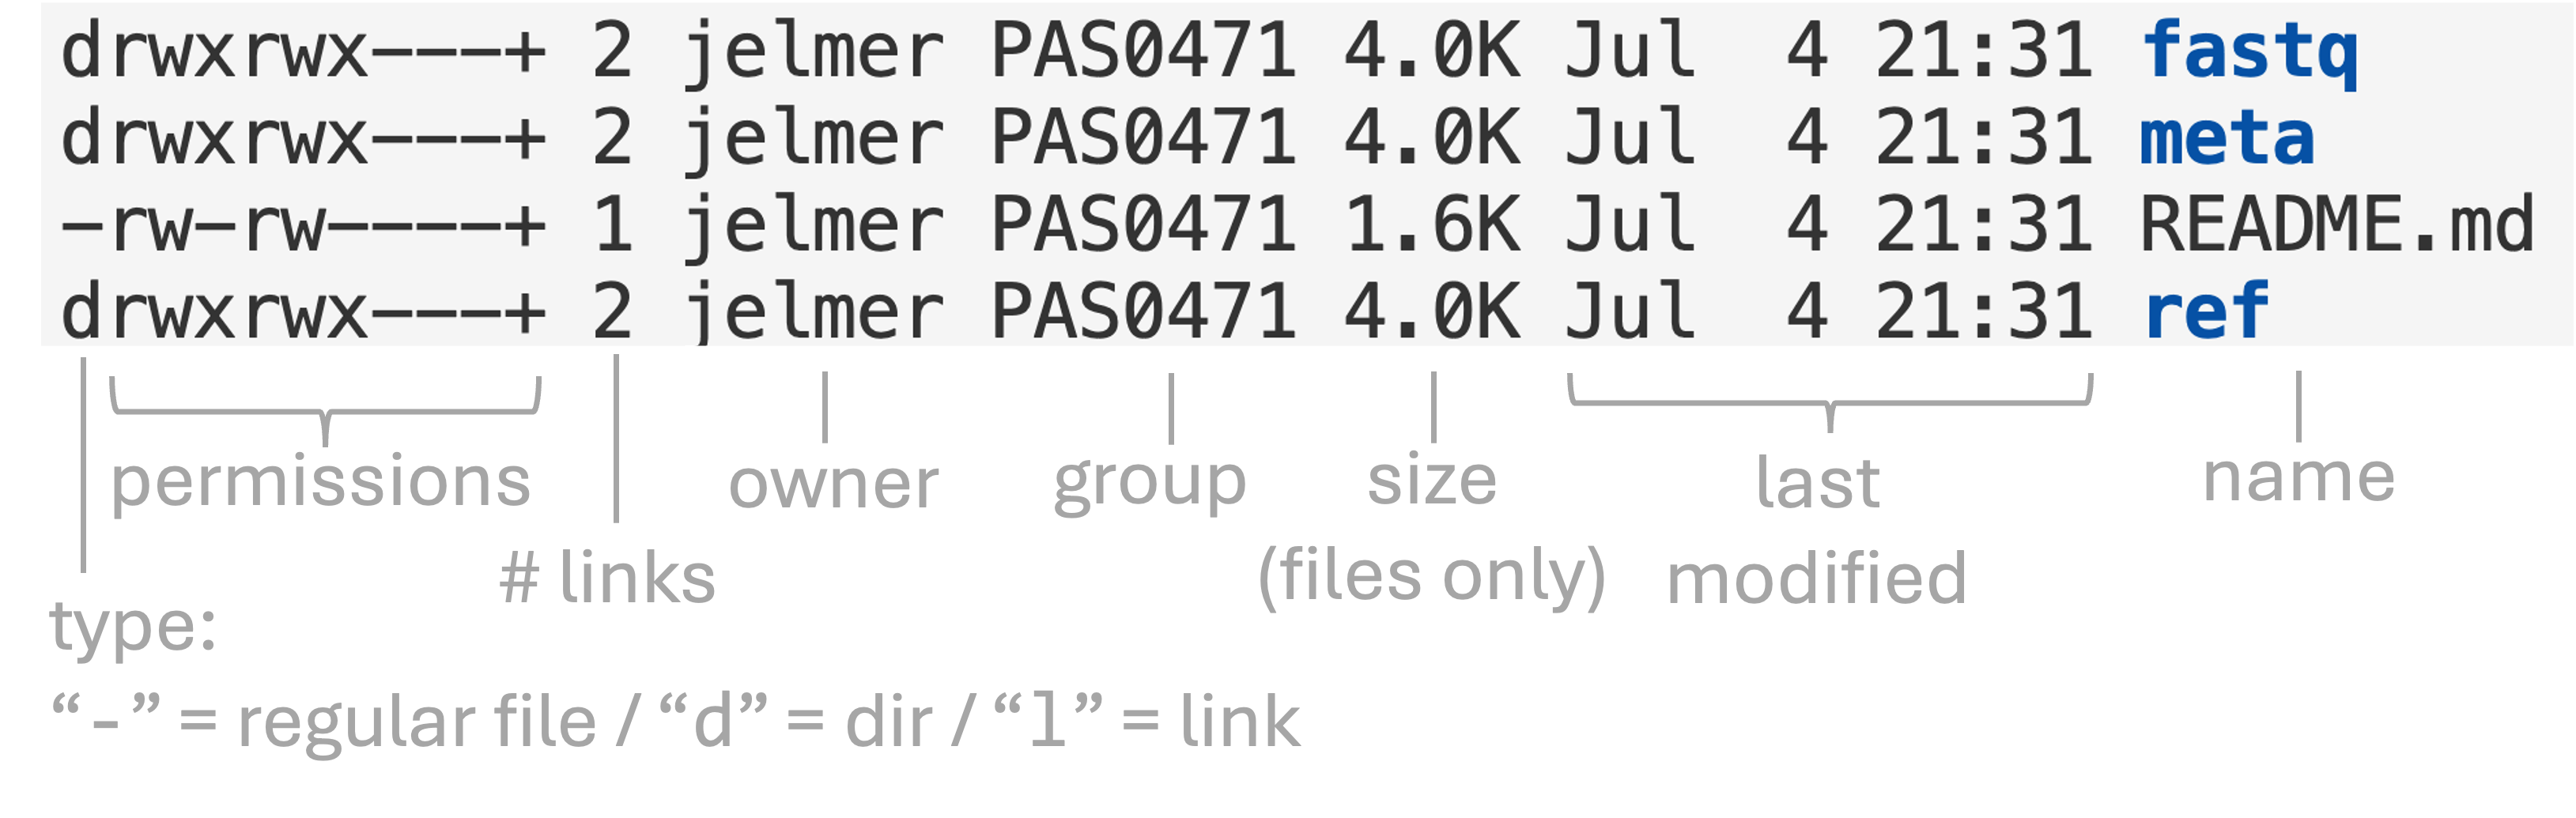
Some notes about the above:
- We will talk about file “permissions” in week 5 of the course.
- You can ignore the column with the “number of links”, as this is not informative for regular users.
- Sizes shown for directories do (unfortunately) not correspond to the total size of the dir and its contents. Basically, you should only pay attention to sizes of files when looking at long-format
lsoutput (see the next box to get dir sizes).
Finally, the first line of long-format ls output (total 2 / total 2k in the examples above) gives an indication of the total size of files that are directly located in this folder, i.e. not including those in subdirs.
Moving on to argument(s) – we can list the contents of dirs other than our working dir by specifying one or more as arguments:
# [Your output should show file names in red]
ls fastq
ERR10802863_R1.fastq.gz ERR10802867_R1.fastq.gz ERR10802871_R1.fastq.gz ERR10802877_R1.fastq.gz ERR10802881_R1.fastq.gz ERR10802885_R1.fastq.gz
ERR10802863_R2.fastq.gz ERR10802867_R2.fastq.gz ERR10802871_R2.fastq.gz ERR10802877_R2.fastq.gz ERR10802881_R2.fastq.gz ERR10802885_R2.fastq.gz
ERR10802864_R1.fastq.gz ERR10802868_R1.fastq.gz ERR10802874_R1.fastq.gz ERR10802878_R1.fastq.gz ERR10802882_R1.fastq.gz ERR10802886_R1.fastq.gz
ERR10802864_R2.fastq.gz ERR10802868_R2.fastq.gz ERR10802874_R2.fastq.gz ERR10802878_R2.fastq.gz ERR10802882_R2.fastq.gz ERR10802886_R2.fastq.gz
ERR10802865_R1.fastq.gz ERR10802869_R1.fastq.gz ERR10802875_R1.fastq.gz ERR10802879_R1.fastq.gz ERR10802883_R1.fastq.gz
ERR10802865_R2.fastq.gz ERR10802869_R2.fastq.gz ERR10802875_R2.fastq.gz ERR10802879_R2.fastq.gz ERR10802883_R2.fastq.gz
ERR10802866_R1.fastq.gz ERR10802870_R1.fastq.gz ERR10802876_R1.fastq.gz ERR10802880_R1.fastq.gz ERR10802884_R1.fastq.gz
ERR10802866_R2.fastq.gz ERR10802870_R2.fastq.gz ERR10802876_R2.fastq.gz ERR10802880_R2.fastq.gz ERR10802884_R2.fastq.gzAnd like you saw last week with cal, options and arguments can be combined:
ls -lh fastqtotal 941M
-rw-r-----+ 1 jelmer PAS0471 21M Nov 13 2024 ERR10802863_R1.fastq.gz
-rw-r-----+ 1 jelmer PAS0471 22M Nov 13 2024 ERR10802863_R2.fastq.gz
-rw-r-----+ 1 jelmer PAS0471 21M Nov 13 2024 ERR10802864_R1.fastq.gz
-rw-r-----+ 1 jelmer PAS0471 22M Nov 13 2024 ERR10802864_R2.fastq.gz
-rw-r-----+ 1 jelmer PAS0471 22M Nov 13 2024 ERR10802865_R1.fastq.gz
-rw-r-----+ 1 jelmer PAS0471 22M Nov 13 2024 ERR10802865_R2.fastq.gz
# [...output truncated...]Some notes about these FASTQ files:
- The files have a
.gzextension and should for you be printed in red, which indicates they have been compressed with thegzipcommand. - There are two files per sample:
_R1(forward reads) and_R2(reverse reads). - The files are ~21-22 Mb in size — considerably smaller than the original file sizes (~1-2 Gb) because they were subsampled.
Exercise: Listing a single file
Say you want to check the size of a single file. Then, it may be always not be convenient to list an entire dir’s contents. Can you figure out how to use ls to show you the file size only for the fastq/ERR10802865_R2.fastq.gz file?
Click to see the solution
The argument to ls can be a path of any kind, including to a file rather than to a dir:
ls -lh fastq/ERR10802865_R2.fastq.gz-rw-r-----+ 1 jelmer PAS0471 22M Nov 13 2024 fastq/ERR10802865_R2.fastq.gz4.2 tree to recursively list files in tree-like format
By default, ls is not recursive, which means that it only shows results for one directory level. Compare that with the output of the tree command, which gives a nice recursive overview in a simple tree-like format (with the -C option additionally adding colors):
tree -C# [colors not shown in this output]
.
├── fastq
│ ├── ERR10802863_R1.fastq.gz
│ ├── ERR10802863_R2.fastq.gz
│ ├── ERR10802864_R1.fastq.gz
│ ├── ERR10802864_R2.fastq.gz
│ ├── ERR10802865_R1.fastq.gz
│ ├── ERR10802865_R2.fastq.gz
├── [...other FASTQ files not shown...]
├── meta
│ └── metadata.tsv
├── README.md
└── ref
└── GCF_016801865.2.gtf.gz
3 directories, 47 filesLet’s take a step back and consider what’s in our dataset:
- A
README.mdMarkdown file - 44 FASTQ files with RNA-Seq reads for 22 samples (in the
fastqdir) - A metadata file with treatment group info for each sample (in the
metadir) - A GTF annotation file for the reference genome (in the
refdir)
We will take a closer look at these files today and in the weeks to come.
5 mkdir and touch to create
First, navigate to your directory for this week:
cd ../week035.1 mkdir to create new directories
The mkdir command creates one or more new directories, and the -p option is needed to enable recursive behavior:
mkdir -p sandbox/testdir1This command was recursive because both the sandbox dir and the testdir1 dir within it had to be created at once.
The name sandbox is common for dirs meant for experimentation and testing. Now, move into the sandbox dir you just created:
cd sandbox
ls
testdir1 Exercise: mkdir and recursiveness
What do you think the following command does? Would you consider that recursive? Run the command and see what it did.
mkdir testdir2 testdir3Click to see the solution
This command created two dirs at once. It is not recursive but it only operated on one “dir level”, i.e. it did not need to create two dir levels (or put another way, it did not create a dir within a dir).
lstestdir1 testdir2 testdir3Run the below two commands one by one, and read any output the commands print the screen. Why does the first command fail? What can you conclude about the
-pother than that it enables recursiveness?mkdir testdir1 mkdir -p testdir1Click to see the solution
mkdir testdir1produces an error, because you’re trying to create a dir that already exists:mkdir testdir1mkdir: cannot create directory ‘testdir1’: File existsWhile
mkdir -p testdir1doesn’t print anything:mkdir -p testdir1The latter may either mean that
mkdir -precreated the dir, or that it did nothing but also didn’t complain. Looking at thels -ltimestamp would be one way to distinguish between possibilities. Or you could create a file inside the dir and see whether that’s removed by when you (re)runmkdir -p. Here, I’ll just give you the answer:mkdir -pdoesn’t do anything when the dir already exists, and won’t produce an error either. This can be useful in non-interactive contexts.
5.2 touch to create a new file
To create new, empty files, use the touch command, specifiying the file name(s) as the argument(s):
# Create a single new file called newfile1.txt
touch newfile1.txt

# Create two additional files:
touch newfile2.txt newfile3.txtAs you just saw, both mkdir and touch can take multiple arguments. Notably, almost all Unix commands that operate on files and/or dirs can operate on multiple (many!) files at a time, which is one reason that using these commands can be highly efficient.
That’s especially true once you know how to select/specify many files at once using shortcuts known as wildcards: we will look at that later in this lecture.
Exercise: File locations
Can you check the sizes of the
newfilefiles you just created?Click to see the solution
ls -lhtotal 0 -rw-rw----+ 1 jelmer PAS0471 0 Jul 3 12:38 newfile1.txt -rw-rw----+ 1 jelmer PAS0471 0 Jul 3 12:38 newfile2.txt -rw-rw----+ 1 jelmer PAS0471 0 Jul 3 12:38 newfile3.txtCreate a create a new file
monarch.txtinside a new dirbutterflies. Don’t change your working dir while you’re doing this.Click to see the solution
To make a new dir and create a file in there, you can’t just use the
touchcommand, as it cannot create the directory for you (pay attention to the error, which may seem a bit confusing):touch butterflies/monarch.txttouch: butterflies/monarch.txt: No such file or directoryInstead, you first have create the new dir with
mkdir, and then create the new file in there:mkdir butterflies touch butterflies/monarch.txt
6 cp to copy
The cp command copies files and/or dirs from one location to another. Just like when copying files in a GUI file browser, the new copy can have a different name than the original. It can also have the same name, as long as it’s copied to a different dir.
cp has two required arguments in the following order:
- What you want to copy (source path)
- Where you want to copy it to (destination path).
That is, its basic syntax is cp <source path> <destination path>.
<...> notation
Recall that when I use < > around text in a line of code, that text is descriptive rather than literal, and has to be replaced. In this example, <source> should be replaced in an actual line of code by whatever “source” you want to use, and likewise for the <destination>.
Basic examples
Make a copy of one of the files you created above:
cp newfile3.txt newfile3_copy.txtImportantly, like with any Unix command, you can always refer to files and dirs that aren’t in your current working dir – for example:
cp ../../garrigos-data/meta/metadata.tsv meta2.tsvThat command copied metadata.tsv, which was not in your working dir, to a new file meta2.tsv in your working dir.
For example, you may get confused about how many levels you need to go up, and pressing Tab after the / will help you to orient. Additionally, you will be much faster and less likely to have typos in your paths when you consistently use Tab completion!
Copying into your working dir without changing the name
When copying something into your working dir, like above, you may not actually want to change the file name. To accomplish this, you could just repeat the original file name in the destination path:
cp ../../garrigos-data/meta/metadata.tsv metadata.tsvBut do you really need to repeat the filename – which is not just more typing, but can be error-prone as well? No!
If the destination path is simply the . shortcut that indicates your current working dir, then the file name of the copy will not be changed:
cp ../../garrigos-data/meta/metadata.tsv .Copying dirs and their contents
Finally, cp will by default refuse to copy directories and their contents — that is, like mkdir, it is not recursive3. The -r option is needed for recursive copying:
cp -r ../../garrigos-data/meta .Check the contents of the sandbox dir again now that you’ve copied several items there:
lsbutterflies meta2.tsv metadata.tsv newfile1.txt newfile2.txt newfile3.txt meta7 mv to move and rename
First off, recall from last week that a mere file name like monarch.txt can represent a path, implying that the file is in your current working dir. More generally, both a file’s name (e.g. monarch.txt) and the dir it is inside (butterflies/) are part of the path (butterflies/monarch.txt).
With that in mind, it becomes apparent that moving a file versus renaming it is fundamentally the same operation: you are changing the path to the file.
As such, the mv command can be used to move files, rename them, or do both at the same time:
Same directory, different file name (“renaming”):
mv meta2.tsv meta_copy.tsvDifferent directory, same file name (“moving”):
# (You don't need the trailing slash to data/, but this can be clearer.)
mv meta_copy.tsv meta/
Different directory, different file name (“moving + renaming”):
mv metadata.tsv meta/metadata_old.tsv
Finally, note that unlike cp, the mv command is recursive by default!
mv and cp
You can move or copy multiple files at once with mv and cp. If you give these commands three or more arguments, only the last argument is interpreted as the destination — for example:
cp <source1> <source2> <destination>
mv <source1> <source2> <source3> <source4> <destination>mv and cp commands will by default:
- Not report what they do: no output = success (use the
-voption for verbose to make them report what they do). - Overwrite existing files without reporting this (use the
-ioption for interactive to make them ask before overwriting).
8 rm to remove
The rm command removes files and optionally dirs – here, remove the file copy you made above:
rm newfile1.txtLike with cp, the -r option is needed to make the command work recursively:
rm butterfliesrm: cannot remove ‘butterflies’: Is a directory# (This produces no output if it works)
rm -r butterfliesrm with caution! (Click to expand)
rm -r can be very dangerous — for example, the command rm -r / would attempt to remove the entire contents of the computer, including the operating system. A couple ways to take precautions:
- You can add the
-ioption, which will make you confirm each individual removal (can be tedious) - When you intend to remove an empty dir, you can use the
rmdircommand. This command fails on non-empty dirs.
Exercise: Spaces in file names — what could go wrong?
Say, you have a dir called
rawthat has important raw data:# [Hypothetical - don't run] lsrawNext, you create a dir for sequences, with a space in the file name (this is possible by quoting the full name as shown below):
# [Hypothetical - don't run]
mkdir "raw sequences"
Finally, you don’t need this dir after all, and carelessly try to remove it:
# [Hypothetical - don't run]
rm -r raw sequences
What would happen when that last command is run? (Click for the answer)
Because the "..." quotes were omitted with the rm command, it will interpret raw and sequences as two separate arguments, i.e. as two separate files/dirs to remove.
Therefore, the rm command will not remove the raw sequences dir, but it will remove the “earlier” raw dir — now your project’s data has been erased! 😳
sequences dir.)
9 Wildcard expansion (globbing)
Shell wildcard expansion is a very useful technique to select multiple files, where wildcards are characters that have a special meaning.
To practice with this, start by creating some dummy FASTQ files in your sandbox dir:
# (Copy-and-paste this into the shell rather than typing it out)
touch sample1_R1.fastq sample1_R2.fastq
touch sample2_R1.fastq sample2_R2.fastq
touch sample3_R1.fastq sample3_R2.fastq
By far the most commonly used wildcard is *, which matches any number of any combination of characters (including “nothing” – the absence of any characters). For example, you can match only the two sample1 files with a * using:
# This matches files that start with "sample1"
ls sample1*
sample1_R1.fastq sample1_R2.fastqSelecting files with wildcard expansion is also called globbing. When globbing, the pattern has to match the entire file name – therefore, the following doesn’t match anything:
# This matches files that _end in_ R1, but there are no such files:
ls *R1
ls: cannot access *R1: No such file or directorySo, if the string (text) that we use for matching is in the middle of the filename, like R1, we need a * on both sides of it:
# This matches files that contain, anywhere in their names, "R1":
ls *R1*
sample1_R1.fastq sample2_R1.fastq sample3_R1.fastqIn summary:
| Pattern | Matches files whose names… |
|---|---|
sample1* |
Start with “sample1” |
*fastq |
End with “.fastq” |
*_R1* |
Contain “_R1” |
* |
(matches all files in the working dir)4 |
Exercise: File matching
List only the FASTQ files for sample 3.
Click for the solution
ls sample3*sample3_R1.fastq sample3_R2.fastqWhich files does
ls *samp*le*match? Make a prediction before you test it.Click for the solution
It matches all the FASTQ files, because:
- All file names start with
sample, - Since
*also matches “zero characters”, there is no requirement for the presence of characters at the locations of the “unnecessary”*s.
- All file names start with
Create 2 new files called
sample1.txtandsample2.txtin the current working dir. Then, only match the 2 FASTQ files for sample1.Click for the solution
First we create the files:
touch sample1.txt sample2.txtThen we match them – the below code means any file that starts with “sample1” and end with “fastq”:
ls sample1*fastqsample1_R1.fastq sample1_R2.fastq
Expansion is done by the shell itself
While it may seem like a trivial or odd distinction, it is important to realize that the “expansion” –of a wildcard to matching file names– is done by the shell itself instead of by ls or another command you might be using wildcards with. This means that a command like ls will “see”/“receive” the list of files after the expansion has already happened.
So, when you type…
ls sample1*fastq…the shell will first do wildcard expansion. That means that what it really ends up running, in this particular case, is:
ls sample1_R1.fastq sample1_R1.fastqPractical examples
Because the expansion is done by the shell, wildcard expansion works with any command that accepts multiple paths as arguments, such as copy (cp command), move (mv) or delete (rm). For example, we can:
Remove any stray
.txtfiles using:# (The -v option will make rm report what it's removing) rm -v *.txtremoved 'newfile2.txt' removed 'newfile3_copy.txt' removed 'newfile3.txt' removed 'sample1.txt' removed 'sample2.txt'Move all FASTQ files using:
mkdir fastq_files
mv -v *fastq fastq_files/
renamed 'sample1_R1.fastq' -> 'fastq_files/sample1_R1.fastq' renamed 'sample1_R2.fastq' -> 'fastq_files/sample1_R2.fastq' renamed 'sample2_R1.fastq' -> 'fastq_files/sample2_R1.fastq' renamed 'sample2_R2.fastq' -> 'fastq_files/sample2_R2.fastq' renamed 'sample3_R1.fastq' -> 'fastq_files/sample3_R1.fastq' renamed 'sample3_R2.fastq' -> 'fastq_files/sample3_R2.fastq'
Footnotes
Or use the keyboard shortcut Ctrl+`.↩︎
gitis a type of command that has “subcommands”, such ascloneand many others. You will learn much more about Git next week.↩︎For better or worse, non-recursiveness in Unix commands is meant as a sort of safety mechanism, as you may otherwise more easily operate on very large amounts of data accidentally.↩︎
Except so-called hidden files.↩︎