VS Code and Markdown
Week 2 – Lecture B

1 Introduction
1.1 Context & overview
The previous lecture emphasized the importance of research documentation, and recommended using plain-text files to do so. Now, you will learn to use Markdown, a simple plain-text markup language that is a great option for writing your documentation.
But first, we’ll introduce to VS Code, the text editor you’ll use to write Markdown – as well as to write Unix shell code throughout the course.
2 VS Code
2.1 What is VS Code?
VS Code is basically a fancy text editor. Its full name is Visual Studio Code, and it’s also called “Code Server” at OSC.
To emphasize the additional functionality relative to basic text editors like Notepad and TextEdit, editors like VS Code are also referred to as IDEs: Integrated Development Environments. The RStudio program is another good example of an IDE. Just like RStudio is an IDE for R, VS Code will be our IDE for shell code1.
2.2 Starting VS Code at OSC
Log in to OSC’s OnDemand portal at https://ondemand.osc.edu
In the blue top bar, select
Interactive Appsand near the bottom, clickCode Server.Interactive Apps like VS Code and RStudio run on compute nodes (not login nodes). Because compute nodes always need to be “reserved”, we have to fill out a form and specify the following details:
- The Cluster that we want to use:
pitzer - The Account, the OSC Project to be billed for the compute node usage:
PAS2880 - The Number of hours we want to make a reservation for:
2 - This time, leave the Working Directory (starting point) for the program blank
- The App Code Server version:
4.8.3(this should be the only available option)
- The Cluster that we want to use:
Click
Launchand you’ll be sent to the My Interactive Sessions page with a card for your job at the top.First, your job may be Queued for some seconds (i.e., waiting for computing resources to be assigned to it), but it should soon switch to Starting and then be ready for usage (Running) in another couple of seconds:
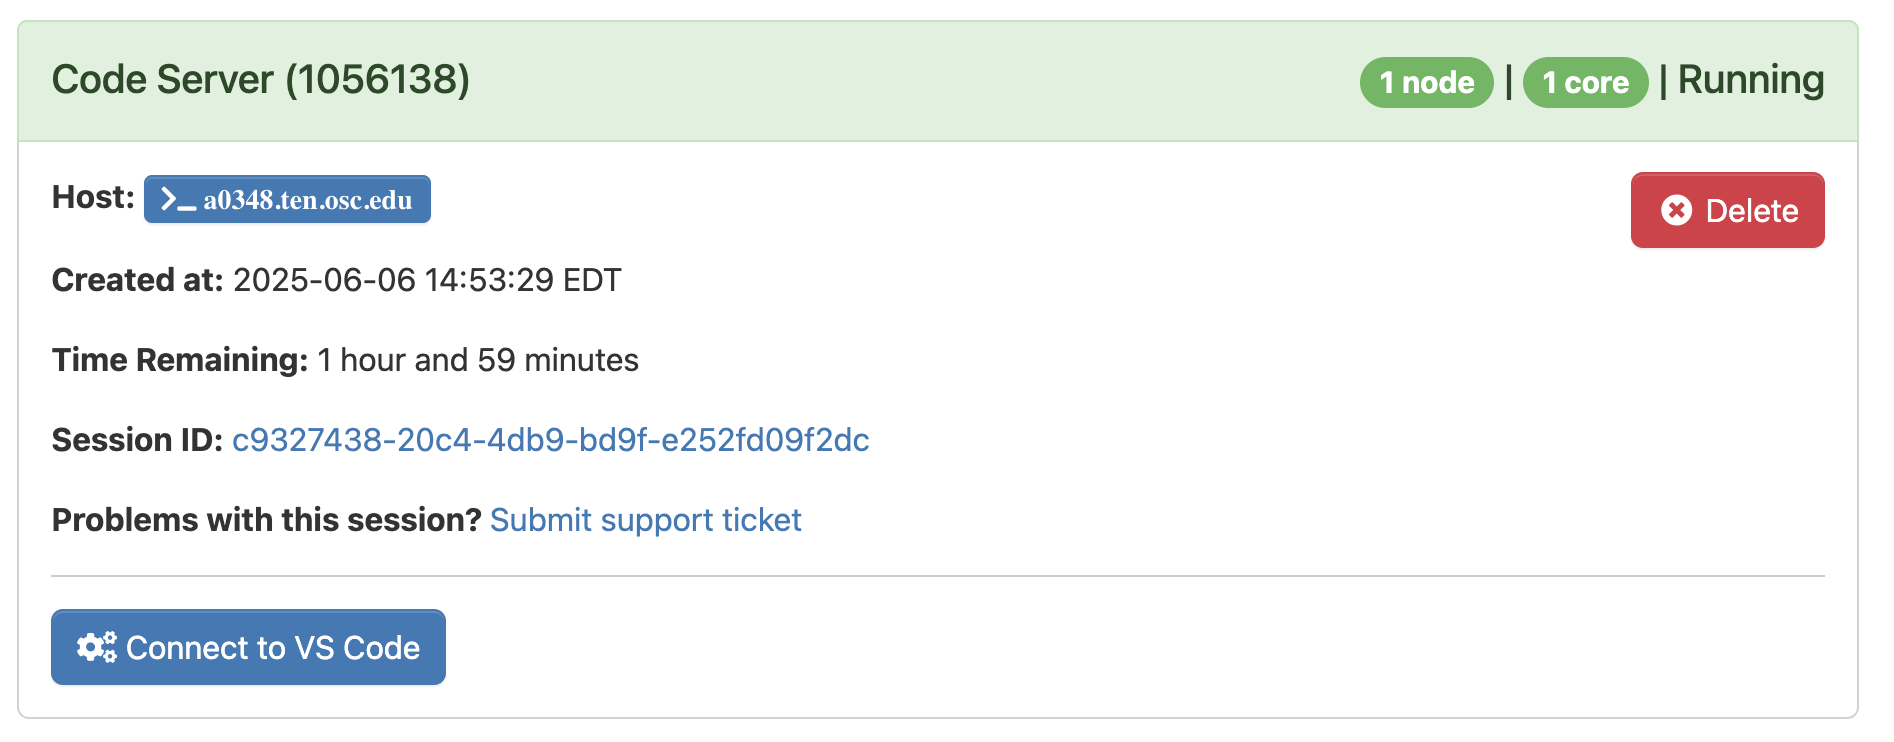
Once the blue Connect to VS Code button appears, click that to open VS Code in a new browser tab.
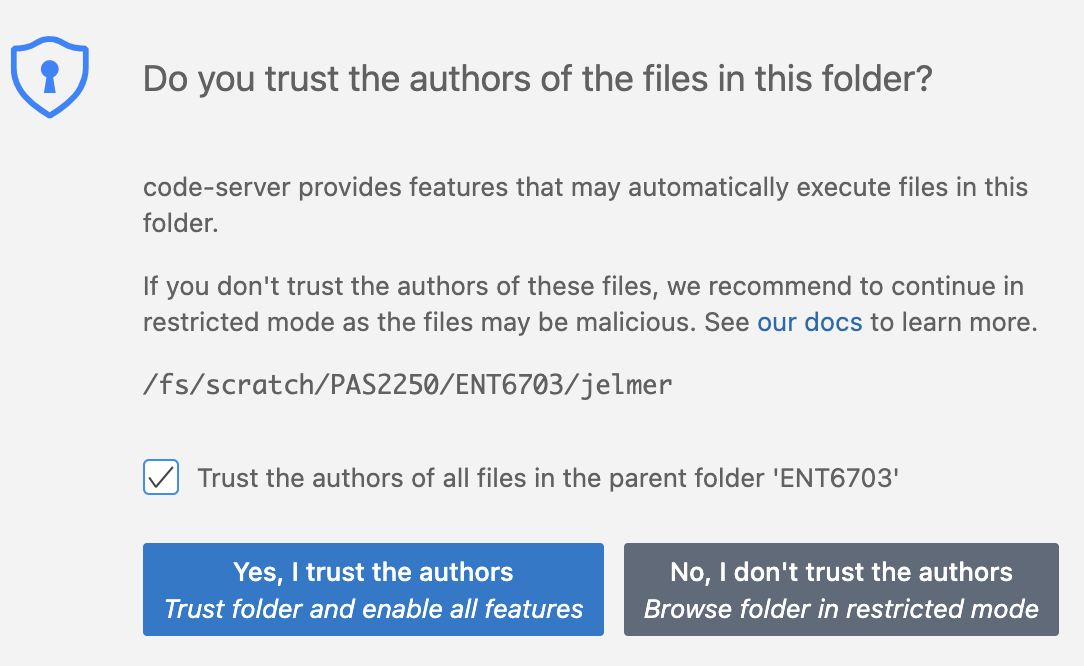
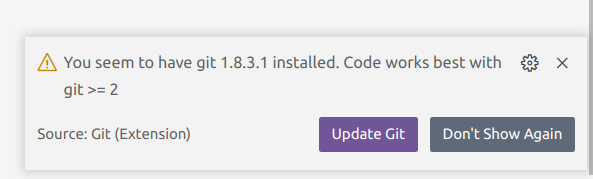
When VS Code opens, you may get these two pop-ups (and possibly some others) — click “Yes” (and check the box) and “Don’t Show Again”, respectively:
- You’ll also see a Get Started page — you don’t have to go through any steps that may be suggested there.
Congratulations: you have started your first compute job at OSC! 🥳
2.3 The VS Code User Interface
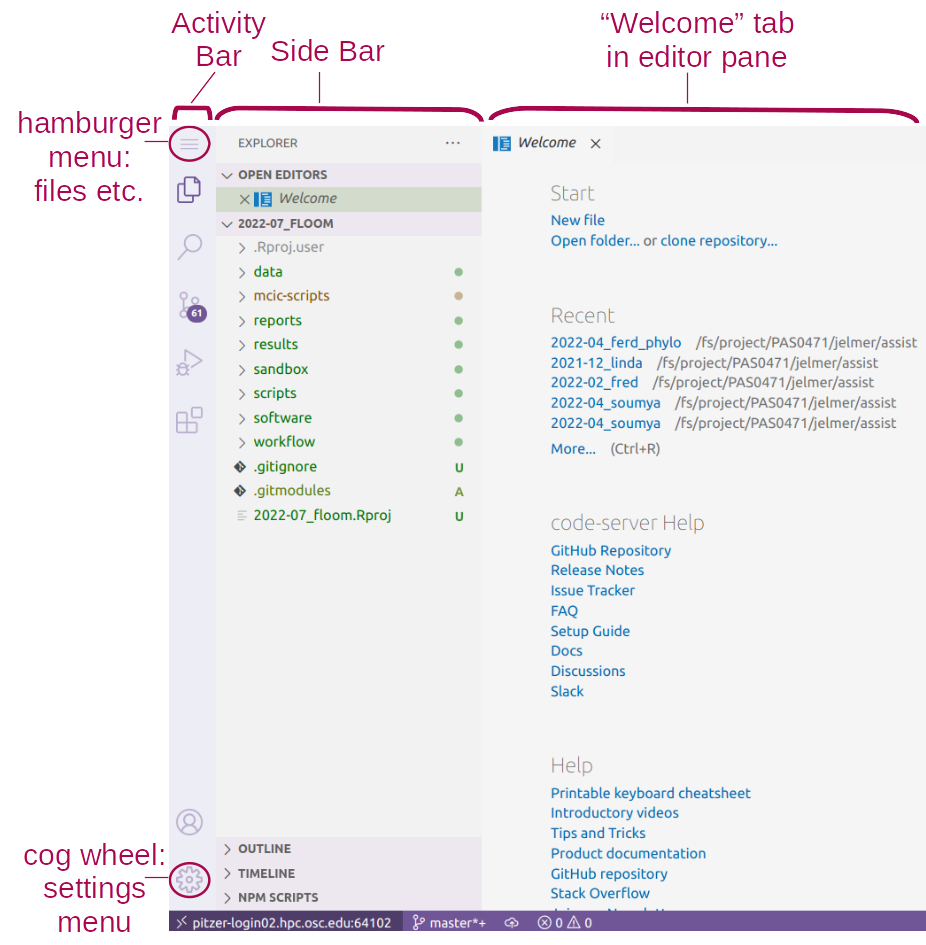
Side bars
By default, the (wide) Side Bar will show a file explorer, where you see your files, create new folders and files, and so on.
The Activity Bar (narrow side bar) on the far left has:
- A (“hamburger menu”), which has menu items like
Filethat you often find in a top bar - A (cog wheel icon) in the bottom, through which you can mainly access settings
- Icons to toggle between options for the wide Side Bar: we’ll talk about those in a later session
2.4 A folder as a starting point
Very conveniently, VS Code takes a specific folder as a starting point in all parts of the program:
- In its file explorer
- When saving files
- In the Unix shell its terminal
Click File > Open Folder and then type/select the personal dir within /fs/ess/PAS2880/users you made last week (for example, I will select /fs/ess/PAS2880/users/jelmer). This will cause the program to reload.
Remember all the talk of using relative paths that are supposed to start at a (research) project’s top-level dir? Opening a folder like this in VS Code will help you with this, and also makes it easy to switch between projects!
Terminal (with a Unix shell)
Open a terminal by clicking > Terminal > New Terminal. We’ll start using this terminal in the next lecture. For now, practice resizing panes (terminal vs. editor, and the width of the side bar) by hovering your cursor over the lines dividing them and then dragging.
Editor pane and Get Started document
The main part of the VS Code is the editor pane. Here, you can open scripts and other types of text files, images, and so on. Like in a web browser, you can have multiple tabs open.
Whenever you open VS Code, an editor tab with a Get Started document is automatically opened. This provides some help and shortcuts to recently opened files and folders.
Create and save a new file:
- Open a new file: Click the hamburger menu >
File>New File. - Save the file (Ctrl/⌘+S) within your
week02dir as a Markdown file, e.g.markdown-intro.md.
3 Markdown
Markdown is a lightweight text “markup language” that provides formatting options for plain-text files. Think of it as a much simpler version of HTML, which also comes in plain-text source code/format and a rendered counterpart. A source Markdown file can be “rendered” to produce an output file in a variety of formats like PDF and (rendered) HTML.
As a first example of the kind of markup you can do: surrounding one or more characters by single or double asterisks (*) will apply italic and bold formatting, respectively:
- When you write
*italic example*this will be rendered as: italic example. - When you write
**bold example**this will be rendered as: bold example.
3.1 Markdown in VS Code
When you save a file in VS Code with the extension .md (short for Markdown) extension, as you have done:
- Some formatting will be automatically applied in the editor.
- You can open a live preview of the rendered version of the file by using the icon “Open Preview to the Side” shown on the right.

Let’s see this in action. Try your first bit of Markdown by typing the following in your markdown-intro.md file…
This is an *italic example*

This is a **bold example**
… and then click the Preview icon:

3.2 An example document
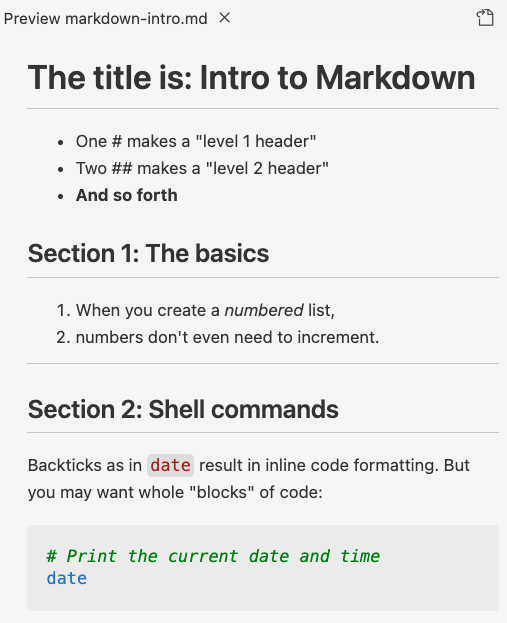
Now, let’s learn some additional Markdown “syntax” (grammar/rules) by typing what is shown on the left, and seeing the effects in the live Preview in VS Code:
Type:
# The title is: Intro to Markdown

- One # makes a "level 1 header"
- Two ## makes a "level 2 header"
- **And so forth**

## Section 1: The basics

1. When you create a _numbered_ list,
1. numbers don't even need to increment.

----

## Section 2: Shell commands

Backticks as in `date` result in inline
code formatting.
But you may want whole "blocks" of code:

```bash
# Print the current date and time
date
```
That should be rendered into the following preview:
3.3 Most common Markdown syntax
Here is an overview of some of the syntax we used above:
| Syntax/source | Result/rendered output |
|---|---|
| *italic* | italic text (or use one underscore: _italic_) |
| **bold** | bold text (or use two underscores: __bold__) |
| # My Title | Header level 1 (largest: use for the document’s title) |
| ## My Section | Header level 2 (smaller – and so forth for additional header levels) |
| - List item | Unordered (bulleted) list |
| 1. List item | Ordered (numbered) list |
| --- | Horizontal rule (line) – use at least 3 dashes |
Code-formatting related options:
| Syntax/source | Result/rendered output |
|---|---|
| `inline code` | “Code-formatted” text for inline use: inline code |
```bashcode-block code ``` |
bash-language code block: This will apply language-specific code formatting. Other languages can be specified equivalently, e.g. ```r creates an R-language code block. |
```code-block code ``` |
Generic/language-agnostic code block |
And some other commonly used Markdown syntax:
| Syntax/source | Result/rendered output |
|---|---|
| [link text](website.com) | Clickable link with “hidden” URL: link text |
| <https://website.com> | Clickable link with visible URL: https://website.com |
| > Text | Blockquote (like quoted text in emails) |
Exercise: Markdown
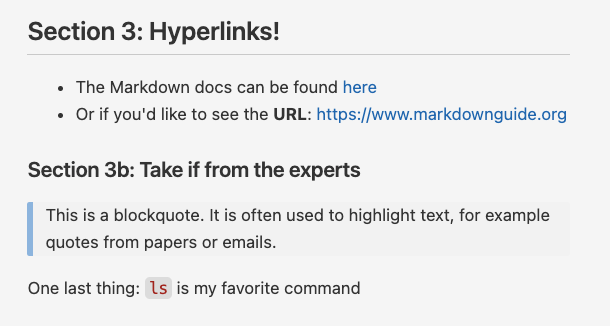
Add text to your markdown-intro.md document that would result in the following preview:
Click for the solution
## Section 3: Hyperlinks!

- The Markdown docs can be found [here](https://www.markdownguide.org)
- Or if you'd like to see the **URL**: <https://www.markdownguide.org>

### Section 3b: Take if from the experts

> This is a blockquote. It is often used to highlight text, for example quotes from papers or emails.

One last thing: `ls` is my favorite command
3.4 Use whitespace around Markdown syntax elements
First, it’s highly recommended (and in some cases necessary for correct rendering) to leave a blank line between different sections, such as between lists, headers, and regular paragraphs:
## Chapter 2: List of ...

- Item 1
- Item 2

For example, ....
Second, leave a space after heading (#) and list (- or 1.) characters or they won’t be interpreted correctly:
This:
##An important list

-x
-y
-z
Will be rendered as:
##An important list
-x -y -z
3.5 How whitespace renders in Markdown
You’ll have noticed Markdown doesn’t show always show whitespace (spaces, newlines, etc.) like you type it:
- A single newline is completely ignored!
This:
Line 1.
Line 2.
Will be rendered as:
Line 1. Line 2.
This:
Writing
one
word
per
line.
Will be rendered as:
Writing one word per line.
- But a blank line between regular text will start a new paragraph, with some whitespace between the two:
This:
Paragraph 1.

Paragraph 2.
Will be rendered as:
Paragraph 1.
Paragraph 2.
- Multiple consecutive spaces or blank lines will be “collapsed” into a single one:
This:
Empty spacesWill be rendered as:
Empty spaces
Many


blank lines
Many
blank lines
- If you want more vertical whitespace than what is provided between paragraphs, you’ll have to resort to HTML (you can use any HTML markup in Markdown!) — each
<br>item forces a visible linebreak:
This:
One <br> word <br> per line
and <br> <br> <br> <br> <br>
several blank lines.
Will be rendered as:
One
word
per line and
several blank lines.
- A single linebreak (as opposed to a new paragraph) can be forced using two or more spaces (i.e., press the spacebar twice) or a backslash
\after the last character on a line:
This:
My first sentence.\
My second sentence.
Will be rendered as:
My first sentence.
My second sentence.
Tables are a bit of a pain to make, but you can do so with vertical bars | and dashes/hyphens - as follows:
This:
| city       | inhabitants |
|------------|-------------|
| Columbus   | 906 K       |
| Cleveland  | 368 K       |
| Cincinnati | 308 K       |
Will be rendered as:
| city | inhabitants |
|---|---|
| Columbus | 906 K |
| Cleveland | 368 K |
| Cincinnati | 308 K |
3.6 In closing
Markdown is useful for documentation because it is:
- Easy to write – you only need to know a dozen or so syntax constructs to be able to write Markdown.
- Easy to read in source form – and VS Code will apply some formatting even in source files!
- A de facto standard for documentation files in computational fields, such that e.g. GitHub, where you will learn to share your project files to in week 4, will render them for you.
Therefore, we recommend you use Markdown files (with a .md extension) instead of regular text (.txt) files to write the kind of documentation of your research projects we discussed in the previous session.
Producing a rendered output file like a HTML or PDF from Markdown yourself is rarely need for the abovementioned reasons. That said, if you do need to render a Markdown file to e.g. HTML or PDF, use Pandoc.
Markdown for everything!?
Several Markdown extensions allow Markdown documents to contain code that runs, with that code’s output then included in rendered documents! For example, R Markdown (.Rmd) and the follow-up Quarto — you will learn Quarto later in this course.
All in all, there are many possibilities with Markdown and its extensions! For instance, consider that:
- This entire website, including last week’s slides, is written using Quarto.
- Quarto also has support for citations and journal-specific formatting, so you can even write manuscripts with it.
Learn more about Markdown and its syntax on this excellent documentation site: https://www.markdownguide.org.
Footnotes
Some advantages of VS Code: Works with all operating systems, is free, and open source; it has an integrated terminal with a Unix shell; it is available at OSC OnDemand; it is very popular and heavily developed↩︎