Project file organization and documentation
Week 2 – Lecture A

1 Introduction
1.1 Learning goals
- This lecture – learn best practices for:
- Organization and management of your research project files
- Documentation of your research project
- This week’s second lecture:
- Learn how to use Markdown for documentation.
- Get to know the text editor you’ll use throughout the course: VS Code.
- This week’s third lecture:
- Learn the basics of working in the Unix shell.
1.2 Lecture context & overview
This lecture covers the principles behind, and practice of, good research project documentation and file organization. Why is this important? Thoughtful and systematic project documentation and organization facilitates:
- Collaboration with others and your future self
- Reproducibility of your research
- Your ability to automate your work
- Your ability to use version control (week 4)
Relatedly, Noble (2009) cited the following two principles underlying his recommendations on this topic:
- Someone unfamiliar with your project should be able to look at your computer files and understand in detail what you did and why.
- Everything you do, you will probably have to do over again.
Keep those principles in mind while we discuss the recommendations below!
2 File organization and management
I will recommend the following set of practices for research project file organization and management:
- Use one folder (folder hierarchy) for one project
- Within your project folder, separate different kinds of files using a consistent subfolder structure
- Avoid manual editing of your data and your results
- Follow file and folder naming practices that favor machine- and human-readability
- Use so-called “relative paths” to refer to files and folders within your project
Let’s get into these!
2.1 Use one folder for one project
For one research project, all files should be contained in one folder — or we should perhaps say one hierarchy of folders, since you can -and should!- make liberal use of “subfolders”. Regardless, this recommendation entails that you should not store files associated with one project scattered across a computer.
Here is a minimal example diagram of two properly separated and systematically organized research project folders:

The way to read this is that the blue
data folder is contained within the project1 folder,which in turn is contained within the Home folder (your personal Home location on the computer).
This means that for a given research project, you can pinpoint a specific folder, like project1 in the image above…
- that contains all files related to that project,
- while not containing any files unrelated to that project.
When you have a single folder hierarchy for each project, it is easier to:
- Find files
- Share or back up your entire project
- Avoid throwing away stuff in error
From Wilson et al. (2017):
As a rule of thumb, divide work into projects based on the overlap in data and code files:
If 2 research efforts share no data or code, they will probably be easiest to manage independently.
If they share more than half of their data and code, they are probably best managed together.
If you are building tools that are used in several projects, the common code should probably be in a project of its own.
2.1.1 Projects with shared data or code
To access files outside of the project (e.g., shared across projects), it is easiest to create links (i.e. shortcuts/aliases) to these files:

project1 but used in both projects.project2 contains a link to the data.But shared data or scripts are generally better stored in separate folders, and then linked to by each project using them:

These strategies do decrease the portability of your project, and moving the shared files even within your own computer will cause links/shortcuts to break. A more portable method is to keep shared (multi-project) files online — this is especially feasible for scripts under version control:

For data, this is also possible but often not practical due to file sizes._ It’s easier after data has been deposited in a public repository._
2.2 Separate different kinds of files using a consistent folder structure
Within your project’s folder hierarchy, use subfolders to separate different kinds of files, such as files that contain:
- Code
- Data
- Results (of data processing and analysis)
Here is one good way of organizing project files with a set of top-level folders and some standard documentation files:
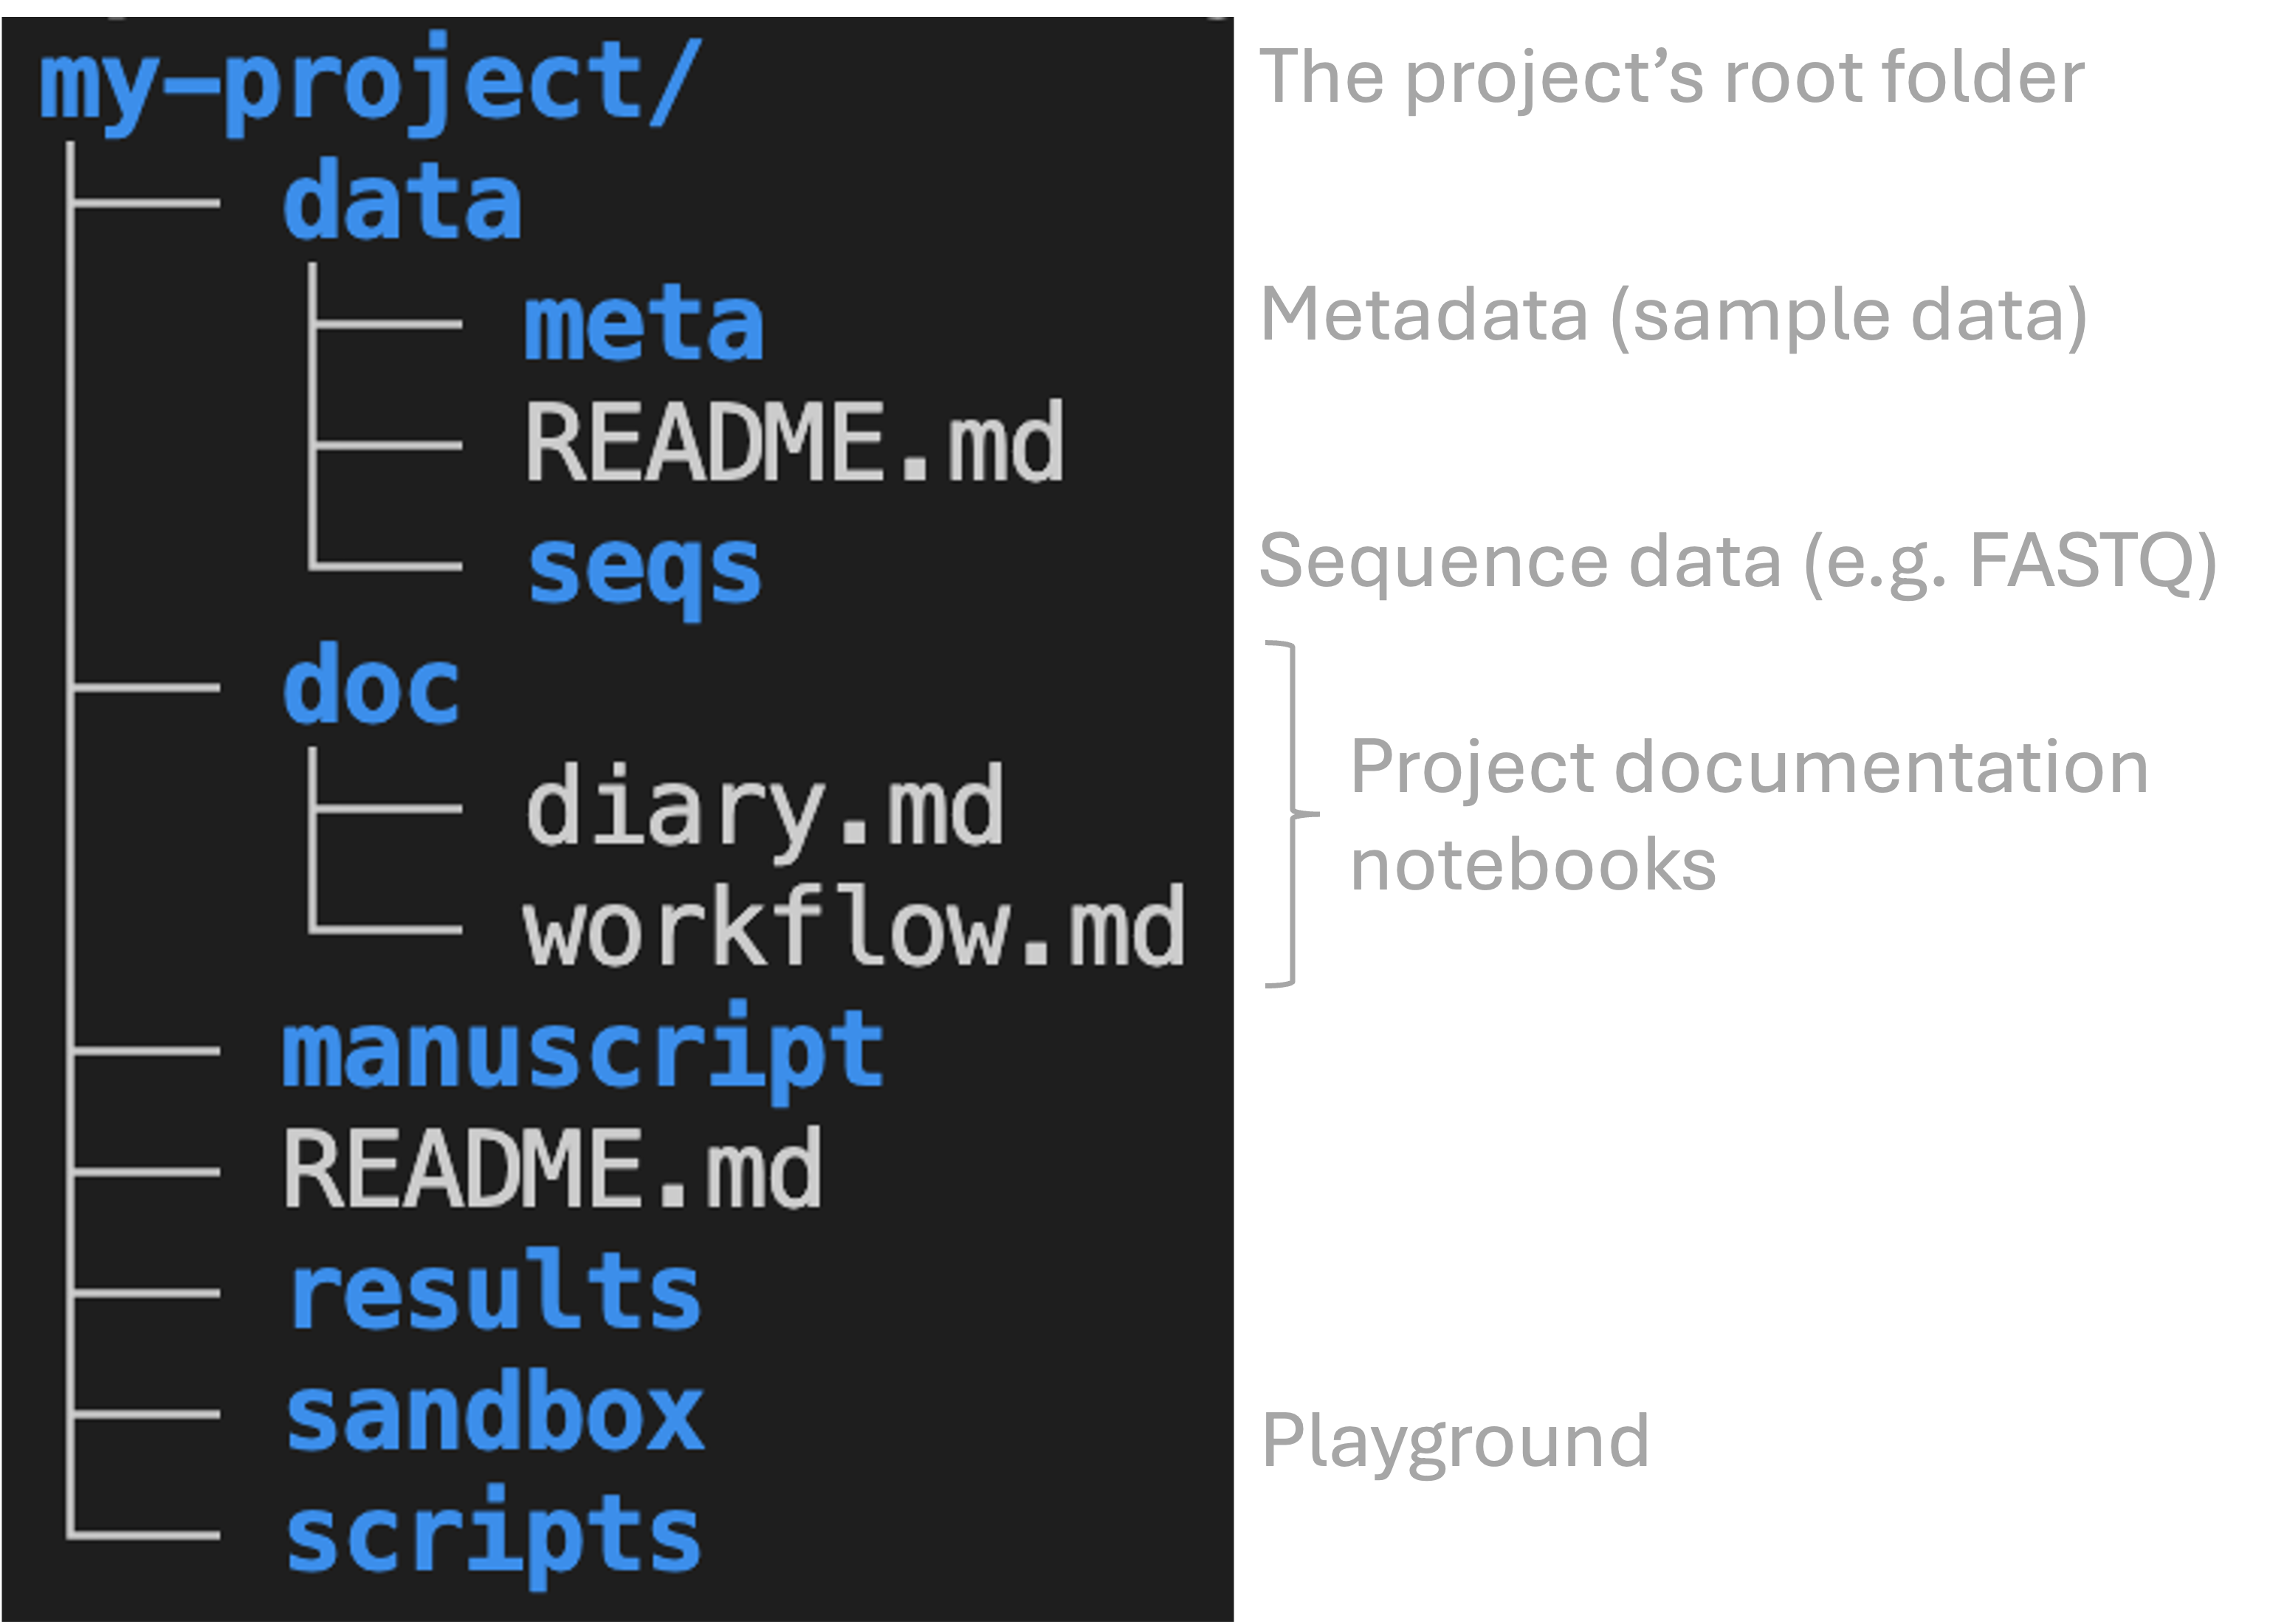
my-project, which e.g. contains the data folder that in turn contains other folders. Folders are shown in blue and files in white. The last section of this page will cover the .md documentation files shown.Another important good practice is to use subfolders liberally and hierarchically. For example, create subfolders within results for each step in your project. At least in in omics data analysis, it is often most convenient to mostly name these subfolders after the tool (piece of software) it uses:
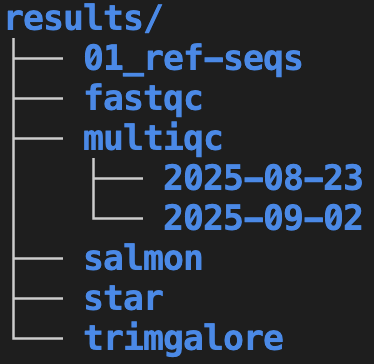
results mostly organized by the software that produced the results. Separate runs for MultiQC are grouped into further subfolders by date.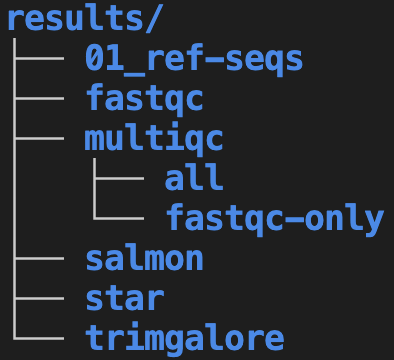
In the above examples:
While most subfolders are organized by and named after the software that produced each set of results, other kinds of categories and names make more sense in some cases. For example,
01_ref-seqsrepresents a folder with reference genome sequences. The01_prefix is used to ensure this folder shows up at the top (see the box below, and the section on file naming, for more on file/folder numbering).Say that the MultiQC program was run multiple times. On the left, these folders are named after the run date, whereas on the right, folder names describe what each run was for. Both of these options have pros and cons – for example, always using a date is simple and consistent but is less clear about the purpose of each folder.
The two different treatments of multiqc subfolders illustrates that for many of the recommendations presented here, multiple reasonable alternatives do exist.
The above recommendations only go so far, and several details can be modified depending on personal preferences and project specifics. For example:
You can start folder and file names with numbers so that they would automatically be sorted in a logical way (i.e. step 1 then step 2, etc.), e.g. within
resultsand/orscriptsas shown below. That can be really neat and clear but the drawback of this is that if you later insert a step, a lot of renaming needs to be done…|-- results/ | |-- 01_reference-seqs/ | |-- 02_fastqc/ | |-- 03_multiqc/ | |-- 04_trimgalore/ | |-- 05_star/ | |-- 06_salmon/ |-- scripts/ | |-- 01_download-reference.sh | |-- 02_fastqc.shSeveral of these folders could be named differently, such as:
- Some researchers prefer
analysisinstead ofresults - Some researchers prefer
src(“source”) instead ofscripts
- Some researchers prefer
Some recommendations, such as by Buffalo (2015), use
data/rawanddata/processedfolders. However, this blurs the line between data and analysis results, and I much prefer to put “processed data” withinresults.Noble (2009) recommends that subfolders within
resultsare initially organized by date and then by topic/software (e.g:results/2025-08-30/multiqc). I personally don’t think this works well for most omics data analysis.
2.3 Avoid manual editing of data and results
Once they have been produced, raw data files should never be edited. Instead, any data processing or even correction should be done with separate copies of the data.
Additionally, you should avoid manually editing any data and results files. Instead, such editing should be done using code. As Abdill, Talarico, and Grieneisen (2024) explain (my bolding):
For example, if script A processes raw data into a table of gene expression levels, and script B summarizes this table by pathway, we should be concerned if there is a step after script A that requires a user to open the table and edit fields by hand to prepare the data for script B. Such quick fixes can be tempting, but they also add risk: A researcher could easily add a typo, corrupt a file in unexpected ways, or forget the step altogether.
When you use code to make such fixes, it can be included as part of your project’s “workflow” and therefore be reproducible.
That also makes these fixes much easier to repeat if needed. Recall the second of Noble (2009)’s guiding principles mentioned above: “Everything you do, you will probably have to do over again.” While a manual fix may be quicker if it really only needed to be done once, it is common to have to repeat things in practice, such that writing code to do the fix can also end up saving time.
While managing your files, you should conceptually treat raw data and results differently:
- Raw data, once collected or received, should be treated as read-only (never edit the original files!) and highly valuable (make backups!)
- Results can be treated as essentially disposable, because you should be able to regenerate them easily with the skills you will learn in this course (see also the section on avoidng manual editing below).
2.4 Use machine- and human-readable file names
Here are three key principles for good file names (from Jenny Bryan) — they should:
- Be machine-readable
- Be human-readable
- Wherever appropriate, be ordered correctly by default alphanumeric file sorting
We’ll go into each of these aspects below.
2.4.1 Machine-readable
Consistent and informative naming helps you to programmatically find and process files.
Don’t use spaces in file names, as these lead to inconvenience at best and disaster at worst when working in the Unix Shell – and to some extent with other programming languages as well.
More generally, only use the following characters in file names:
- Alphanumeric characters (A-Za-z0-9)
- Underscores (_)
- Hyphens (AKA dashes, -)
- Periods (AKA dots, .)
Where appropriate, you can provide metadata like Sample ID, date, and treatment in file names:
sample032_2016-05-03_low.txt
samples_soil_treatmentA_2019-01.txt
With such file names, you can easily find files from e.g. a certain month or treatment.
2.4.2 Human-readable
While machine-readability in file names is important, this should not go at the expense of human readability. For example, from Wilson et al. (2017):
“Name all files to reflect their content or function. For example, use names such as
bird_count_table.csv,manuscript.md, orsightings_analysis.py.”
Not only are the above file names informative, they are also human-readable thanks to the use of underscores (_) to separate words. Just because you shouldn’t use spaces in file names, doesn’t mean you should name your files like firstattemptatthissequenceanalysis.R!
More specifically, while there are multiple reasonable methods, here is one good way I will recommend:
- Use underscores (_) to delimit units you may later want to separate on: sampleID, batch, treatment, date.
- Within such units, use dashes (-) to delimit words:
grass-samples. - Limit the use of periods (.) to indicate file extensions (e.g.,
.R,.sh). - Generally avoid capitals.
For example, for a set of BAM (.bam) sequence alignment files:
mmus001_filtered-by-mq30_sorted.bam
mmus002_filtered-by-mq30_sorted.bam
...
mmus086_filtered-by-mq30_sorted.bam
Most important, however, is that once you find a scheme that works for you, you use that scheme consistently.
2.4.3 File names that are automatically ordered appropriately
Within file listings in computer’s file browsers (and in the Unix Shell, as you’ll see), default file ordering is typically alphanumerical. With that in mind:
Dates should be written as
YYYY-MM-DD: for example,2020-10-11. Not only does this lead to files being ordered correctly, this format is also unambiguous, preventing confusion between month and day in particular.Use leading zeros for correct alphanumeric sorting:
sample005. If you don’t do this,sample10will appear beforesample2, etc.:
Without leading zeros:
sample1
sample10
sample11
sample2
sample3
...
With leading zeros:
sample01
sample02
sample03
...
sample10
sample11- You may want to group similar files together by starting with the same phrase, and to number scripts by execution order – for example:
DE-01_normalize.R
DE-02_test.R
DE-03_process-significant.R
preprocess-01_fastqc.sh
preprocess-02_multiqc.sh
2.5 Use relative paths
To understand this recommendation, you first need to learn more about paths and folder structures.
2.5.1 Terminology and concepts related to paths
“Directory” (or “dir” for short) is another term for folder that is commonly used e.g. in coding contexts.
A “working dir” is the dir that you are currently located in. In a command-line interface, like the Unix shell you’ll learn after this, you are always in a certain working dir (and the same is basically true in a regular file browser).
“Unix-based” operating systems include MacOS and Linux (note: OSC uses Linux), and these have a single starting point to the directory structure: the root directory, depicted as
/1.
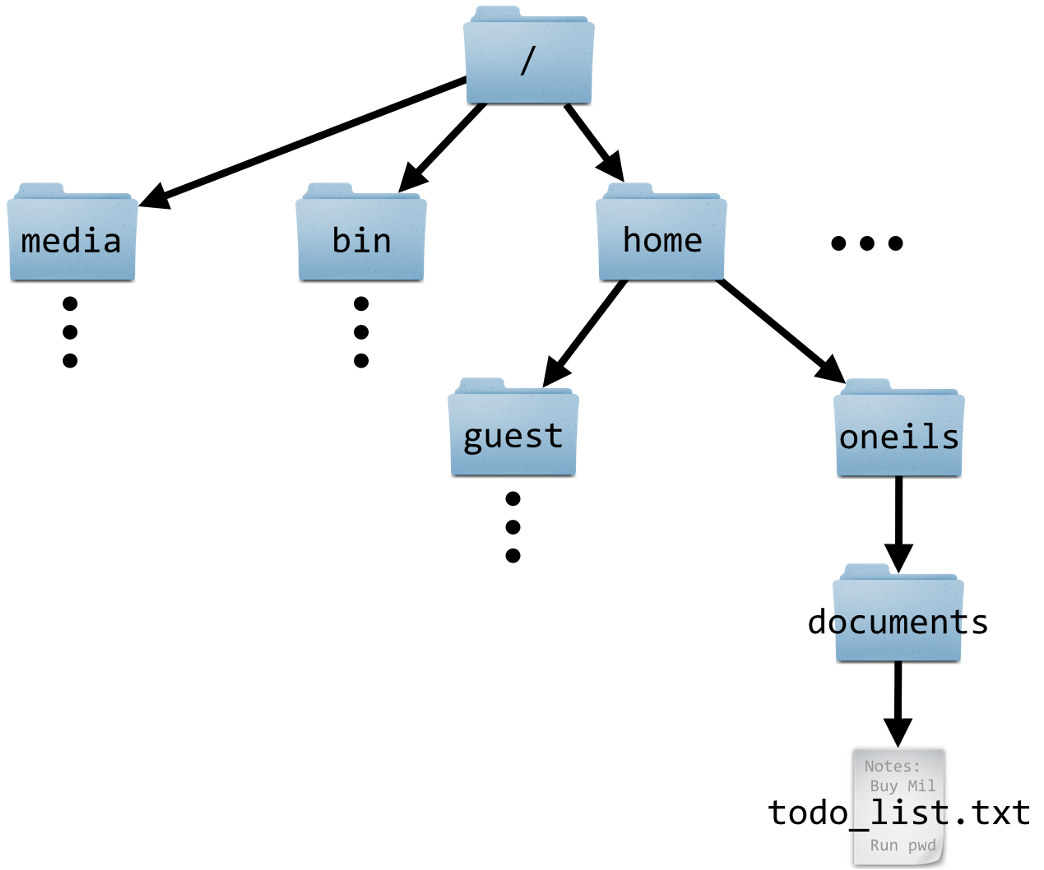
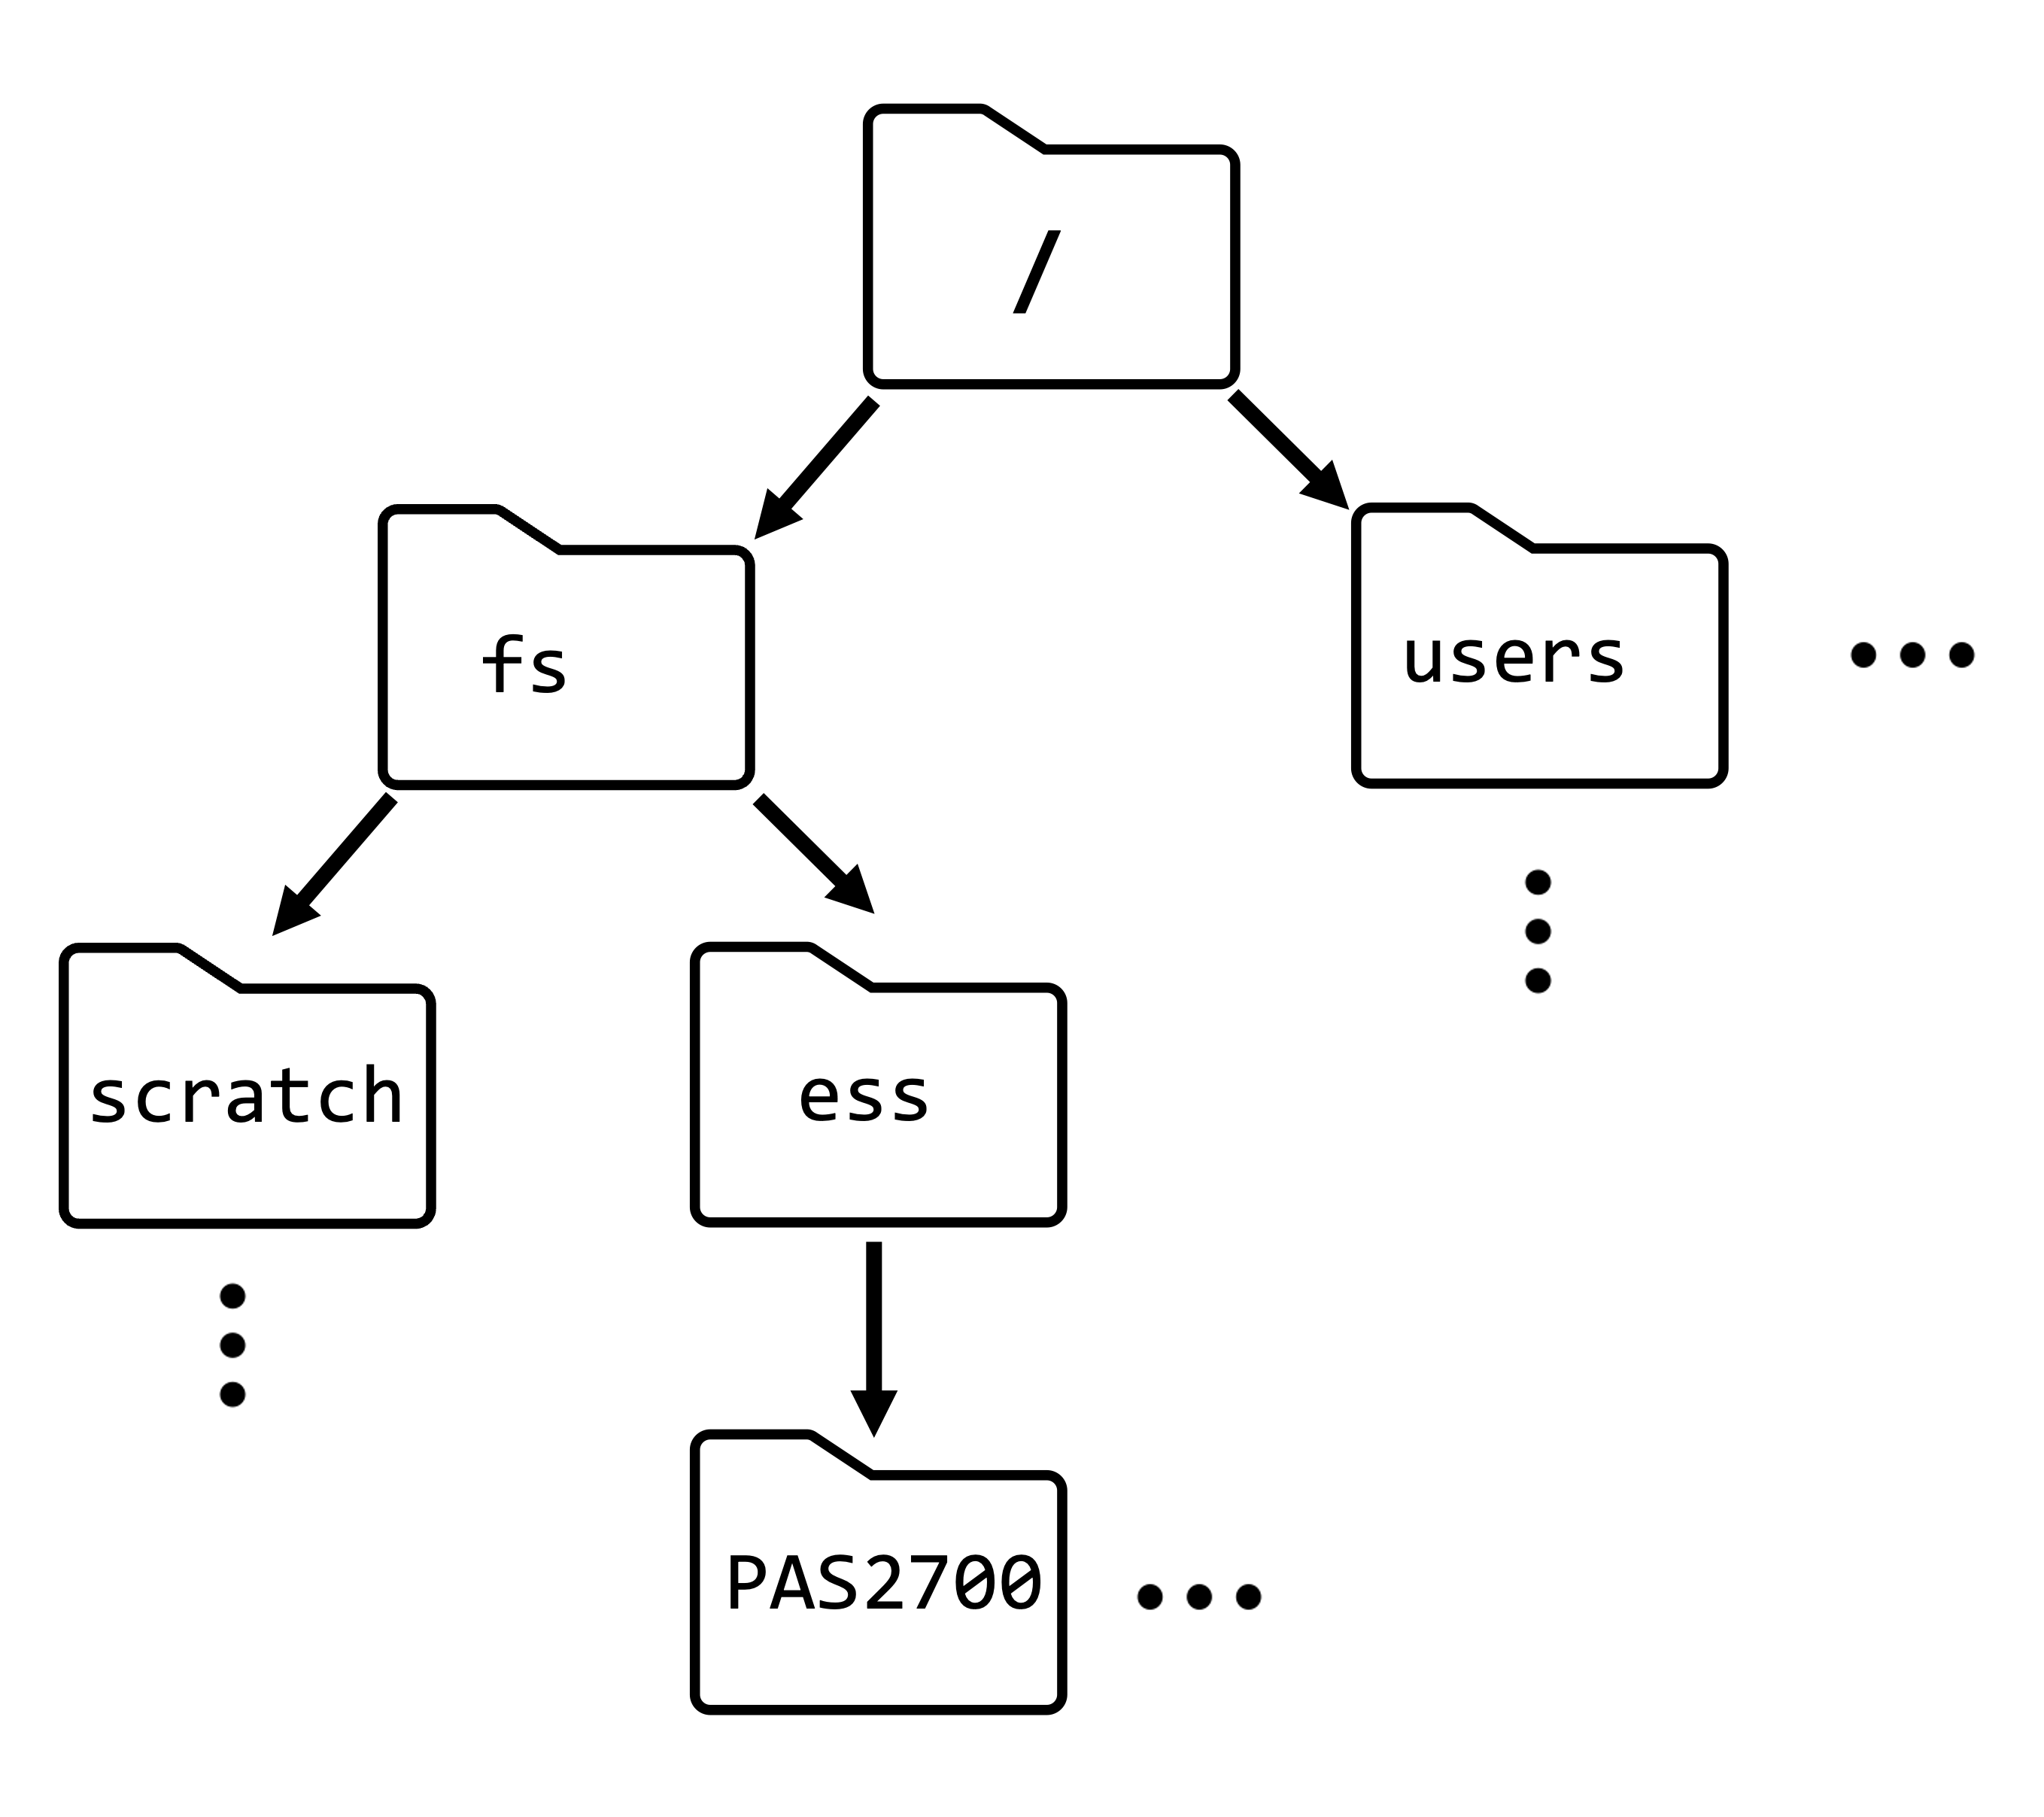
A “path” gives the location of a file or directory, in which directories are separated by forward slashes (
/)2.In a path, a leading
/is the root dir, and any subsequent/are used to separate dirs. For example, the path to our OSC project’s dir is/fs/ess/PAS2880. This means: the dirPAS2880is located inside the diress, which in turn is inside the dirfs, which in turn is in the computer’s root directory.Why all this talk of paths? When you code, you always use paths to refer to files and dirs.
In the left-hand schematic above, what is the path to the file todo_list.txt? (Click for the solution)
/home/oneils/documents/todo_list.txt
2.5.2 Absolute versus relative paths
The location of any file or dir can be referred to in two different ways, using either:
| Absolute paths | Relative paths | |
|---|---|---|
| Meaning | Start from the computer’s root dir | Start from your working dir |
| Recognized by | A leading / 3 |
No leading / |
| Examples | /fs/ess/PAS2880 |
– data/meta/metadata.tsv – todo_list.txt |
| Analogy | GPS coordinates for a geographical location: valid regardless of where you are | Directions along the lines of “take the second left”: validity depends on your current location |
In the examples above, how can the mere file name todo_list.txt represent a path? (Click for the solution)
A file name like todo_list.txt, with no directories included, can represent a relative path that implies the file is in our current working dir.
./ preface, e.g.: ./todo_list.txt. Next week, you’ll learn more about the . notation for the current working dir.
2.5.3 Why you should prefer relative paths
Given that absolute paths do not depend on your working dir, while relative paths do and therefore won’t work if you’re elsewhere — don’t absolute paths sound better? What could be a disadvantage of them?
The disadvantages of absolute paths are that they:
- Don’t generally work across computers
- Break when you move your entire project dir
Relative paths, on the other hand, can continue to work after moving project dirs within and between computers. This is the case as long as you consistently use the project’s top-level dir as your working dir (this is another general recommendation), i.e. as the starting point of your relative paths. For example:
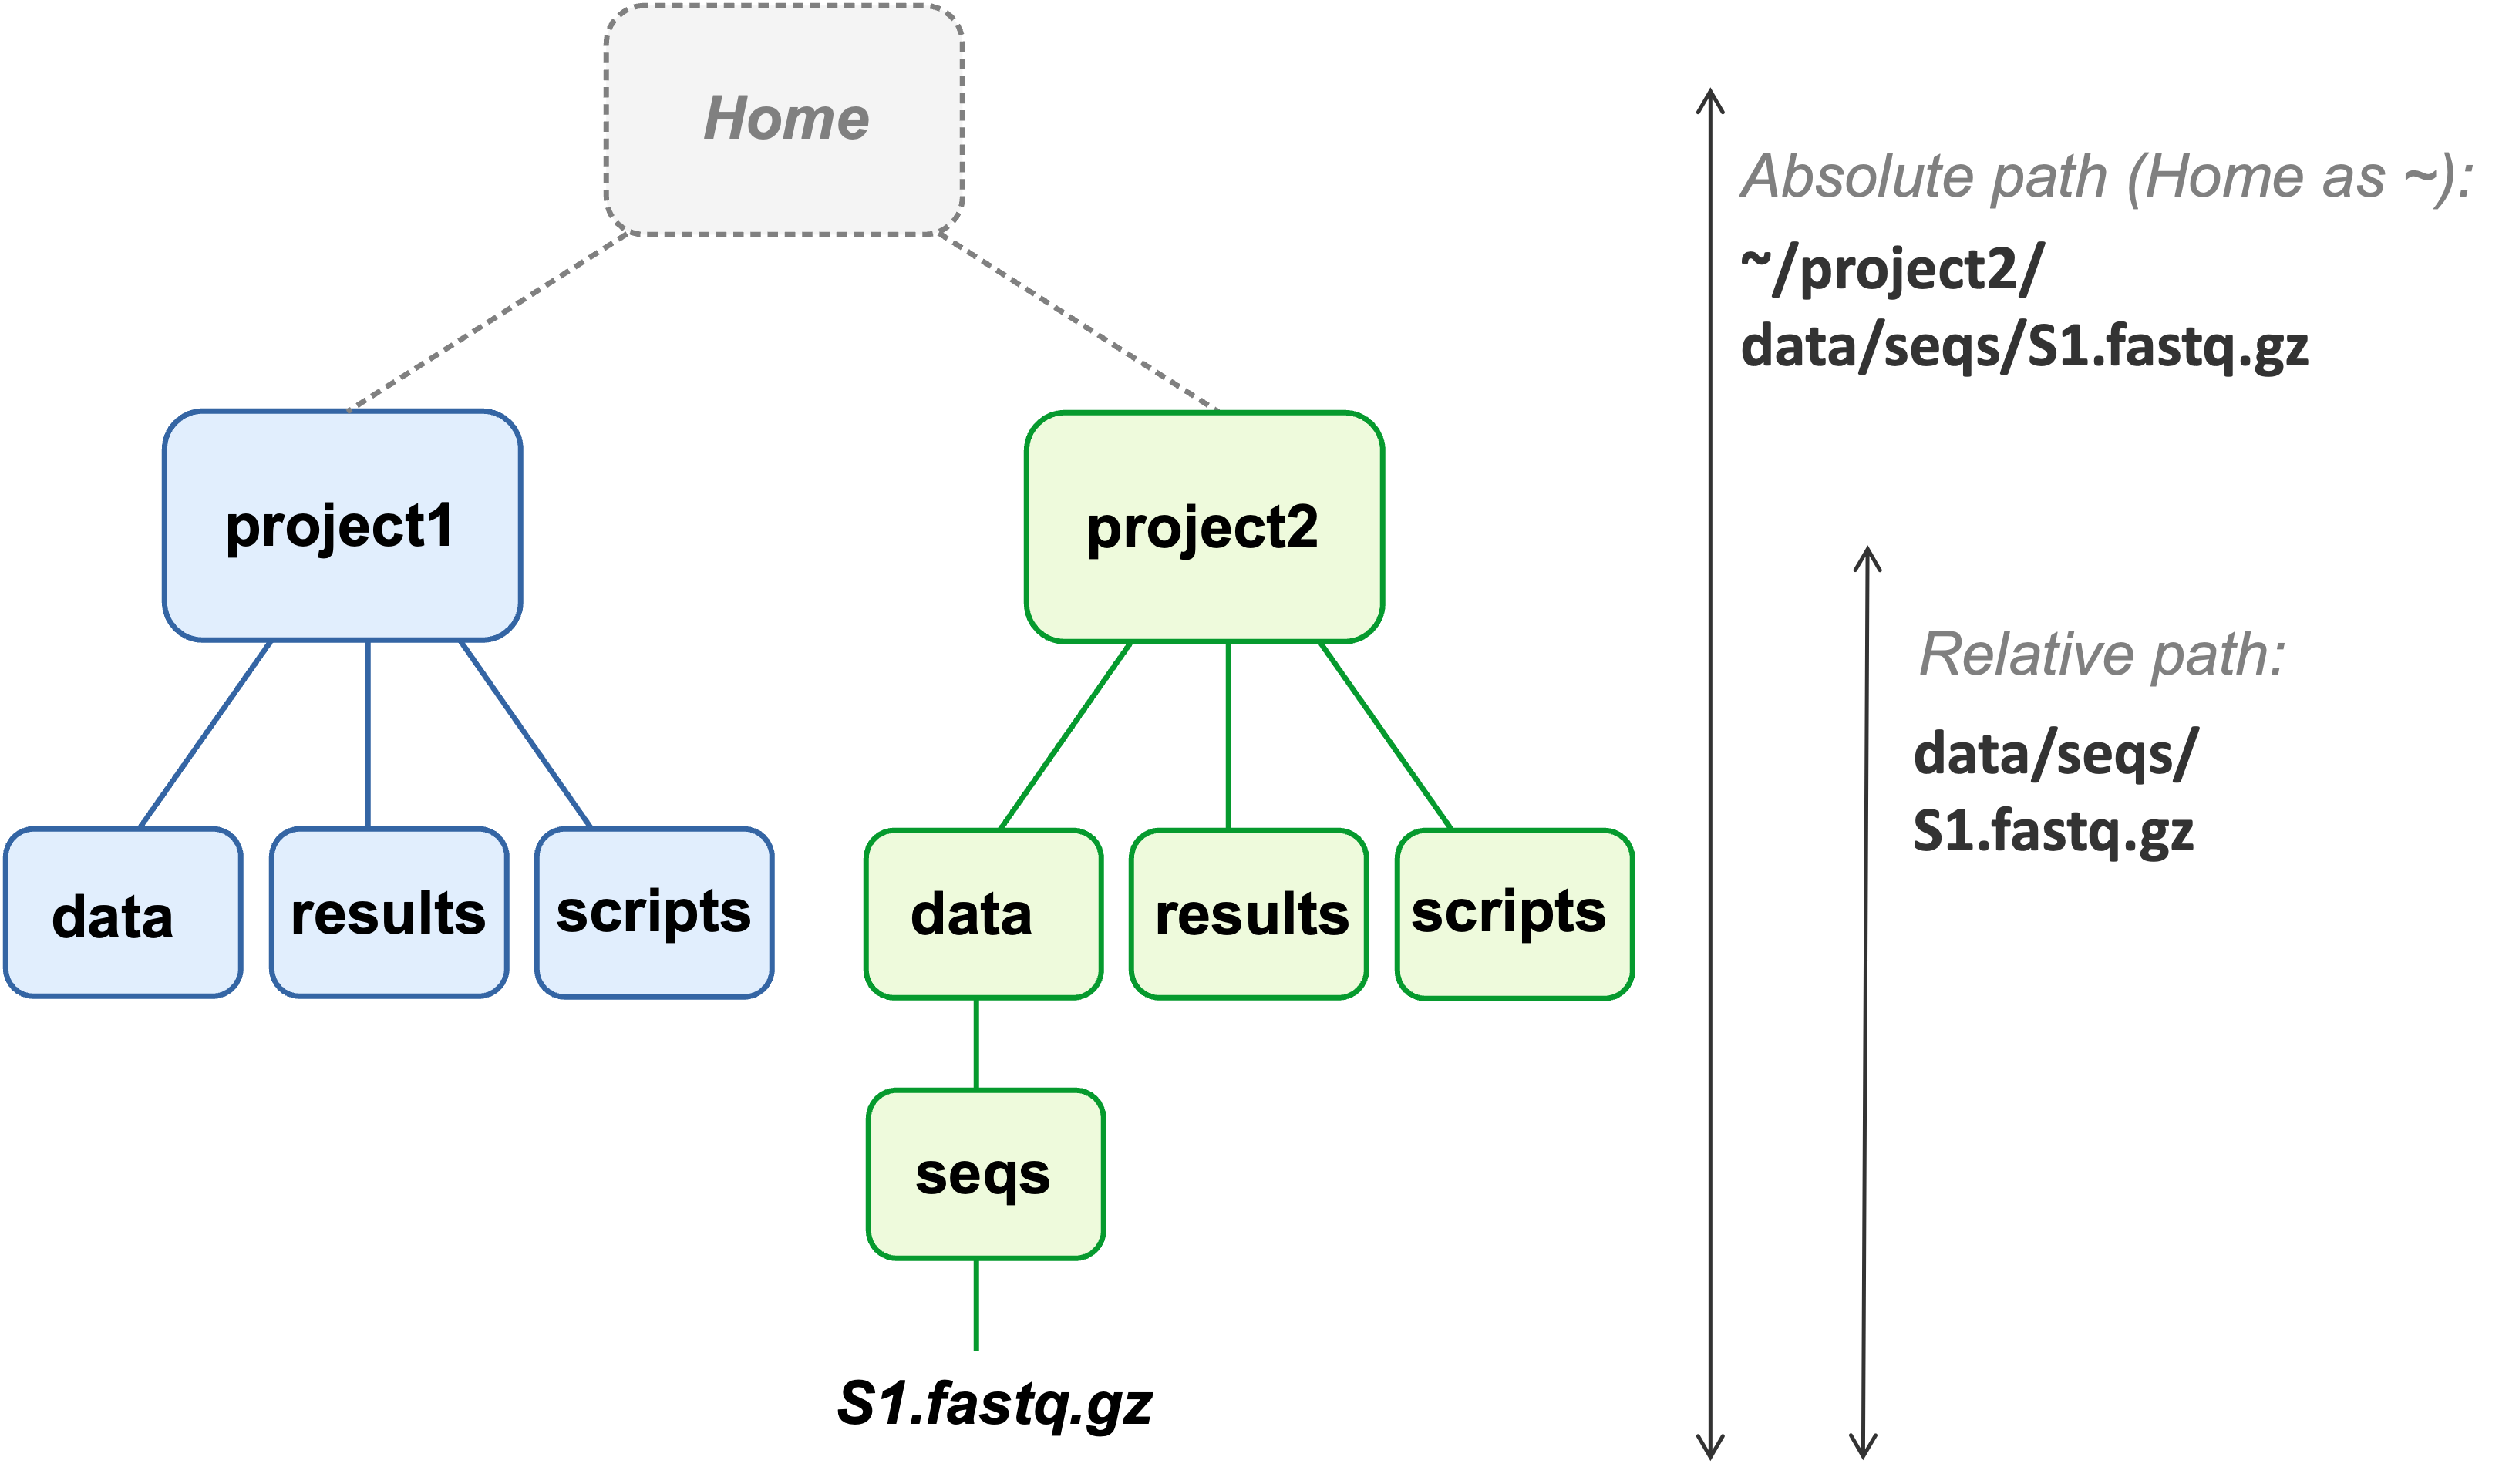
Following best practices, the relative path starts from the relevant project’s top-level dir.
(Note that
~ is a way to refer to your Home folder.)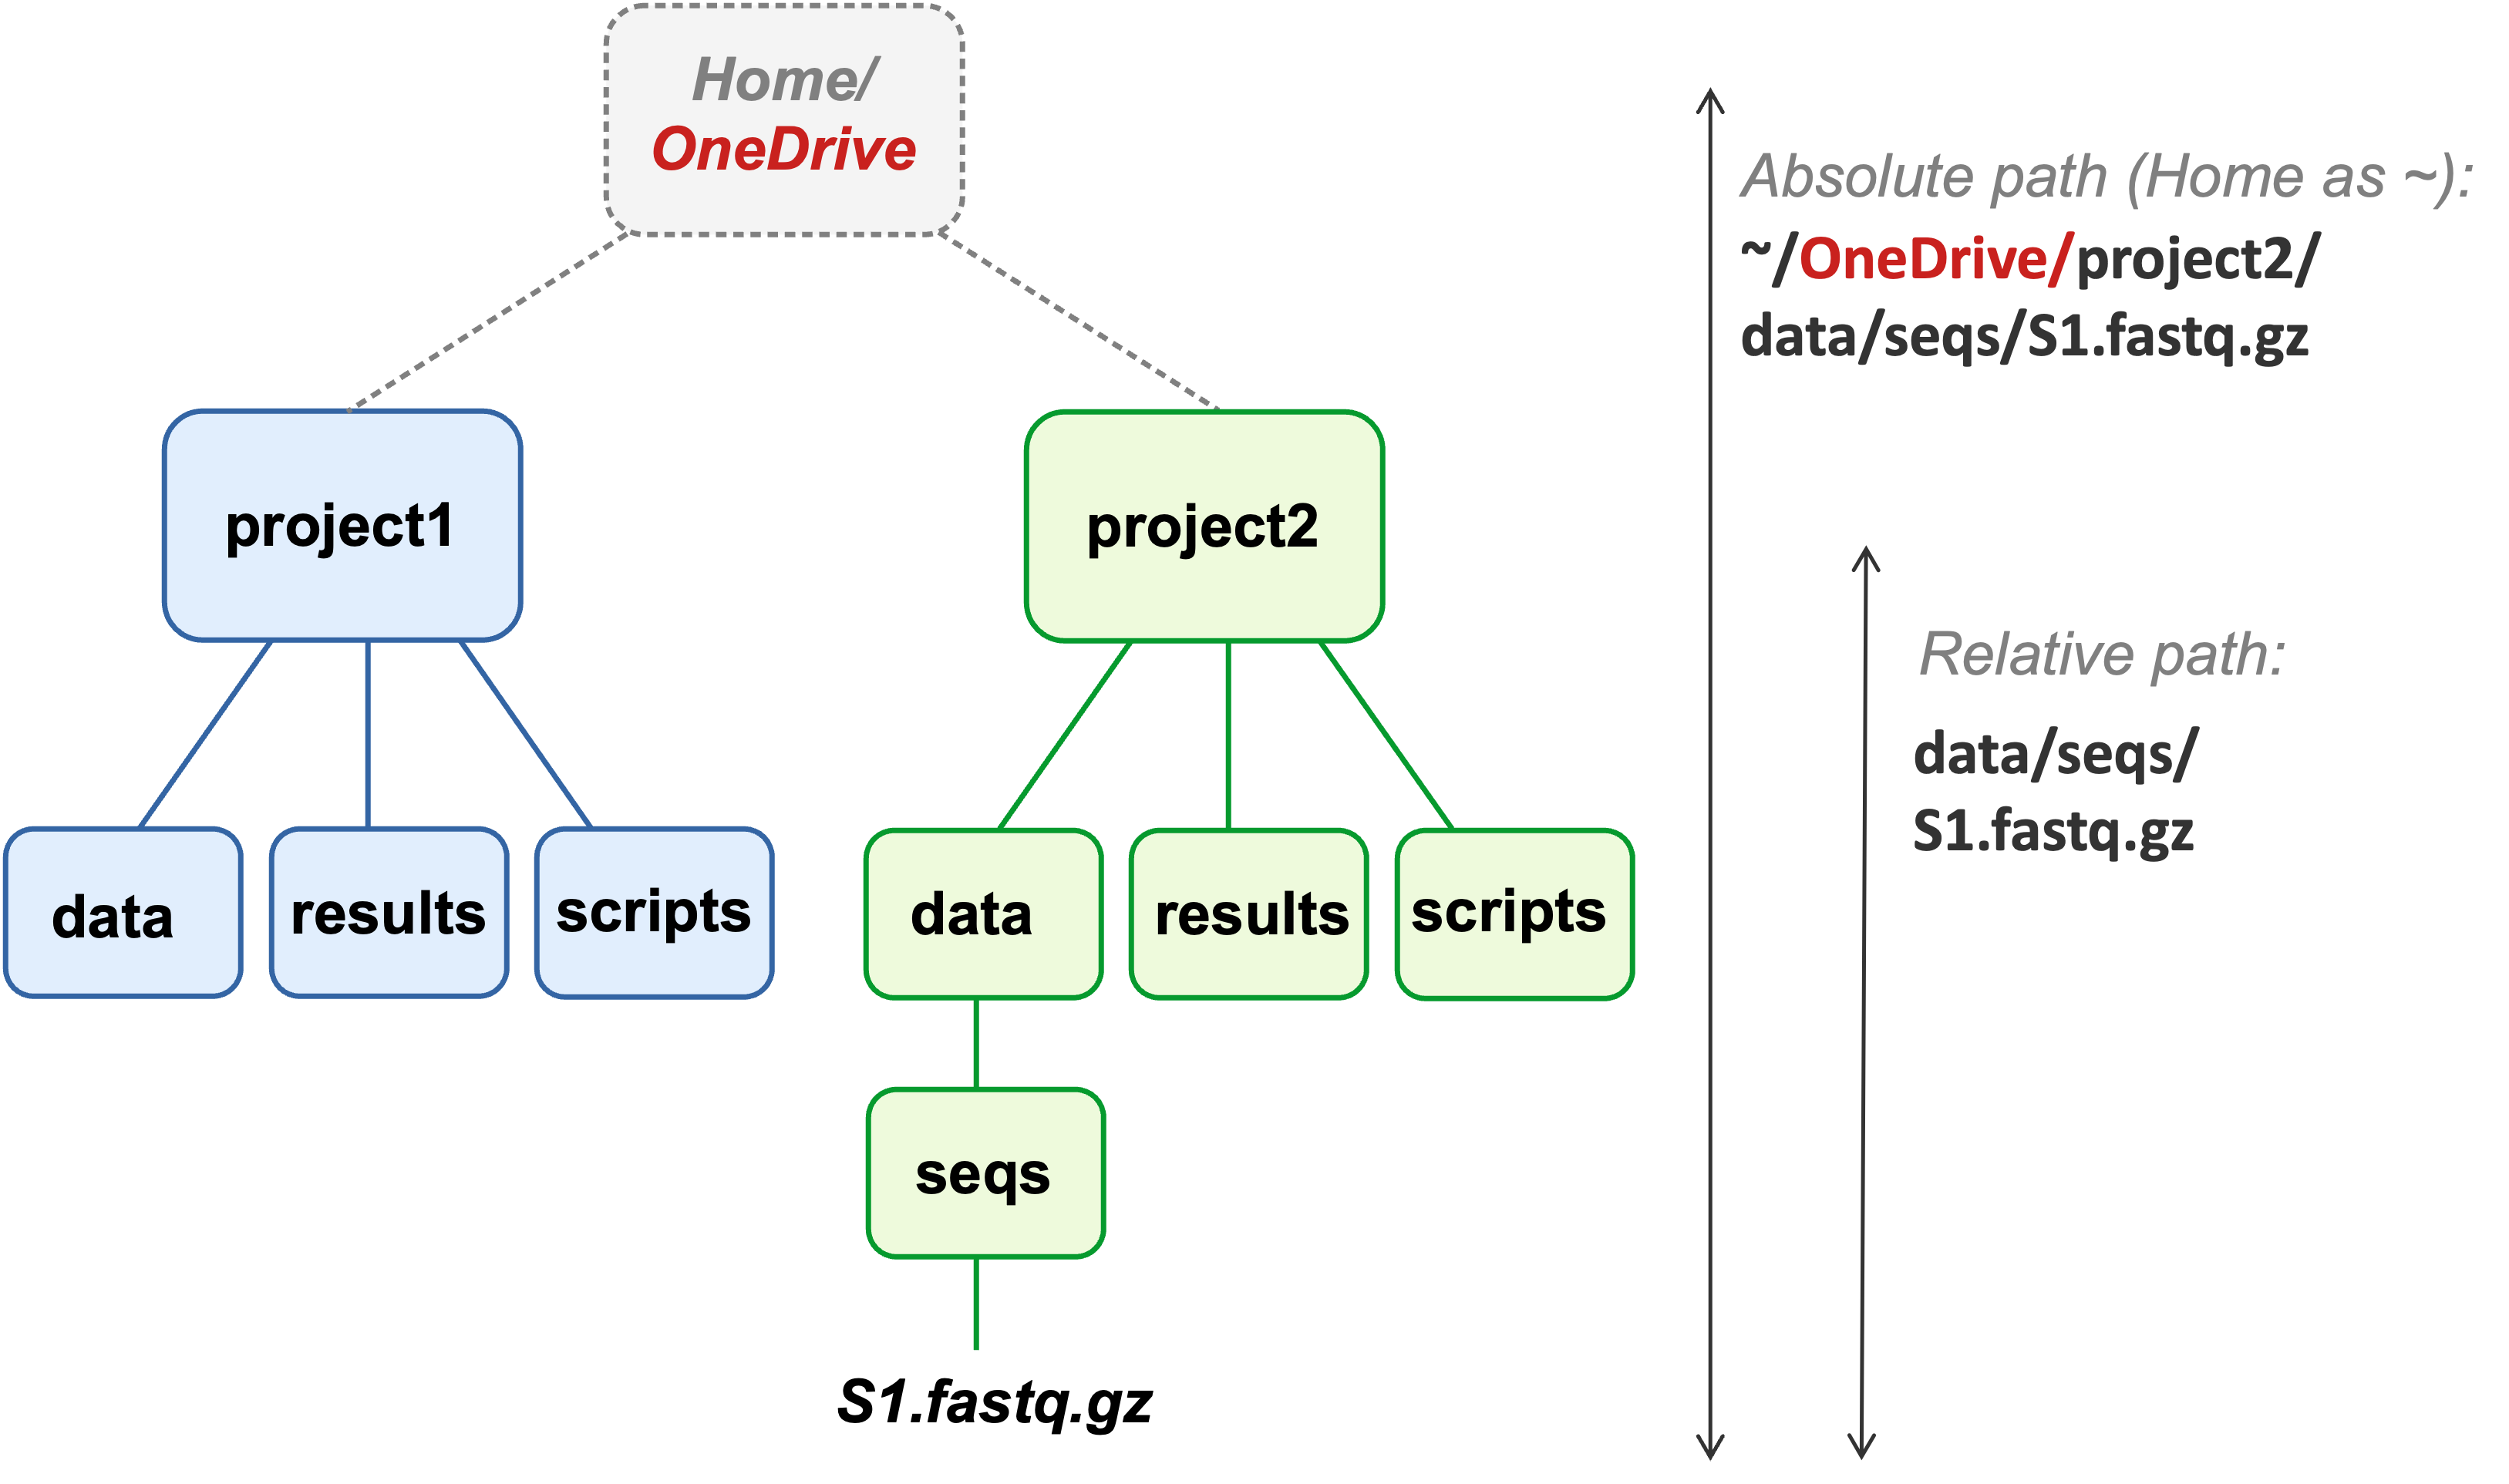
OneDrive.The absolute path to the FASTQ file has changed,
but the relative path from the project’s top-level dir remains the same.
3 Documenting your research project
It is essential to document what you are doing while working on your research project. This is not always easy! It can be much more appealing to just keep chugging along. In the moment, it may seem like a waste of time to make notes on what then and there is obvious: you will likely have a clear picture of what you did, say, this morning.
However, you won’t have such a clear picture a month later, and a collaborator won’t either. Therefore, you should often make a conscious effort at taking a step back, slowing down, and writing down what you did and why.
An important advantage of using code to do your analyses, like you will learn in this course, is that code is self-documenting to a much larger extent than pointing and clicking in a program with a Graphical User Interface (GUI). However, this should not make you complacent and skip documenting what you did.
How should you do this in practice?
3.1 Always maintain README and other documentation files
Your documentation files should contain all information needed to reproduce your research. Some specific examples:
- Where/when/how each data and metadata file originated
- Versions of software, databases, reference genomes
In computational work, it is common practice to store project documentation in files that are called (or include the word) “README”, e.g. README.md. Additionally, it often makes sense to use a few kinds of other documentation files as well, like in the example we saw earlier:
Below, we’ll discuss the three types of documentation files shown in the image above. While you should always have a README file in the top-level folder of your project, you may end up wanting to organize other files differently, but take this as a starting point:
3.1.1 README file(s)
Assuming that you keep separate “lab notebook” and “protocol” files (see below), this README file does not need to be very long, but should for example contain:
- A brief overview of the project
- An explanation of your project’s folder structure. What can be found where? How are the files named?
- Details about the data, such as how and when it was obtained
- Contact information
You may choose to use multiple README files, including ones in key subfolders such as data, results, and scripts, each of which describe the files in that folder.
3.1.2 Electronic lab notebook (organized by date)
Keep an electronic lab notebook or “diary” with chronological entries that documents everything you did (doc/diary.md in the example above):
This file should include things like what code you ran and why, quick interpretations of results, and so on. It can also include notes on meetings and copies of important emails.
This should not be a “clean” document — for example, you should not remove entries on say failed experiments and analyses, or consideration/testing of methods that you did not include in your final analyses.
3.1.3 Final workflow/protocol file (organized in order of execution)
Write a separate file (doc/workflow.md in the example above) that contains the code and other details needed to rerun the final analyses you performed for your project:
- Entries should be organized by the most sensible final order of execution
- This should be a “clean” document, and omit any steps you don’t consider part of your final results.
3.2 Use plain text files
In this course, we’ll be working almost exclusively with so-called “plain-text” files (files with .txt and related extensions). These are files that can be opened by any text editor on any computer.
Plain-text files are different from so-called “binary” and proprietary formats like Microsoft Excel (e.g. .xlsx) or Word (e.g. .docx), which can often be opened and edited only in their respective programs. That can pose many problems: for example, these programs are not always available, and version mismatches may make files impossible to open.
Many common sequence file formats are also plain-text. And while their simplicity may seem limiting, plain-text files are generally preferable for reproducible science because they:
- Can be accessed on any computer, including over remote connections
- Can be operated on by Unix shell commands and any other programming language
- Are future-proof
- Can be version-controlled appropriately
For these reasons, I recommend to also use a plain-text format to document your research, and you will practice with that during the course. Specifically, you’ll use so-called Markdown files (.md), which strike a nice balance between ease of writing and reading on the one hand, and formatting options on the other hand. In the next lecture, you will learn the basics of the Markdown “syntax”.
Discussion: Do you have a note-keeping/documentation system?
- What kinds of files do you use?
- How do you organize these files?
- Do you use any specialized electronic lab notebook systems?
4 In closing
Some of these project organization and documentation recommendations may seem a bit abstract this early in the course. Therefore, I recommend that you revisit this page later on in the course.
You may also wonder how file organization works when your work is done on multiple computers, like your own laptop in addition to OSC. This is a question we’ll get back to in weeks 4 and 5.
References
Footnotes
Windows computers often contain multiple dir structures instead, but each of these similarly have roots / starting points, such as
C:\.↩︎But Windows uses backslashes (
\).↩︎This leading
/can be implicit though: For example,~is a shortcut that expands to an absolute path to your Home directory.↩︎