Part 1: Git setup
These instructions are for setting up Git at OSC, but from Step 3 onwards, you can also follow them to set up Git for your local computer.
Open up a terminal at OSC.
You can do this after logging in at https://ondemand.osc.edu in one of two ways:- Direct shell access:
Clusters(top blue bar) >Pitzer Shell Access. - In VS Code:
Interactive Apps>Code Server> then open a terminal using Ctrl+backtick > break out of the Singularity shell by typingbash.
- Direct shell access:
Load the OSC Git module.
(Note: Git is available in any OSC shell without loading any modules, but that is a rather old version – so we load a newer one.)module load git/2.18.0Use
git configto make your name known to Git.
Somewhat confusingly, mote that this should be your actual name, and not your GitHub username:git config --global user.name 'John Doe'Use
git configto make your email address known to Git.
Make sure that you use the same email address you used to sign up for GitHub.git config --global user.email 'doe.391@osu.edu'Use
git configto set a default text editor for Git.
Occasionally, when you need to provide Git with a “commit message” to Git and you haven’t entered one on the command line, Git will open up a text editor for you. Even though we’ll be mostly be working in VS Code during this course, in this case, it is better to select a text editor that can be run within the terminal, likenano(orvim, if you are familiar with it). To specify Nano as your default text editor for Git:git config --global core.editor "nano -w" # You could set VS Code as your editor on your local computer, # if you use it there: # git config --global core.editor "code --wait"Check whether you successfully changed the settings:
git config --global --list

# user.name=John Doe
# user.email=doe.39@osu.edu
# colour.ui=true
# core.editor=nano -w
Set colors if needed.
Make sure you seecolour.ui=truein the list (like above), so Git output in the terminal will use colors. If you don’t see this line, set it using:git config --global color.ui true
Part 2: GitHub authentication
GitHub authentication: Background
To be able to link local Git repositories to their online counterparts on GitHub, we need to set up GitHub authentication.
Regular password access (over HTTP/HTTPS) is now “deprecated” by GitHub, and two better options are to set up SSH access with an SSH key, or HTTPS access with a Public Access Token.
We’ll use SSH, as it is easier – though still a bit of drag – and because learning this procedure will also be useful for when you’ll be setting up SSH access to the Ohio Supercomputer Center. (But note that GitHub now labels HTTPS access as the “preferred” method.)
For everything on GitHub, there are separate SSH and HTTPS URLs, and GitHub will always show you both types of URLs. When using SSH, we need to use URLs with the following format:
git@github.com:<USERNAME>/<REPOSITORY>.git(And when using HTTPS, you would use URLS like https://github.com/<USERNAME>/<REPOSITORY>.git)
Setting up GitHub SSH authentication
These instructions are for setting up authentication at OSC, but you can repeat the same steps to set up authentication for your local computer.
In a terminal at OSC, use the
ssh-keygencommand to generate a public-private SSH key pair like so:ssh-keygen -t rsaYou’ll be asked three questions, and for all three, you can accept the default by just pressing
Enter:# Enter file in which to save the key (<default path>): # Enter passphrase (empty for no passphrase): # Enter same passphrase again: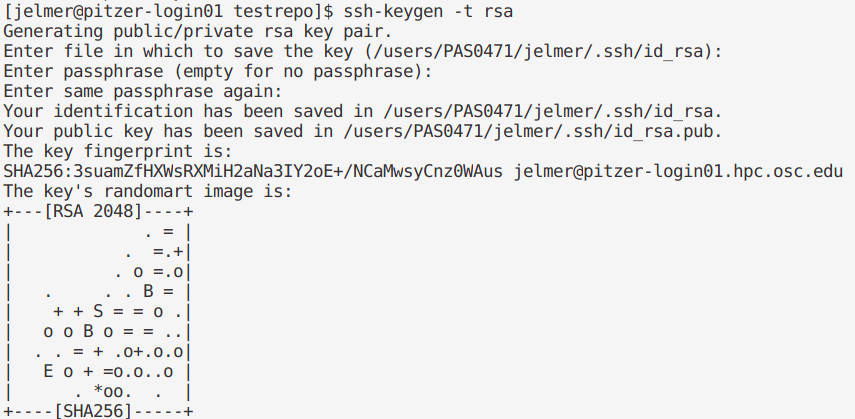
Now, you have a file called
id_rsa.pubin your~/.sshfolder, which is your public key. To enable authentication, we will put this public key on GitHub – our public key interacts with our private key, which we do not share.
Print the public key to screen usingcat:cat ~/.ssh/id_rsa.pubCopy the public key, i.e. the contents of the public key file, to your clipboard. Make sure you get all of it, including the “
ssh-rsa” part (but beware that your new prompt may start on the same line as the end the key):
In your browser, go to https://github.com and log in.
Go to your personal Settings. (Click on your avatar in the far top-right of the page, and select
Settingsin the drop-down menu.)Click on
SSH and GPG keysin the sidebar.Click the green
New SSH keybutton.Give the key an arbitrary, informative name, e.g. “OSC” to indicate that you are using this key at OSC.
Paste the public key, which you copied to your clipboard earlier, into the box.

- Click the green
Add SSH keybutton. Done!