Using Software at OSC
Loading existing modules and installing and using software with conda
So far, we have only used commands that are available in any Unix shell. But to actually analyze genomics data sets, we also need to use specialized bioinformatics software.
Most software that is already installed at OSC must nevertheless be “loaded” (“activated”) before we can use it — and if our software of choice is not installed, we have to do so ourselves. We will cover those topics in this module.
1 Setup
Log in to OSC at https://ondemand.osc.edu.
In the blue top bar, select
Interactive Appsand thenCode Server.In the form that appears:
- Enter
4or more in the boxNumber of hours - To avoid having to switch folders within VS Code, enter
/fs/ess/scratch/PAS2250/participants/<your-folder>in the boxWorking Directory(replace<your-folder>by the actual name of your folder). - Click
Launch.
- Enter
On the next page, once the top bar of the box is green and says
Runnning, clickConnect to VS Code.Open a terminal: =>
Terminal=>New Terminal.In the terminal, type
bashand press Enter.Type
pwdin the termain to check you are in/fs/ess/scratch/PAS2250.If not, click =>
File=>Open Folderand enter/fs/ess/scratch/PAS2250/<your-folder>.
2 Running command-line programs
As pointed out in the introduction to the workshop, bioinformatics software (programs) that we use to analyze genomic data are typically run from the command line. That is, they have “command-line interfaces” (CLIs) rather than “graphical user interfaces” (GUIs), and are run using commands that are structurally very similar to how we’ve been using basic Unix commands.
For instance, we can run the program FastQC as follows, instructing it to process the FASTQ file sampleA.fastq.gz with default options:
fastqc sampleA.fastq.gz # Don't runSo, with all the scaffolding we have learned in the previous modules, we only need to make small modifications to have our scripts run command-line programs. But, we first need to load and/or install these programs.
Like any other command, we could in principle run the line of code above either in our interactive shell or from inside a script. In practice, it is better to do this in a script, especially at OSC, because:
- Such programs typically take a while to run
- We are not supposed to run processes that use significant resources on login nodes
- We can run the same script simultaneously for different input files.
3 Software at OSC with Lmod
OSC administrators manage software with the Lmod system of software modules. For us users, this means that even though a lot of software is installed, most of it can only be used after we explicitly load it.
(That may seem like a drag, but on the upside, this practice enables the use of different versions of the same software, and of mutually incompatible software on a single system.)
3.1 Checking for available software
The OSC website has a list of software that has been installed at OSC. You can also search for available software in the shell using two subtly different commands:
module spiderlists modules that are installed.module availlists modules that can be directly loaded, given the current environment (i.e., depending on which other software has been loaded).
Simply running module spider or module avail would spit out complete lists — more usefully, we can add search terms as arguments to these commands:
module spider python| python: |
 Versions:
    python/2.7-conda5.2
    python/3.6-conda5.2
    python/3.7-2019.10
module avail pythonpython/2.7-conda5.2 python/3.6-conda5.2 (D) python/3.7-2019.10
(D) = default version
The (D) in the output above marks the default version of the program; that is, the version of the program that would be loaded if we don’t specify a version (see examples below).
3.2 Loading software
All other Lmod software functionality is also accessed using module “subcommands” (we call module the command and e.g. spider the subcommand). For instance, to load a module:
# Load a module:
module load python              # Load the default version
module load python/3.7-2019.10  # Load a specific version (copy from module spider output)
To check which modules have been loaded (the list includes automatically loaded modules):
module listCurrently Loaded Modules:
1) xalt/latest 2) gcc-compatibility/8.4.0 3) intel/19.0.5 4) mvapich2/2.3.3 5) modules/sp2020
Occasionally useful when running into conflicting (mutually incompatible) modules:
module unload python        # Unload a module
module purge                # Unload all modules
3.3 A practical example
Let’s load a very commonly used bioinformatics program that we will also use in examples later on: FastQC. FastQC performs quality control (hence: “QC”) on FASTQ files.
First, let’s test that we indeed cannot currently use fastqc by running fastqc with the --help flag:
fastqc --helpbash: fastqc: command not found
A solid majority of command-line programs can be run with with a --help (and/or -h) flag, and this is often a good thing to try first, since it will tell use whether we can use the program, and if we can, we immediately get some usage information.
Next, let’s check whether FastQC is available at OSC, and if so, in which versions:
module avail fastqcfastqc/0.11.8
There is only one version available (0.11.8), which means that module load fastqc and module load fastqc/0.11.8 would each load that same version.
When we use it inside a script:
This would ensure that when we run the same script a year later, the same version would be used (assuming it hasn’t been removed) — otherwise, it’s possible a newer version would has been installed in the meantime, which might produce different results.
It will make it easy to see which version we used, which is something we typically report in papers.
Let’s load the FastQC module:
module load fastqc/0.11.8After we have loaded the module, we can retry our --help attempt:
fastqc --help | head # I'm piping into head to avoid pages worth of output FastQC - A high throughput sequence QC analysis toolSYNOPSIS
    fastqc seqfile1 seqfile2 .. seqfileN

fastqc [-o output dir] [--(no)extract] [-f fastq|bam|sam]
       [-c contaminant file] seqfile1 .. seqfileN
4 When software isn’t installed at OSC
It’s not too uncommon that software you need for your project is not installed at OSC, or that you need a more recent version of the software than is available. The main options available to you in such a case are to:
“Manually” install the software, which in the best case involves downloading a directly functioning binary (executable), but more commonly requires you to “compile” (build) the program. This is sometimes straightforward but can also become extremely tricky, especially at OSC where you don’t have “administrator privileges”1 at OSC and will often have difficulties with “dependencies”2.
Send an email to OSC Help. They might be able to help you with your installation, or in case of commonly used software, might be willing to perform a system-wide installation (that is, making it available through
module).Use
Apptainer/Singularity“containers”. Containers are self-contained software environments that include operating systems, akin to mini virtual machines.Use
conda, which creates software environments that are activated like in themodulesystem.
Conda and containers are useful not only at OSC, where they bypass issues with dependencies and administrator privileges, but more generally, for reproducible and portable software environments. They also allow you to easily maintain distinct “environments”, each with a different version of the same software, or with mutually incompatible software.
We will teach conda here because it is easier to learn and use than containers, and because nearly all open-source bioinformatics software is available as a conda package.
- If you need to use software that requires a different Operating System (OS) or OS version than the one at OSC.
- If you want or require even greater reproducibility and portability to create an isolated environment that can be exported and used anywhere.
5 Using conda
Conda creates so-called environments in which you can install one or more software packages. As mentioned above, these environments are activated and deactivated in a similar manner as with the Lmod system – but the key difference is that we can create and manage these environments ourselves.
Below are two reasonable ways to organize your conda environments, and their advantages:
- Have one environment per program (my preference)
- Easier to keep an overview of what you have installed
- No need to reinstall the same program across different projects
- Less risk of running into problems with your environment due to mutually incompatible software and complicated dependency situations
- Have one environment per research project
- You just need to activate that one environment when you’re working on your project.
- Easier when you need to share your entire project with someone else (or yourself) on a different (super)computer.
Its not recommended to simply install all programs across all projects in one environment. This doesn’t benefit reproducibility and your environment is likely to sooner or later stop functioning properly.
A side note is that even when you want to install a single program, multiple programs are in fact nearly always installed: the programs that your target program depends on (“dependencies”).
5.1 Loading the (mini)conda module
While it is also fairly straightforward to install conda for yourself 3, we will use OSC’s system-wide installation of conda in this workshop. Therefore, we first need to use a module load command to make it available:
# (The most common installation of conda is actually called "miniconda")
module load miniconda3
5.2 One-time conda configuration
We will also do some one-time configuration, which will set the conda “channels” (basically, software repositories) that we want to use when we install software. This config also includes setting relative priorities among channels, since one software package may be available from multiple channels.
Like with module commands, conda commands consist of two parts, the conda command itself and a subcommand, such as config:
conda config --add channels defaults     # Added first => lowest priority
conda config --add channels bioconda
conda config --add channels conda-forge  # Added last => highest priority
Let’s check whether this configuration step worked:
conda config --get channels–add channels ‘defaults’ # lowest priority
–add channels ‘bioconda’
–add channels ‘conda-forge’ # highest priority
5.3 Example: Creating an environment for cutadapt
To practice using conda, we will now create a conda environment with the program cutadapt installed.
cutadapt is a commonly used program to remove adapters or primers from sequence reads in FASTQ files — in particular, it is ubiquitous for primer removal in (e.g. 16S rRNA) microbiome metabarcoding studies. But there is no Lmod module on OSC for it, so if we want to use it, our best option is to resort to conda.
Here is the command to create a new environment and install cutadapt into that environment:
conda create -y -n cutadapt -c bioconda cutadapt # Don't run thisLet’s break the above command down:
createis the conda subcommand to create a new environment.-yis a flag that prevents us from being asked to confirm installation.Following the
-noption, we can specify the name of the environment, so-n cutadaptmeans that we want our environment to be calledcutadapt. We can use whatever name we like for the environment, but of course a descriptive yet concise name is a good idea. Since we are making a single-program environment, it makes sense to simply name it after the program.Following the
-coption, we can specify a channel from which we want to install, so-c biocondaindicates we want to use thebiocondachannel. (Given that we’ve done some config above, this is not always necessary, but it can be good to be explicit.)The
cutadaptat the end of the line simply tells conda to install the package of that name. This is a “positional” argument to the command (note that there’s no option like-sbefore it): we put any software package(s) we want to install at the end of the command.
Specifying a version
If we want to be explicit about the version we want to install, we can add the version after = following the package name. We do that below, and we also include the version in the environment name.
Let’s run the command above and see if we can install cutadapt
conda create -y -n cutadapt-4.1 -c bioconda cutadapt=4.1Collecting package metadata (current_repodata.json): done
Solving environment:
Collecting package metadata (current_repodata.json): done
Solving environment: done


==> WARNING: A newer version of conda exists. <==
  current version: 4.10.3
  latest version: 4.13.0

Please update conda by running

    $ conda update -n base -c defaults conda


## Package Plan ##

  environment location: /fs/project/PAS0471/jelmer/conda/cutadapt-TMP

  added / updated specs:
    - cutadapt=4.1


The following packages will be downloaded:

    package                    |            build
    ---------------------------|-----------------
    cutadapt-4.1               |  py310h1425a21_1         211 KB  bioconda
    dnaio-0.9.1                |  py310h1425a21_1          80 KB  bioconda
    libsqlite-3.39.2           |       h753d276_1         789 KB  conda-forge
    openssl-3.0.5              |       h166bdaf_1         2.8 MB  conda-forge
    pip-22.2.2                 |     pyhd8ed1ab_0         1.5 MB  conda-forge
    python-isal-1.0.1          |  py310h5764c6d_0          47 KB  conda-forge
    setuptools-65.0.2          |  py310hff52083_0         1.4 MB  conda-forge
    sqlite-3.39.2              |       h4ff8645_1         788 KB  conda-forge
    tzdata-2022c               |       h191b570_0         119 KB  conda-forge
    xopen-1.6.0                |  py310hff52083_0          27 KB  conda-forge
    xz-5.2.6                   |       h166bdaf_0         409 KB  conda-forge
    ------------------------------------------------------------
                                           Total:         8.1 MB

The following NEW packages will be INSTALLED:

  _libgcc_mutex      conda-forge/linux-64::_libgcc_mutex-0.1-conda_forge
  _openmp_mutex      conda-forge/linux-64::_openmp_mutex-4.5-2_gnu
  bzip2              conda-forge/linux-64::bzip2-1.0.8-h7f98852_4
  ca-certificates    conda-forge/linux-64::ca-certificates-2022.6.15-ha878542_0
  cutadapt           bioconda/linux-64::cutadapt-4.1-py310h1425a21_1
  dnaio              bioconda/linux-64::dnaio-0.9.1-py310h1425a21_1
  isa-l              conda-forge/linux-64::isa-l-2.30.0-ha770c72_4
  ld_impl_linux-64   conda-forge/linux-64::ld_impl_linux-64-2.36.1-hea4e1c9_2
  libffi             conda-forge/linux-64::libffi-3.4.2-h7f98852_5
  libgcc-ng          conda-forge/linux-64::libgcc-ng-12.1.0-h8d9b700_16
  libgomp            conda-forge/linux-64::libgomp-12.1.0-h8d9b700_16
  libnsl             conda-forge/linux-64::libnsl-2.0.0-h7f98852_0
  libsqlite          conda-forge/linux-64::libsqlite-3.39.2-h753d276_1
  libuuid            conda-forge/linux-64::libuuid-2.32.1-h7f98852_1000
  libzlib            conda-forge/linux-64::libzlib-1.2.12-h166bdaf_2
  ncurses            conda-forge/linux-64::ncurses-6.3-h27087fc_1
  openssl            conda-forge/linux-64::openssl-3.0.5-h166bdaf_1
  pbzip2             conda-forge/linux-64::pbzip2-1.1.13-0
  pigz               conda-forge/linux-64::pigz-2.6-h27826a3_0
  pip                conda-forge/noarch::pip-22.2.2-pyhd8ed1ab_0
  python             conda-forge/linux-64::python-3.10.5-ha86cf86_0_cpython
  python-isal        conda-forge/linux-64::python-isal-1.0.1-py310h5764c6d_0
  python_abi         conda-forge/linux-64::python_abi-3.10-2_cp310
  readline           conda-forge/linux-64::readline-8.1.2-h0f457ee_0
  setuptools         conda-forge/linux-64::setuptools-65.0.2-py310hff52083_0
  sqlite             conda-forge/linux-64::sqlite-3.39.2-h4ff8645_1
  tk                 conda-forge/linux-64::tk-8.6.12-h27826a3_0
  tzdata             conda-forge/noarch::tzdata-2022c-h191b570_0
  wheel              conda-forge/noarch::wheel-0.37.1-pyhd8ed1ab_0
  xopen              conda-forge/linux-64::xopen-1.6.0-py310hff52083_0
  xz                 conda-forge/linux-64::xz-5.2.6-h166bdaf_0
  zlib               conda-forge/linux-64::zlib-1.2.12-h166bdaf_2


Downloading and Extracting Packages
sqlite-3.39.2        | 788 KB    | ################################################################################################################################################################### | 100%
xz-5.2.6             | 409 KB    | ################################################################################################################################################################### | 100%
cutadapt-4.1         | 211 KB    | ################################################################################################################################################################### | 100%
xopen-1.6.0          | 27 KB     | ################################################################################################################################################################### | 100%
libsqlite-3.39.2     | 789 KB    | ################################################################################################################################################################### | 100%
dnaio-0.9.1          | 80 KB     | ################################################################################################################################################################### | 100%
python-isal-1.0.1    | 47 KB     | ################################################################################################################################################################### | 100%
setuptools-65.0.2    | 1.4 MB    | ################################################################################################################################################################### | 100%
pip-22.2.2           | 1.5 MB    | ################################################################################################################################################################### | 100%
tzdata-2022c         | 119 KB    | ################################################################################################################################################################### | 100%
openssl-3.0.5        | 2.8 MB    | ################################################################################################################################################################### | 100%
Preparing transaction: done
Verifying transaction: done
Executing transaction: done
#
# To activate this environment, use
#
#     $ conda activate cutadapt-4.1
#
# To deactivate an active environment, use
#
#     $ conda deactivate
5.4 Activating conda environments
Whereas we use the term “load” for Lmod modules, we use “activate” for conda environments — it means the same thing. Oddly enough, the most foolproof way to activate a conda environment is to use source activate rather than the expected conda activate — for instance:
source activate cutadapt-4.1(cutadapt-4.1) [jelmer@pitzer-login03 PAS2250]$
When we have an active conda environment, its name is conveniently displayed in our prompt, as depicted above.
After we have activated the cutadapt environment, we should be able to actually use the program. To test this, we’ll again simply run it with a --help option:
cutadapt --help | head # I'm piping into head to avoid pages worth of output cutadapt version 4.1
Copyright (C) 2010-2022 Marcel Martin marcel.martin@scilifelab.se
cutadapt removes adapter sequences from high-throughput sequencing reads.
Usage:
cutadapt -a ADAPTER [options] [-o output.fastq] input.fastq
For paired-end reads:
5.5 Creating an environment for any program
Minor variations on the conda create command above can be used to install almost any program for which is conda package is available. However, you may be wondering how we would know:
- Whether the program is available and what its conda package’s name is
- Which conda channel we should use
- Which versions are available
My strategy to finding these things out is to simply Google the program name together with “conda”, e.g. cutadapt conda.
Let’s see that in action:
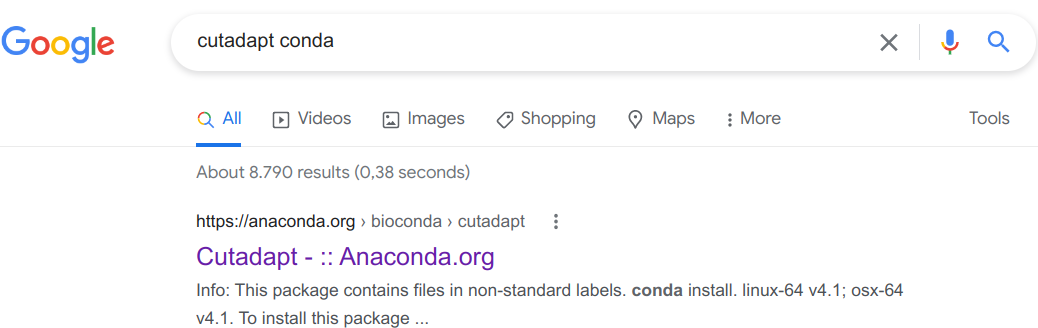
We click on that first link (it should always be the first Google hit):
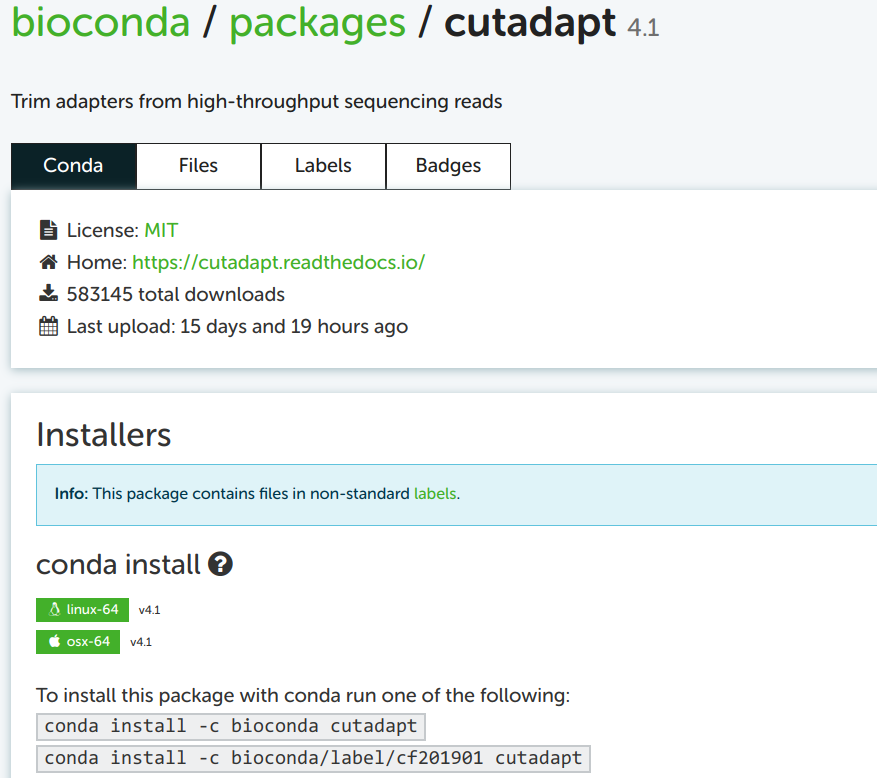
I always take the top of the two example installation commands as a template, here: conda install -c bioconda cutadapt
You may notice the install subcommand, which we haven’t yet seen. This would install Cutadapt into the currently activated conda environment. Since our strategy here –and my general strategy– is to create a new environment each time you’re installing a program, the all-in-one command is to replace install by create -y -n <env-name>.
Then, our full command (without version specification) again becomes:
conda create -y -n cutadapt -c bioconda cutadaptTo see which version will be installed by default, and to see which older versions are available:
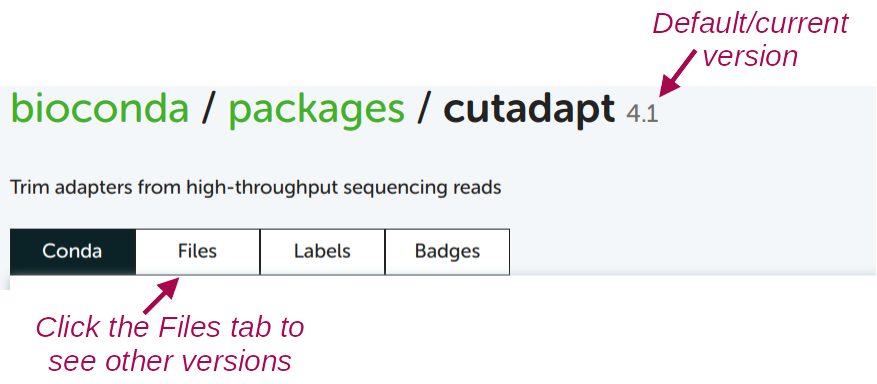
For almost any other program, this works exactly the same!
5.6 Lines to add to your Bash script
While you’ll typically want to do installation interactively and only need to do to it once (see note below), you should always include the necessary code to load/activate your programs in your shell scripts.
When your program is in an Lmod module, this simply entails a module load call — e.g., for fastqc:
#!/bin/bash
set -ueo pipefail

# Load software
module load fastqc
When your program is available in a conda environment, this entails a module load command to load conda itself, followed by a source activate command to load the relevant conda environment:
#!/bin/bash

# Load software
module load miniconda3
source activate cutadapt-4.1

# Strict/safe Bash settings
set -ueo pipefailWe’ve moved the set -ueo pipefail line below the source activate command, because the conda activation procedure can sometims throw “unbound variable” errors otherwise.
Provided you don’t need to switch versions, you only need to install a program once. This is true also at OSC and also when using conda: your environments won’t disappear unless you delete them.
In every single “session” that you want to use a program via an
Lmodmodule or a conda environment, you need to load/activate the program. So the line(s) to do so should always be in your script for that program.
6 Addendum: a few other useful conda commands
Deactivate the currently active conda environment:
conda deactivateActivate one environment and then “stack” an additional environment (a regular
conda activatecommand would switch environments):source activate cutadapt # Now, the env "cutadapt" is active conda activate --stack multiqc # Now, both "cutadapt" and "multiqc" are activeRemove an environment entirely:
conda env remove -n cutadaptList all your conda environments:
conda env listList all packages (programs) installed in an environment:
conda list -n cutadapt
Footnotes
When your personal computer asks you to “authenticate” while you are installing something, you are authenticating yourself as a user with administrator privileges. At OSC (and for OSU-managed personal computers, too!), you don’t have such privileges.↩︎
Other software upon which the software that you are trying to install depends.↩︎
And this is certainly worth considering if you find yourself using conda a lot, because the conda version at OSC is quite out-of-date.↩︎